background image


About this User Manual 

 
This manual aims at assisting the user on how to operate the monitors described in this 
manual.  
 
This manual is subject to rigid quality control. However, no guarantee can be given that 
mistakes are not present. We reserve the right to make changes to the manual without 
prior notice.  
 
Before operating the appliance, please read this manual carefully and retain it for further 
reference. Verify that all appliance items are included in the delivery. Should items be 
missing, do not operate the appliance and contact your local dealer.  
 
Never attempt to repair the appliance yourself. This should only be done by qualified 
service personnel.  
 
Improper handling of the appliance will invalidate the warranty.  


Items included in package 

1x LCD Monitor 
1x Power supply unit 12V DC 
1x Power cord 
1x VGA cable 
1x Audio cable 
1x IR remote control 
1x User manual 


Содержание AVL240SDI

Страница 1: ...AVL240SDI 24 TFT LCD MONITOR USER MANUAL ...

Страница 2: ...ackage 5 1 IR Remote control 6 2 LCD Monitor Mounting Guide 9 3 Monitor controls 10 4 Connections 11 5 Monitor Settings via OSD Menu 11 5 1Picture 12 5 2Sound 12 5 3OSD Setup 13 5 4Advance 13 5 5PIP 14 5 6PC 14 5 7Geometry 15 5 8PC Timing 15 6 Special features 15 7 Technical specifications 16 8 Appendices 17 ...

Страница 3: ...alert the user to the presence of important operating and maintenance servicing instructions in the literature accompanying the appliance Precautions Safety Should any liquid or solid object fall into the cabinet unplug the unit and have it check by qualified personnel before operating it any further Unplug the unit from the wall outlet if it is not going to be used for several days or more To dis...

Страница 4: ...ed in accordance with the instructions may cause harmful interference to radio communications However there is no guarantee that interference will not occur in a particular installation If this equipment does cause harmful interference to radio or television reception which can be determined by turning the equipment off and on the user is encouraged to try to correct the interference by one or mor...

Страница 5: ...ance please read this manual carefully and retain it for further reference Verify that all appliance items are included in the delivery Should items be missing do not operate the appliance and contact your local dealer Never attempt to repair the appliance yourself This should only be done by qualified service personnel Improper handling of the appliance will invalidate the warranty Items included...

Страница 6: ...nd Red Green Blue 7 Source To switch the video inputs or sub picture source in pip mode please use the IR remote control included in the delivery This button is also used as Enter and Select function in the OSD menu and to confirm your selected settings in the OSD menu 8 OK Menu Press this button to call up the OSD menu This button is also used as Exit Note The menu button is also used to return t...

Страница 7: ...e of the four screen corners or centered 15 ID Can be control several monitors are installed in the same area In ID mode press ID key then input setting number 01 99 to unlock ID function 16 0 9 For ID setting number used 17 USB Right Left Catalog 17 1 Press USB Key into the JPEG Menu 17 2 Press MENU Key into the USB Main menu 17 3 Press Left or Right key to select the JPEG MP3 DRIVE function 17 4...

Страница 8: ... Up Down Key to select the play file and press Right key to play Press Menu to stop play Then press Catalog return the menu Press Menu into the USB Main menu 17 7 Press PC HD AV1 AV2 or SV to exit the USB function ...

Страница 9: ...de A Desktop Adjust the viewing angle of LCD to fit most comfortable monitoring status B Wall mount Free your space with wall mount design Please follow the fix hole size in back panel to install the LCD to the wall C VESA Bracket ...

Страница 10: ... sharpness and Red Green Blue 5 Menu Function Press this button to call up the OSD menu This button is also used as Exit 6 Source To switch the video inputs or sub picture source in pip mode This button is also used as Enter and Select function in the OSD menu and to confirm your selected settings in the OSD menu KEY Lock Function Into key lock mode Push Menu and Item after the LED flashes OSD of ...

Страница 11: ...ngs can be made using the OSD menu On Screen Display Press the Menu OK button to call up the OSD main menu Here you can make adjustments to the following items Picture Sound OSD Setup Advance PIP PC at PC input signal Geometry at PC input signal Use the buttons to toggle between the different items Press the Source button to select the appropriate item ...

Страница 12: ...erature Normal Warm Cool User DNR Noise Reduction Use the source buttons to select the level of noise reduction Off Low Medium High DLC Use the source buttons to change the Black Level Extension on off 5 2 Sound Use the buttons to select adjusts item and press source button to confirm Then use the buttons to increase decrease the values or use source button to change the values Press the menu butt...

Страница 13: ...disable the freeze picture and to re establish the normal picture OSD Time Use the buttons to setting the OSD menu display time OSD Halftone Use the buttons to setting the OSD menu display time Recall Press the source button to restore the factory settings Obiter Anti blur Use the source buttons to on off the screen saver Screen protector Anti blur Version Firmware Version 5 4 Advance Use the butt...

Страница 14: ...on to select the sub picture background color Black Blue Sound Source Use source button to select the sound source Main Sub Swap Use source button to swap the main picture and the sub picture Note This function is only active if you have previously defined a sub picture 5 6 PC Use the buttons to select adjusts item and press source button to confirm Then use the buttons to increase decrease the va...

Страница 15: ...t image distortion appearing as horizontal or noise on the screen 5 8 PC Timing Mode Resolution 1 800 x 600 60 2 800 x 600 72 3 800 x 600 75 4 1024 x 768 60 5 1280 x 1024 60 6 1360 x 768 60 7 1440 x 900 60 8 1920 x 1080 60 6 Special Features Special Video Processor 3G SDI IN OUT PIP Control Function Only PC Video Video Video option Screen protector Anti blur Image auto move NTSC PAL Auto Switch 3D...

Страница 16: ...o input 1x DVI D input Speaker 1x built in speaker 2 watt SDI standards 3G SDI SMPTE 424M HD SDI SMPTM 292M SD SDI SMPTE 259M SDI Video support 3G 1080P50 60 4 2 2 HD 720P 50 60Hz 1080i 50 60Hz 1080p25 30Hz SD NTSC 60Hz PAL 50Hz SDI Video bandwidth 2 97Gpbs 2 975 1 001Gpbs SDI Cable Transmission 3G SDI 100Meter HD SDI 200Meter SD SDI 300Meter _ 5C2V orRG6Cable 3D Comb Filter Yes 3D De Interlace fu...

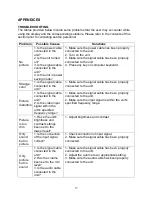
Страница 17: ...onnected to the unit Picture distortion 1 Is the signal cable connected to the unit 2 Is the video input signal within the unit s specified frequency range 1 Make sure the signal cable has been properly connected to the unit 2 Make sure the input signal is within the unit s specified frequency range Picture is too dim 1 Have the unit s brightness and contrast settings been set to the lowest level ...

Страница 18: ...18 Please contact the customer service center of your local dealer if you have any questions regarding the unit after reading the information provided above THANK YOU FOR CHOOSING AVUE PRODUCTS ...

Отзывы: