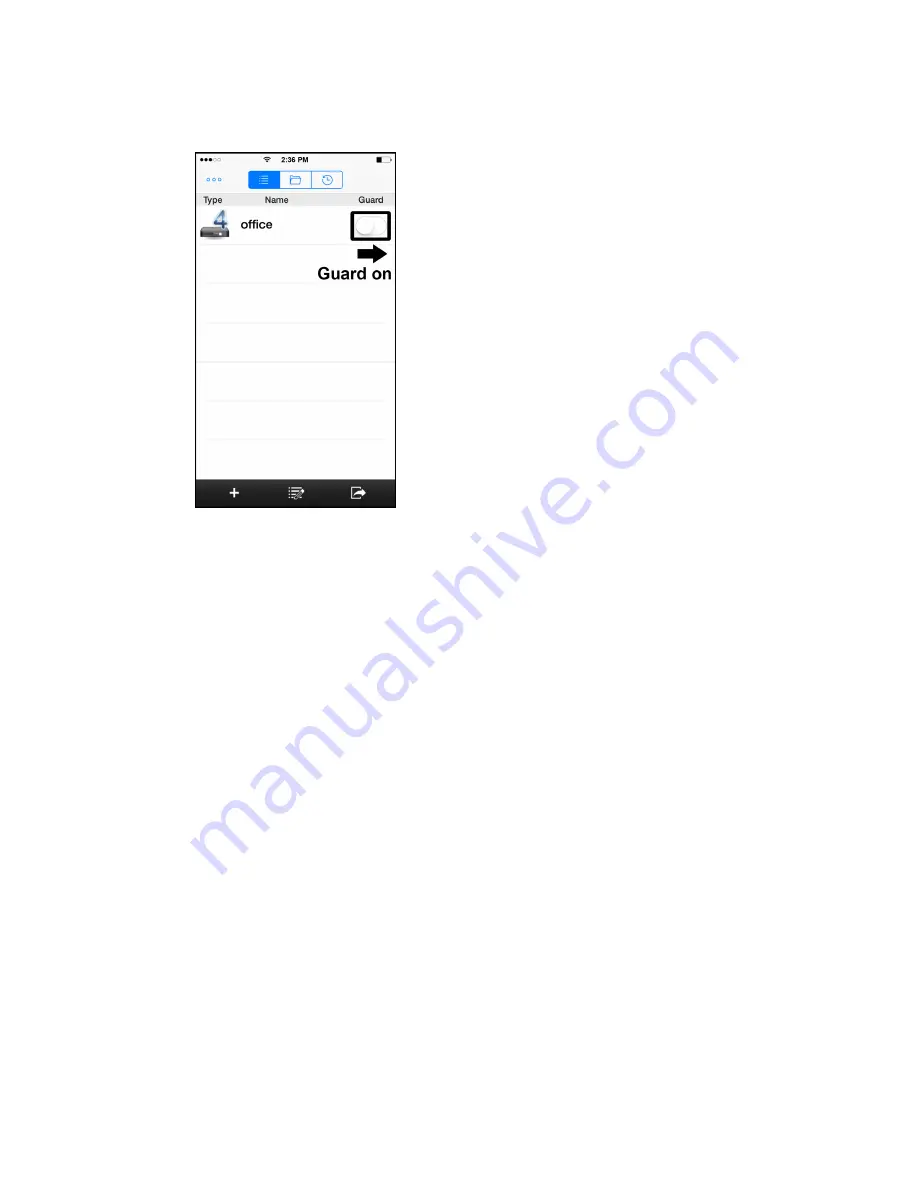
Step4: Return to the address book of EagleEyes, and enable “Guard”. The camera will fix at the point
after the time specified in Step2 unless the “Guard” status is disabled.
Страница 1: ...to constitute a risk of electric shock to persons This exclamation point within an equilateral triangle is intended to alert the user to the presence of important operating and maintenance servicing instructions in the literature accompanying the appliance ROHS Announcement All lead free products offered by the company comply with the requirements of the European law on the Restriction of Hazardou...
Страница 2: ...nce PACKAGE CONTENT IR camera User manual Accessory pack DIMENSIONS Dimensional Tolerance 5mm SPECIFICATIONS Pick up Element 1 2 8 SONY CMOS image sensor Number of Pixels 1936 H 1096 V Video Frame Rate 1080P 30fps 1080P 25fps Min Illumination 0 1 Lux F1 8 0 Lux IR LED ON S N Ratio More than 48dB AGC OFF Shutter Speed 1 10 000 1 7 5 Slow shutter Lens f3 6mm F1 8 Lens Angle 87 Horizontal 46 Vertical...
Страница 3: ..._installation_sticker pdf For cabling behind the ceiling or wall mark the location for one more hole for the camera cable to go through For cabling along the ceiling or wall do as indicated below for the cable to go through Step 4 Fix the camera to the ceiling or wall with the supplied screws Step 5 Connect your camera to power Step 6 Tilt and rotate the lens itself to adjust the position and view...
Страница 4: ...ncrease the exposure time to get clearer image for example at night The options are AUTO 1 15 and 1 6 MIRROR Select ON to rotate the images horizontally based on your installation situation when necessary FLIP Select ON to rotate the image 180 when necessary DENOISE Click and drag the slider to adjust the level from 0 10 to decrease the noise shown in the dark environment EXPOSURE VALUE Drag the s...
Страница 5: ... of the PTZ camera Preset point Click to enter the PTZ preset point you want to see To pan the camera Click to move the camera manually To set a sequence group Step1 Click to display the preset point panel and click to go to the setting panel Step2 Click to move to the point you want to configure as a preset point and click the numbering you want to appoint for this point Then wait till you see co...
Страница 6: ...NSPEED No2 01 No2 60 0 0 255 No3 02 No4 60 0 0 255 No4 03 No5 60 0 0 255 No5 04 No1 60 0 0 255 No6 05 No3 60 0 0 255 No7 No8 No9 No10 No11 No12 No13 No14 EXIT ACTIVE TIME MINUTES Select how long the area patrolling lasts in minute The options are 2 3 and 5 DWELL TIME Select the time in second after which to move to the next point The time ranges from 3 to 60 PAN SPEED Select how fast to move the c...
Страница 7: ...n select the channel which connects this camera and click SETUP to enter the menu of camera parameters ADVANCED CONFIG CAMERA CH1 CH2 CH3 CH4 DETECTION MENU SETUP ALERT NETWORK DISPLAY RECORD DCCS NOTIFY DEVICE AVT503S MULTICASTING CONNECTION OK EXIT Step2 Select CAMERA GUARD and enable this lock function Then configure the timeout after which the camera will be fixed to the current point and any ...
Страница 8: ...Step4 Return to the address book of EagleEyes and enable Guard The camera will fix at the point after the time specified in Step2 unless the Guard status is disabled ...