


CONNECTION
3
2. CONNECTION
2.1 Configurations Caméra IP par LAN
Remarque : Avant de brancher le système et de mettre sous tension le NVR, assurez-vous qu’un
disque dur est installé dans le NVR pour l’enregistrement. Pour savoir comment installer
un disque veuillez vous référer à « ANNEXE 4 Installation du disque dur » à la page 22.
2.2.1 Mode AUTO
Le mode Auto permet d’effectuer les réglages compliqués liés au réseau en trois minutes. Le mode de
connexion du port LAN est « AUTO » par défaut. Ce mode est adapté lorsque le port LAN du NVR est connecté
à un hub.
Remarque : Chemin de configuration :
(PARAMETRAGE AVANCE)
Réseau
LAN
MODE.
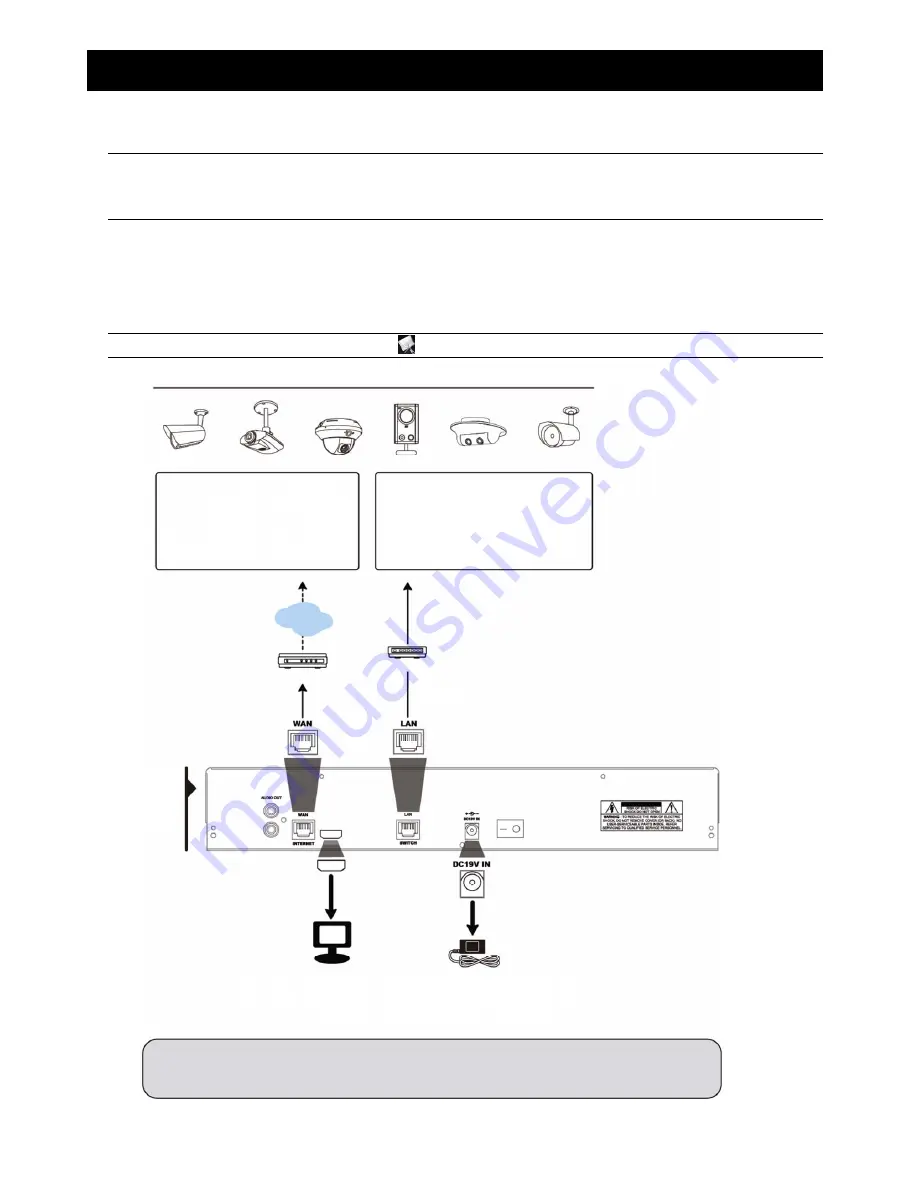
Connectez jusqu’à 6 périphériques IP :
Remarque :
Le panneau arrière peut varier selon les modèles, de sorte que la photo ci-dessus est seulement pour référence.
Connexion à distance**
1. Entrez l’adresse IP et les
informations d’accès de la caméra
IP dans le NVR.
2. Attendez jusqu’à ce que vous puissiez
voir des images sur le moniteur.
Connexion locale*
1. Raccordement de la caméra à un hub.
2. Attendez que la caméra soit
automatiquement configurée jusqu’à ce
que vous voyiez apparaître des images
de la caméra sur le moniteur.
Câble
réseau
RJ45
Internet
Modem
Câble
réseau
RJ45
Câble réseau
RJ45
Panneau
arrière du
NVR
Moniteur
Qui prend en charge la
haute définition
Adaptateur DC19V
* La connexion locale ne permet le suivi qu’au niveau local. Pour surveiller depuis un endroit différent de la localisation physique du
NVR, veuillez connecter votre NVR à Internet. Pour plus de détails, veuillez vous référer à « 3. CONFIGURATION RÉSEAU ».
** La connexion à distance est disponible uniquement lorsque le NVR est connecté à Internet.
Pour connecter votre NVR à Internet, veuillez vous référer à « 3. CONFIGURATION RÉSEAU ».
Содержание avh-312
Страница 1: ...Multilingual Version English Italiano Fran ais Deutsch Espa ol Espa ol Deutsch...
Страница 3: ......
Страница 7: ......
Страница 9: ...HARDWARE OVERVIEW 2...
Страница 15: ...CONNECTION 8...
Страница 18: ...USER INTERFACE 11 3 2 Remote...
Страница 19: ...USER INTERFACE 12...
Страница 32: ...026Z _h306_h312_h312pv_h312l_network_V1 6 NVR www surveillance download com user h306 swf...
Страница 33: ......
Страница 37: ......
Страница 39: ...2...
Страница 40: ...3 2 2 1 NVR NVR 22 4 2 1 1 LAN NVR LAN Hub...
Страница 42: ...5 2 1 2 IP DHCP NVR LAN Hub IP IP 192 168 0 1 192 168 0 xx xx 2 254 IP DHCP DHCP IP...
Страница 44: ...7 2 3...
Страница 45: ...8...
Страница 46: ...9 3 3 1 3 1 1 NVR USB USB PTZ PTZ CPU WAN WAN WAN LAN Mbit s LAN Gbit s LAN DHCP IP LAN 3 1 2 PTZ...
Страница 47: ...10 3 1 3 PTZ PTZ IP 3 1 4 PUSH 3 1 5 1 4X 1 8X 11 00 12 00 14 00 15 00...
Страница 48: ...11 3 2...
Страница 49: ...12...
Страница 56: ...1 EAGLEEYES 19 A1 3 2 Android...
Страница 59: ...4 22 4 1 NVR 2 3 4 5 NVR 6 7 8 NVR 1 NVR...
Страница 63: ......
Страница 67: ...HARDWARE OVERVIEW 2...
Страница 74: ...USER INTERFACE 9 3 2 Remoto...
Страница 75: ...USER INTERFACE 10...
Страница 85: ...h306_h312_h312pv_ _V1 5 www surveillance download com user h306 swf...
Страница 86: ......
Страница 90: ......
Страница 92: ...2...
Страница 98: ...8...
Страница 100: ...10 3 1 3 PTZ PTZ IP 3 1 4 3 1 5 1 1 1 4X 1 8X 1H 1H 11 00 12 00 14 00 15 00...
Страница 101: ...11 3 2 FR DR DATE TIME...
Страница 102: ...12...
Страница 103: ...13 4 4 1 1 2 NVR 4 2 4 3 4 2 NVR IP DHCP 1 RJ45 NVR WAN LAN WAN RJ45 RJ45...
Страница 109: ...1 EAGLEEYES 19 A1 3 2 Android Guard OFF ON...
Страница 112: ...4 22 4 1 2 NVR 3 PCB 4 5 NVR 6 PCB 7 2 8 1 HDD NVR...
Страница 113: ...5 23 5 CR2032 DVR CR2032 CR2032 CR2032 1 2 3 DVR 4 1 2 5 1 CR2032 2 CR2032 6 7 DVR...
Страница 116: ......
Страница 120: ......
Страница 122: ...PR SENTATION DU MAT RIEL 2...
Страница 128: ...CONNECTION 8...
Страница 132: ...INTERFACE UTILISATEUR 12...
Страница 146: ......
Страница 150: ......
Страница 152: ...HARDWARE BERSICHT 2...
Страница 158: ...VERBINDUNG 8...
Страница 162: ...BENUTZERSCHNITTSTELLE 12...


