REMOTE OPERATION
25
6.2. IE Web Browser
Note: The supported PC operation systems are Windows Vista / XP / 2000.
Step 6: Key in the IP address used by your DVR in the URL address box, such as 60.121.46.236, and press
Enter. You will be prompted to enter the user name and password to access the DVR.
If the port number your DVR used is NOT 80, you need to key in the port number additionally. The format
is
ipaddress:portnum
. For example, for IP address 60.121.46.236 and port No. 888, please key
in ”http://60.121.46.236:888” into the URL address box, and press “Enter”.
Step 7: Enter the user name and password, the same as the ones used for video viewer login, and press “OK”.
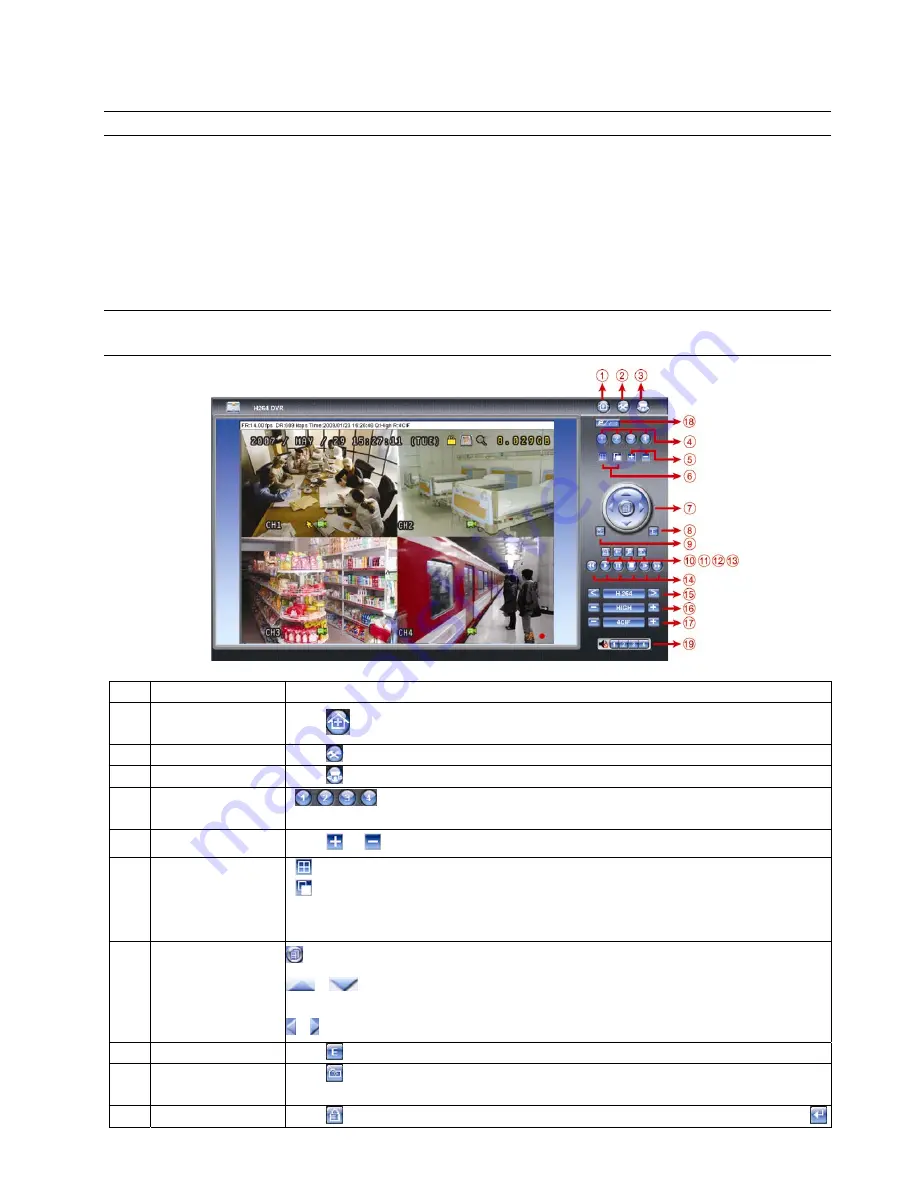
You will see a screen when the login information is correct.
Note: The buttons and functions described below may differ from the actual ones and are for selected
model(s) only.
NO.
Function
Description
1 Home
Click
to go to the main page of the DVR
2 Config.
Click
to go to the detailed DVR setting.
3 PTZ
Click
to enter the PTZ mode.
4 Channel
Selection
Click one of the number to switch to the channel you want to see in full screen.
5 Selection
Click
or
to go to the previous / next channel, or change setting.
:
Click to show 4-cut display.
6 Display
Mode
:
Click to display each channel one by one, starting from CH1. When the last channel is displayed,
it will start from CH1 again.
To exit from this display mode, press any other channel display button.
:
Click to enter the menu / exit the menu mode.
/
:
Move the cursor up / down to select the previous / next menu or sub-menu function, or change
the setting.
7
Menu and Arrow Keys
/ :
Move the cursor left / right to the previous / next sub-menu items.
8 Event
Click
to enter the playback search settings screen.
9 Snapshot
Click
to take a snapshot for the current view, and open another browser window to display the
captured image.
10 Key
Lock
Click
to enable the DVR key lock function. To unlock the DVR, key in your password, and press
.


