IP65 Garden Lasers User Manual
Components
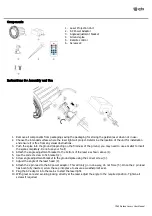
1.
Laser Projection Unit
2.
AC Power Adaptor
3.
Angle adjustment bracket
4.
Ground spike
5.
Remote control
6.
Screws x2
Instructions for Assembly and Use
1.
Remove all components from packaging saving the packaging for storing the garden laser when not in use.
2.
Choose the intended surface where the laser light will project. Determine the location of the unit for installation
and ensure it is free from any visual obstructions.
3.
Push the spike into the ground (depending on the firmness of the ground, you may need to use a mallet to insert
the spike completely. Do not use your foot!)
4.
Attach the angle adjustment bracket to the bottom of the laser as shown above (1).
5.
Use the correct screw to fix bracket (2).
6.
Screw angle adjustment bracket to the ground spike using the correct screw (3).
7.
Adjust the angle of the laser head (4).
8.
Attach the 2 pin lead to the AC power adaptor. This will only go in one-way, do not force (5). Once the 2 pin lead
has been fully inserted, screw the cap into place to ensure a weatherproof seal.
9.
Plug the AC adaptor into the mains to start the laser light.
10.
With great care and avoiding looking directly at the laser adjust the angle to the required position. Tighten all
screws if required.


