


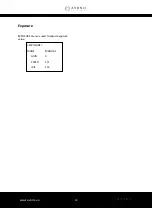
www.avonic.eu
7
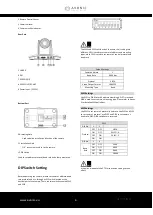
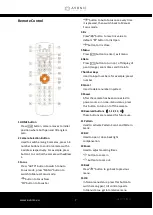
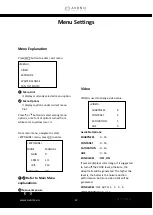
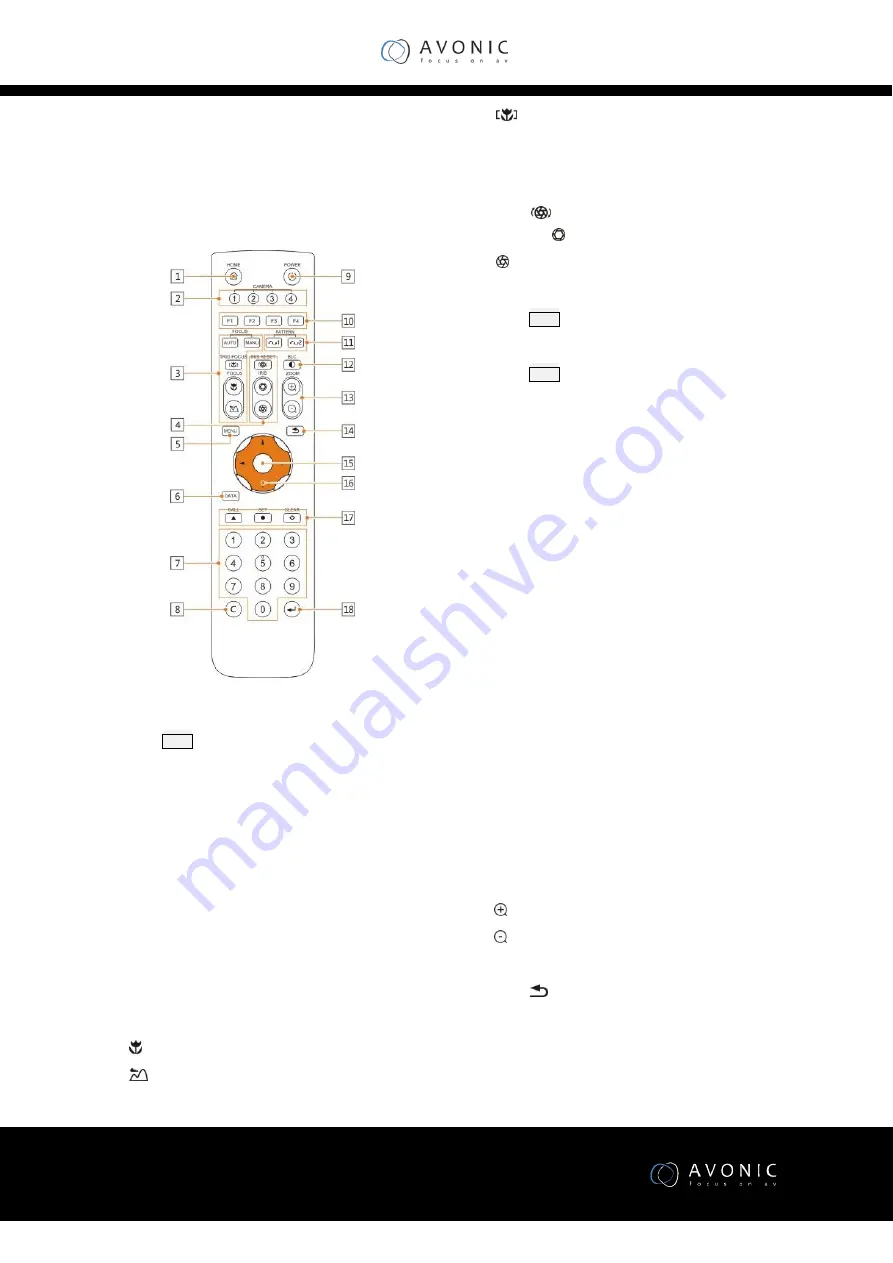
Remote Control
1 HOME button
Press
HOME
button, camera moves to initial
position where both pan and tilt angle is
zero.
2 Camera Selection Button
Used to switch among 4 cameras, press 1-4
number buttons to control cameras with 1-
4 address respectively. For example, press
button 1 to control the camera with address
1.
3 Focus
Press “AUTO” button to switch to Auto
Focus mode, press “MANU” button to
switch to Manual Focus mode.
“ ”button to Focus Near
“
”button to Focus Far
“
”button to Auto Focus once every time
it is pressed, then switch back to Manual
Focus mode.
4 Iris
Press“
”button to reset iris value to
default. “ ”button to Iris Open
“ ”button to Iris Close.
5 Menu
Press
MENU
button to enter / exit menu.
6 Data
Press
DATA
button to turn on / off display of
pan tilt angel, zoom times and title info
7 Number Keys
Used to input numbers, for example, preset
number.
8 Cancel
Used to delete number inputted.
9 Power
After the camera has been connected to
power source, in none-menu status, press
this button to turn on / off the camera.
10 Reserved buttons
(
F1
,
F2
,
F3
,
F4
)
These buttons are reserved for future use.
11 Pattern
Used to activate Pattern Scan1 and Pattern
Scan2.
12 BLC
Used to open / close back light
compensation.
13 Zoom
Used to adjust zooming times.
“ ”button to zoom in
“ ”button to
zoom out.
14 Back
Press“
”button to go back to previous
menu.
15 OK
In None-menu status: press this button to
switch among pan / tilt control speeds.
In Menu status: get into relative menu
option after it has been selected.
Содержание CM55-VCU
Страница 4: ...www avonic eu 4 Troubleshooting 22...
Страница 11: ...www avonic eu 11...
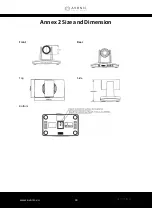
Страница 18: ...www avonic eu 18 Annex 2 Size and Dimension Front Rear Top Side Bottom...
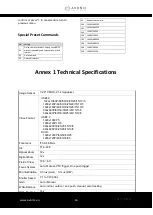
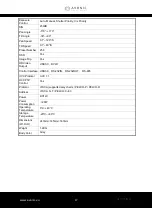
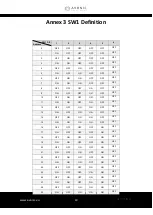
Страница 21: ...www avonic eu 21 reserve reserve reserve DIP No 8 Mounting Type ON Ceiling OFF Desktop...
Страница 23: ...www avonic eu 23...
Страница 24: ...www avonic eu 24 CM55 VCUSB3 0 MAN2 2 Avonic 2017...


