


Available in both two-port and four-port models,
the SwitchView 100 switch supports audio and
microphone capabilities, while enabling you to access,
manage and control power to attached PS/2 PCs.
The independent audio/microphone feature allows
uninterrupted audio on a connected PCs, even when
you switch to another PC.
1
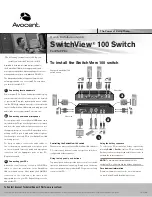
Connecting local peripherals
Power down all PCs. For two and four-port models, plug
your monitor cable into the monitor port on the front left
of your switch. Plug your keyboard and mouse cables
into the PS/2 keyboard and mouse ports located on the
front of the SwitchView 100 switch, and plug your local
audio jacks into the appropriate Console ports.
2
Connecting audio and microphone
For two-port models, connect the mini-USB audio cable
(included) to the PCI port on the right side of your switch
and insert the audio and microphone connectors into
the appropriate ports on your PC. Repeat the process
utilizing the PC2 port to add audio and microphone
functionality to a second PC in your SwitchView 100
switching system.
For four-port models, connect the audio cables to
the corresponding speaker and microphone ports
on the switch and insert the audio and microphone
connectors into the appropriate ports on your PC.
Repeat as needed.
3
Connecting your PCs
Attach the serial connector of the 2-in-1 VGA/PS/2
cable to one of the serial ports on the SwitchView
100 switch and secure. Next, attach the VGA/PS/2
connectors on the other end of the cable to the
appropriate port on your PC. Repeat the process to
add another PC.
Quick Installation Guide
SwitchView
®
100 Switch
For PS/2 PCs
The following instructions will help you
install your SwitchView 100 switch.
To install the SwitchView 100 switch
To Contact Avocent Technical Support: Visit www.avocent.com
Avocent, the Avocent logo, The Power of Being There and SwitchView are registered trademarks of Avocent Corporation or its affiliates. All other marks are the property of their respective owners. ©2007 Avocent Corporation. All rights reserved.
590-745-630A
The Power of Being There
®
Controlling the SwitchView 100 switch
There are two ways to utilize the SwitchView 100 switch for
PC control: push-buttons located on top of the switch or a
configurable hotkey sequence.
Using the top panel push-buttons
Top panel push-buttons provide direct control over switch
operation and channel switching. Simply press the button
that corresponds with your attached PC to gain access and
control to that PC.
Using the hotkey sequence
To select your PC, activate the hotkey sequence by
pressing
ScrLk
+
ScrLk
+ (
x
) (x = PC port number).
Each keystroke must be pressed within two seconds to
validate the hotkey sequence.
NOTE:
To maintain uninterrupted audio while
switching PCs, you must use the hotkey sequence
.
For additional information
Please visit www.avocent.com for more information
on your SwitchView 100 switching system.
1
2
3
Four-port SwitchView 100
switch shown
Rear view
Front view


