Avocent SV 220H Скачать руководство пользователя страница 1

Emerson

®

 Avocent

®

 SV 220H/240H/340H 

2 and 4-Port HDMI KVM Switches

Quick Installation Guide

1

To Contact Avocent Technical Support: Visit www.avocent.com 


590-1233-613A

Emerson, Emerson Network Power and the Emerson Network Power logo are trademarks or service marks of Emerson Electric Co. Avocent and the Avocent logo are trademarks or service marks of Avocent 
Corporation. All other marks are the property of their respective owners. This document may contain confidential and/or proprietary information of Avocent Corporation, and its receipt or possession does not 
convey any right to reproduce, disclose its contents, or to manufacture or sell anything that it may describe. Reproduction, disclosure, or use without specific authorization from Avocent Corporation is strictly 
prohibited. ©2015 Avocent Corporation. All rights reserved.


HELPFUL RESOURCES

Product documentation downloads are 
available at:

www.avocent.com/manuals

Search for additional product information at:

www.avocent.com

For further assistance, contact Avocent 
Technical Support. 

The following instructions will help 
you install your Emerson

®

 Avocent

®

 SV 

220H/240H/340H switch.  


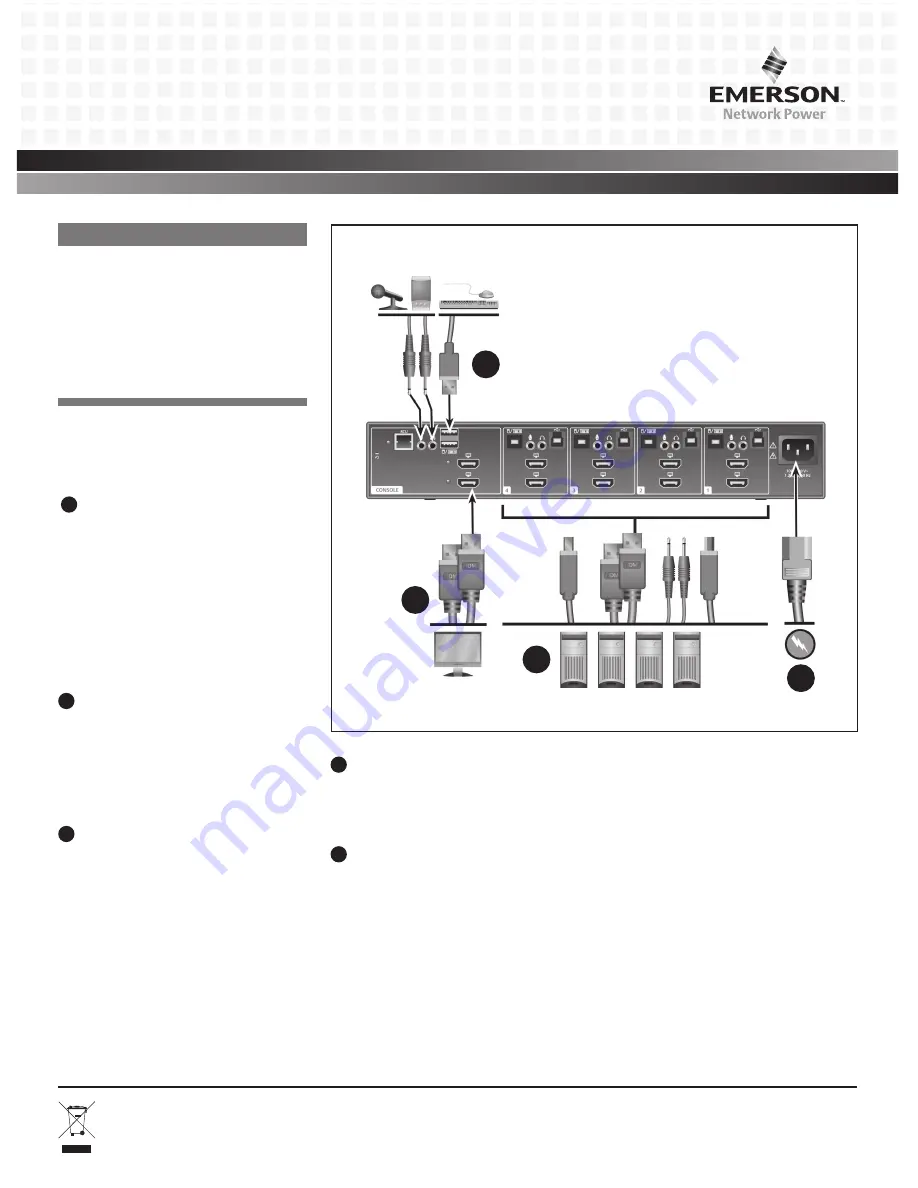
1

Connecting local peripherals

Turn off all computers you plan to use 
with your SV 220H/240H/340H switching 
system. Plug the monitor cable into the 
appropriate CONSOLE port on the back of 
the switch. Plug the USB keyboard  cable, 
USB mouse cable and two audio cables 
(speaker/headset and microphone) into the 
appropriate ports. 

2

Connecting computers to the switch

Make sure all computers are turned off. 
Plug the monitor, audio cables, keyboard 
and mouse cables from the corresponding 
computer into one of the ports on the 
switch.  Repeat for all computers.

3

Turning on your system

Turn the monitor on. Plug the power supply 
cord into the switch. Plug the other end 
of the power supply cord into an AC wall 
outlet.The display diagnostic LED should 
be solid green a few seconds after power 
is applied. This indicates the display EDID 
information has been captured and secured.

4

Turning on the computers

Turn on all the attached computers 
and check for display and peripheral 
functionality.

5

Operating your switch

When the computers are turned on, the 
computer connected to port 1 will be 
displayed on the monitor. You can control 
the 


SV switch by using the front panel 

push-buttons.

2

Emerson

®

 Avocent

®

 SV 340H switch shown

3

1

1

Содержание SV 220H

Страница 1: ...p you install your Emerson Avocent SV 220H 240H 340H switch 1 Connecting local peripherals Turn off all computers you plan to use with your SV 220H 240H 340H switching system Plug the monitor cable into the appropriate CONSOLE port on the back of the switch Plug the USB keyboard cable USB mouse cable and two audio cables speaker headset and microphone into the appropriate ports 2 Connecting comput...

Страница 2: ... The HDMI KVM switches support most HDMI 1 4 monitors and video cards DVI I monitors and video cards with adaptors speakers headsets USB keyboards and USB mice NOTE If a DVI I display is used then all computers must be connected through a DVI I interface Environmental Operating temperature is 32 to 104 F 0 to 40 C Storage temperature is 4 to 140 F 20 to 60 C Humidity requirements are 0 80 RH non c...

Страница 3: ...40H 1 Connexion des périphériques locaux Mettez tous les ordinateurs que vous souhaitez utiliser avec le commutateur SV 220H 240H 340H hors tension Branchez le câble de l écran à la voie CONSOLE appropriée à l arrière du commutateur Branchez le câble du clavier USB le câble de la souris USB et les deux câbles audio haut parleurs casque et micro sur les voies appropriées 2 Connexion des ordinateurs...

Страница 4: ...s Matériel compatible Les commutateurs KVM HDMI prennent en charge la plupart des écrans et cartes vidéo HDMI 1 4 des écrans et cartes vidéo DVI I à l aide d un adaptateur des haut parleurs casques des claviers USB et des souris USB NOTA si vous utilisez un écran DVI I tous les ordinateurs doivent être connectés via une interface DVI I Caractéristiques environnementales La plage de températures de...

Страница 5: ... 340H 1 Collegamento delle periferiche locali Spegnere tutti i computer da utilizzare con il sistema di commutazione SV 220H 240H 340H Inserire il cavo del monitor nella porta CONSOLE appropriata sul pannello posteriore dello switch Collegare i cavi della tastiera e del mouse USB e i due cavi audio altoparlanti cuffie e microfono alle porte corrispondenti 2 Collegamento dei computer allo switch Ve...

Страница 6: ... rigorosamente vietati 2015 Avocent Corporation Tutti i diritti riservati Hardware supportato Gli switch KVM HDMI supportano la maggior parte di monitor e schede video HDMI 1 4 monitor e schede video DVI I con adattatori altoparlanti cuffie tastiere e mouse USB NOTA se si utilizza un display DVI I è necessario che tutti i computer siano connessi mediante un interfaccia DVI I Ambiente Temperatura d...

Страница 7: ...en bei der Installation Ihres Emerson Avocent SV 220H 240H 340H Switches 1 Lokale Peripheriegeräte anschließen Schalten Sie alle Rechner aus die mit dem SV 220H 240H 340H Switching System verwendet werden sollen Schließen Sie das Monitorkabel an den entsprechenden CONSOLE Port an der Rückseite des Switches an Schließen Sie das USB Tastaturkabel USB Mauskabel sowie zwei Audiokabel Lautsprecher Kopf...

Страница 8: ... strengstens untersagt 2015 Avocent Corporation Alle Rechte vorbehalten Unterstützte Hardware Die HDMI KVM Switches unterstützen die meisten HDMI 1 4 Monitore und Grafikkarten DVI I Monitore und Grafikkarten mit Adaptern Lautsprecher Kopfhörer USB Tastaturen und USB Mäuse HINWEIS Wenn ein DVI I Display verwendet wird müssen alle Rechner über eine DVI I Schnittstelle verbunden werden Umgebungsbedin...

Страница 9: ...lación del conmutador Emerson Avocent SV 220H 240H 340H 1 Conexión de periféricos locales Apague todos los ordenadores que tenga pensado usar con el sistema de conmutación SV 220H 240H 340H Conecte el cable del monitor en el puerto de CONSOLA adecuado de la parte posterior del conmutador Conecte los cables de teclado y ratón USB y los dos cables de audio altavoces auriculares y micrófono en los pu...

Страница 10: ...mpatible Los conmutadores KVM con HDMI son compatibles con la mayoría de monitores y tarjetas de vídeo HDMI 1 4 monitores y tarjetas de vídeo DVI I con adaptadores altavoces auriculares y teclados y ratones USB NOTA Si se usa una pantalla DVI I todos los ordenadores se deben conectar a través de una interfaz DVI I Entorno Temperaturadefuncionamiento de0 a40 C Temperatura de almacenamiento de 20 a ...

Страница 11: ......

Страница 12: ...590 1233 613A ...

Отзывы: