Workshop Dobby Loom User’s Manual
WDL Assembly
Compu-Dobby®
Page | 29
5)
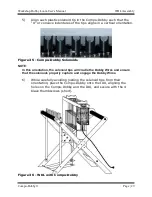
Align each plastic solenoid tip in the Compu-Dobby such that the
“U” or concave indentures of the tips aligns in a vertical orientation.
Figure 35 - Compu-Dobby Solenoids
NOTE:
In this orientation, the solenoid tips will cradle the Dobby Wires and ensure
that the solenoids properly capture and engage the Dobby Wires.
6)
While carefully avoiding jostling the solenoid tips from their
orientation, place the Compu-Dobby onto the IDU, aligning the
holes on the Compu-Dobby and the IDU, and secure with the 4
black thumbscrews (short).
Figure 36 - WDL with Compu-Dobby
Содержание 16 inch Workshop Dobby Loom
Страница 2: ......
Страница 4: ......
Страница 14: ......
Страница 15: ...Workshop Dobby Loom User s Manual WDL Assembly WDL Assembly Page 11 WDL ASSEMBLY WDL ASSEMBLY ...
Страница 58: ......
Страница 66: ......
Страница 67: ...Workshop Dobby Loom User s Manual The Fine Print The Fine Print Page 63 THE FINE PRINT THE FINE PRINT ...
Страница 70: ...The Fine Print Workshop Dobby Loom User s Manual Page 66 Notice to Users in the European Union ...

