background image


17 


WB  Mode: 

Auto/  3000K/  3500K/  4000K/ 

4500K/ 5000K/ 5500K/ 6000K/ 6500K/ 7000K/ 

Manual/ One Push 

RG Tuning: 

-10~10 (only available in Manual 

mode)


BG Tuning: 

-10~10  (only  available in  Manual 

mode)


Red  Gain:

  0~255  (only  available  in  Manual 

mode) 

Blue  Gain:

  0~255  (only  available  in  Manual 

mode) 

Saturation:

  60%,  70%,  80%,  90%,  100%, 

110%,  120%,  130%,  140%,  150%,  160%, 

170%, 180%, 190%, 200% 

Hue

: 0~14   

AWB Sensitivity:

 high/ middle/ low 


IMAGE:   

Enter image settings 

Move the cursor to  [IMAGE] and press [HOME], 

[IMAGE] menu is shown below. 


Brightness:

 0~14 

Contrast:

 0~14 

Sharpness:

 0~15 

Flip-H:

 On/ Off 

Flip-V:

 On/ Off 

B&W Mode:

 color, black/white 

Gamma:

 default/ 0.45/ 0.50/ 0.55/ 0.63 

DZoom:

 digital zoom options: On/ Off   

DCI:

 Dynamic Contrast: Off/ 1


FOCUS:   

Enter focus settings 

Move the cursor to [FOCUS] and press [HOME], 
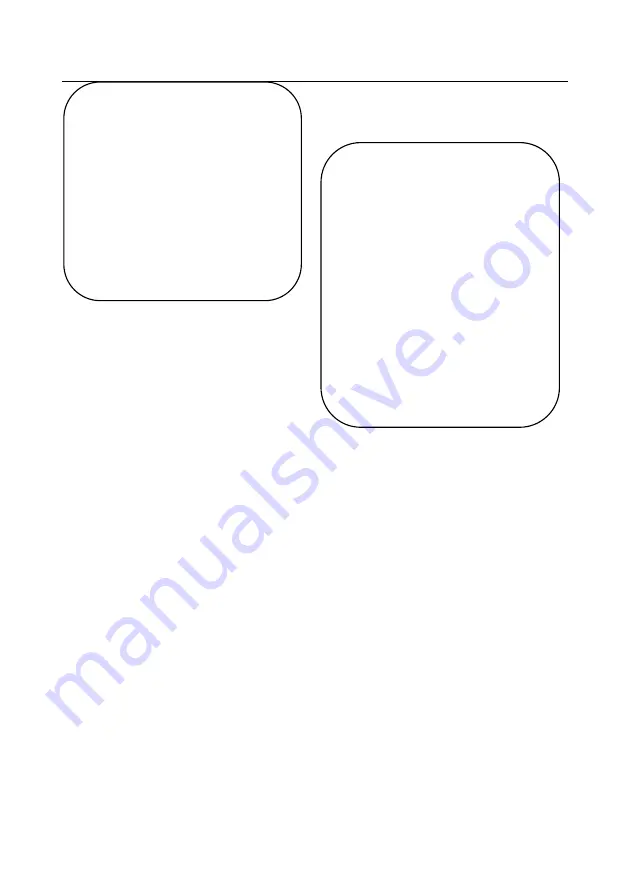
IMAGE


===============


  Brightness


  7


  Contrast


7


  Sharpness


  6 

Flip-H                                      OFF 

Flip-V


                      OFF 

B&W-Mode 


        Color 

Gamma 


        Default 

DZoom 


          OFF 

  DCI                                        Close 


COLOR 

===============


  WB Mode


Auto


  RG Tuning                                  0 

  BG Tuning                                  0


  Saturation


    100%


Hue   


      7 

AWB Sensitivity   


  High         


Содержание AV-1082G

Страница 1: ...1 Model AV 1082W HD Video Conferencing Camera USB 3 0 Model AV 1082G HD Video Conferencing Camera USB 2 0 User Manual V1 0 Please read this user manual thoroughly before using www avipas com...

Страница 2: ...amera to rain or moisture Do not remove the cover Otherwise you may risk receiving an electric shock In case of unintended equipment operation contact an authorized engineer Never operate under unspec...

Страница 3: ...4 Quick Start 5 Features 8 Product Specifications 9 Main Units 11 Dimensions 11 IR Remote Control Menu 12 RS 232 Interface 13 Serial Communication Control 14 Menu Settings 15 Network Connection 20 Ma...

Страница 4: ...carrying it Do not touch camera lens by hand Mechanical damage may result from doing so Do not use in corrosive liquid gas or solid environment to avoid any cover plastic material damage Make sure the...

Страница 5: ...Locating Hole 7 USB Interface 2 Remote Controller Receiver Light 5 RS232 Control Interface input 8 DC12V Power Supply Socket 3 Tripod Screw Hole 6 LAN Interface 2 Bracket mount Note Bracket can only b...

Страница 6: ...6 2 Ceiling mount...

Страница 7: ...7...

Страница 8: ...logy is also used to further reduce noise while ensuring image sharpness Quiet PTZ Mechanism By accurate step driving motor mechanism the camera works extremely quiet and moves smoothly Multi Format V...

Страница 9: ...o Manual Electronic Shutter Auto Manual White Balance Auto Manual One Push 3000K 4000K 5000K 6500K Backlight Compensation On Off Digital Noise Reduction 2D 3D Digital Noise Reduction Video SNR 55dB Vi...

Страница 10: ...Interface Communication Interface 1xRS232 8pin Min DIN Max Distance 30m Protocol Pelco D Pelco P VISCA Baud Rate 115200 9600 4800 2400 Video Output Interface USB LAN RS232 Network interface 1xRJ45 10...

Страница 11: ...11 Main Units External interface of USB model USB Output RS232 LAN DC12V Power Interface Dimensions...

Страница 12: ...ion To use as combination with F1 F4 to set camera address F1 Camera Address No 1 F2 Camera Address No 2 F3 Camera Address No 3 F4 Camera Address No 4 5 Focus Control AUTO to enter auto focus mode MAN...

Страница 13: ...the video format to 1080P60 9 1 Switch the video format to 1080P50 10 2 Switch the video format to 1080I60 11 3 Switch the video format to 1080I50 12 4 Switch the video format to 720P60 13 5 Switch th...

Страница 14: ...data bits 8 Stop bit 1 Parity None Pan Tilt function rotates the camera to its maximum position of top left upon startup then it returns to the center and the process of initialization is finished No...

Страница 15: ...ngs Move the cursor to SETUP in the main menu and press HOME SETUP menu is shown below PROTOCOL VISCA Pelco P Pelco D Auto Visca Addr VISCA 1 7 Pelco P 1 255 Pelco D 1 255 Visca Address Fix On Off Bau...

Страница 16: ...lable in Auto Iris priority Brightness priority mode WDR Off 1 8 Shutter Priority 1 25 1 30 1 50 1 60 1 90 1 100 1 120 1 180 1 250 1 350 1 500 1 1000 1 2000 1 3000 1 4000 1 6000 1 10000 only available...

Страница 17: ...middle low IMAGE Enter image settings Move the cursor to IMAGE and press HOME IMAGE menu is shown below Brightness 0 14 Contrast 0 14 Sharpness 0 15 Flip H On Off Flip V On Off B W Mode color black wh...

Страница 18: ...to P T Z in the main menu and press HOME P T Z menu is shown below Speed by Zoom Only effective for remote controller On Off When zoom in the P T control speed by remoter will become slow Zoom Speed S...

Страница 19: ...ULT menu is shown below Restore Default Yes No Note 1 After selecting restore default the video format won t be restored 2 If the IR address of the camera is not 1 but 2 3 4 the corresponding camera a...

Страница 20: ...cessible if the segment is not consistent For example AV 1082 s default IP address is 192 168 5 163 then segment 5 must be added to your computer Specific steps are as below Open Local Area Connection...

Страница 21: ...ified before adding 2 Confirm Access Click Start and select Operation Input cmd as shown in the picture below to verify whether the network segment has been successfully added Click OK and open the DO...

Страница 22: ...connection as steps above mentioned after the finish of camera self check If IP is default open DOS command window and input 192 168 5 163 then press Enter key It will show message as below which mea...

Страница 23: ...is message download and install MRWebXinstall exe according to instruction prompts After installing the plug in enter user name and password default user name and password admin users can change the u...

Страница 24: ...see below Menu Illustration Local configuration includes video preview mode record video packing time record video storage route settings etc Video configuration includes video encoding video paramet...

Страница 25: ...To set the image quality Main stream default Best Sub stream default Better Bit Rate Kb S To set the video bit rate Main stream default 4096 ranges from 64 12288 sub stream default 512 ranges from 64...

Страница 26: ...multicast protocol Default RTP TS for option Multicast Address To set the multicast address Default 224 1 2 3 Multicast Port To set the multicast port Main stream port default 4000 sub stream port def...

Страница 27: ...e Default 7 ranges from 0 14 AWB Sensitivity To set the sensitivity of auto white balance Default High other options low medium d Image Brightness To set the brightness Default 7 ranges from 0 14 Cont...

Страница 28: ...ncrease decrease font size according to the resolution Main Stream OSD Font Size To set the character size of main stream Default 48 ranges from 28 200 Sub Stream OSD Font Size To set the character si...

Страница 29: ...eferred DNS server Default 0 0 0 0 Alternate DNS server To set the alternate DNS server Default 0 0 0 0 4 GB28181 Enable Check to enable GB28181 ClockSync Check to set time synchronization Video Type...

Страница 30: ...time interval of NTP server Valid after NTP server synchronization is on Default one day ranges from 2 10 Host Url To set NTP server address or domain name Default time nits gov Valid after NTP serve...

Страница 31: ...process or the upgrade will fail Note After the version upgrade is complete users need to restore factory defaults and there are 2 ways a through web login and restore the factory default b through th...

Страница 32: ...tters etc Troubleshooting Image No image 1 Check if the power cord is connected or voltage is right or POWER light is on 2 Check if the camera can self test upon start up 3 Check if video cable is con...

Страница 33: ...modifying the IP address incorrectly causing the wrong IP address or if the web password is forgotten press Manual on the IR remote control to restore the default settings Default IP 192 168 100 88 De...

Страница 34: ...For example when commands controlling the focus manually are received during auto focus Camera control command Command Function Command packet Note AddressSet Broadcast 88 30 0p FF p Address setting...

Страница 35: ...Gain Up 8x 01 04 03 02 FF Down 8x 01 04 03 03 FF Direct 8x 01 04 43 00 00 0p 0q FF pq R Gain CAM_ Bgain Reset 8x 01 04 04 00 FF Manual Control of B Gain Up 8x 01 04 04 02 FF Down 8x 01 04 04 03 FF Di...

Страница 36: ...wn 8x 01 04 0E 03 FF Direct 8x 01 04 4E 00 00 0p 0q FF pq ExpComp Position CAM_Back Light On 8x 01 04 33 02 FF Back Light Compensation Off 8x 01 04 33 03 FF CAM_WDRStrength Reset 8x 01 04 21 00 FF WDR...

Страница 37: ...n on the menu screen OFF 8x 01 04 06 06 03 FF Turn off the menu screen IR_Receive ON 8x 01 06 08 02 FF IR remote commander receive On Off OFF 8x 01 06 08 03 FF IR_ReceiveReturn On 8x 01 7D 01 03 00 00...

Страница 38: ...02 FF DownRight 8x 01 06 01 VV WW 02 02 FF Stop 8x 01 06 01 VV WW 03 03 FF AbsolutePosition 8x 01 06 02 VV WW 0Y 0Y 0Y 0Y 0Z 0Z 0Z 0Z FF RelativePosition 8x 01 06 03 VV WW 0Y 0Y 0Y 0Y 0Z 0Z 0Z 0Z FF...

Страница 39: ...ition CAM_BacklightModeInq 8x 09 04 33 FF y0 50 02 FF On y0 50 03 FF Off CAM_WDRStrengthInq 8x 09 04 51 FF y0 50 00 00 00 0p FF p WDR Strength CAM_NRLevel 2D Inq 8x 09 04 53 FF y0 50 0p FF P 2DNRLevel...

Страница 40: ...format 0 1080P60 8 720P30 1 1080P50 9 720P25 2 1080i60 A 1080P59 94 3 1080i50 B 1080i59 94 4 720P60 C 720P59 94 5 720P50 D 1080P29 97 6 1080P30 E 720P29 97 7 1080P25 Pan tiltMaxSpeedInq 8x 09 06 11 F...

Страница 41: ...Address 0x00 0x03 0x00 Preset ID SUM Clear Preset 0xFF Address 0x00 0x05 0x00 Preset ID SUM Call Preset 0xFF Address 0x00 0x07 0x00 Preset ID SUM Query Pan Position 0xFF Address 0x00 0x51 0x00 0x00 SU...

Страница 42: ...x00 0xAF XOR Zoom Out 0xA0 Address 0x00 0x40 0x00 0x00 0xAF XOR Focus Far 0xA0 Address 0x01 0x00 0x00 0x00 0xAF XOR Focus Near 0xA0 Address 0x02 0x00 0x00 0x00 0xAF XOR Set Preset 0xA0 Address 0x00 0x...

Страница 43: ...ge not resulting from defects in material To receive warranty service please contact AVIPAS Inc first We will decide whether a repair or replacement is needed and will advise you of the cost of such r...

Отзывы: