background image

21


SETTING


THE


TEMPERATURE


CONTROL


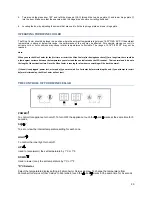
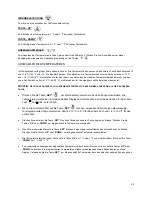
The wine cooler has two temperature zones. The temperature settings of LOWER ZONE and UPPER ZONE are adjustable 
with the range 5º-22ºC/40º-72ºF. It is recommended to set the LOWER ZONE to 13-22ºC / 55-72ºF which is ideal for storing 
white and red wines and the UPPER ZONE to 5-13ºC / 40-55ºF which is ideal for storing sparkling and white wines. 


NOTE:


The temperature set for the LOWER ZONE must always be the same or higher than that in the 

UPPER ZONE. 


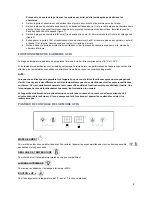
  You can touch 

SET 

mark to set the internal temperature for each zone. The degrees indicators will appear in 

the display window marked    for UPPER ZONE and     for LOWER ZONE.  


  When you touch the 

SET

 mark for the first time, the LED readouts will show the original temperature sets previously (the 

preset temperature at the factory for UPPER ZONE is 10ºC / 50ºF and for LOWER ZONE is 16ºC / 60ºF). 


 Touch 

the 

SET

 mark once. The left LED indicator for UPPER ZONE will flash. Then touch the 

UP

 or 

DOWN

 marks to set 

the desired temperature. 
 

  When you touch the 

SET

 mark again, the right LED indicator for LOWER ZONE will flash. Then proceed to touch the 

UP


or 

DOWN

 marks to set the desired temperature for the LOWER ZONE. 


  The temperature will increase 1°C or 1ºF if you touch the 

UP

 mark once, or the temperature will decrease 1°C or 1ºF if 

you touch the 

DOWN

 mark once. 


  To view the “set” temperature in either zone at any time, touch the 

UP

 or 

DOWN

 mark, the “set” temperature will 

temporarily “flash” in the LED display for 5 seconds. You can touch the 

SET

 mark to view the temperature setting from one 

zone to the second zone. 


TEMPERATURE


DISPLAY


During normal operation, the temperature display on the control panel shows the temperature inside the appliance. 

The 

temperature display will flash

 if: 

 
-  A different temperature is being set,  
 
-  The temperature in the zone deviates by more than 5°C from the set temperature. The temperature display flashing 
ensures that the temperature can not rise or fall un-noticed and impair the wine. 


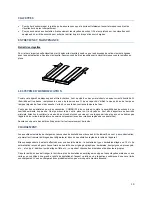
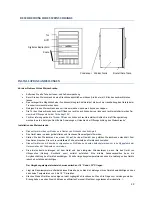
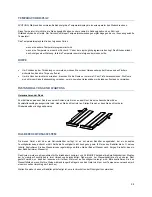
SHELVES


  To prevent damaging the door gasket, make sure the door is fully open when pulling shelves out of the rail compartment. 


  For easy access to the bottles stored, pull the shelves out approximately 1/3.  The shelves are designed with an 

emergency stop to prevent them being removed too far when loaded. 


CARE


AND


MAINTENANCE


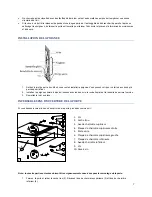
Removing Shelves 

  To remove any of the shelves from the rail compartment, move the shelf to the position where the notch of wooden shelf 

is exactly under the plastic post and lift the wooden shelf. Please ensure these are replaced when the shelf is put back.


Содержание AV45XDZI

Страница 1: ...lo on nn ne e GB USE INSTRUCTIONS NL HANDLEIDING In column wine temperature conditionning Inbouwwinjnkast voor op temperatuur brengen cellar 15 39 D GEBRAUCHSANWEISUNG SP MANUAL DE UTILIZACION Temper...

Страница 2: ...2...

Страница 3: ...e celui ci peut s av rer dangereux D branchez la fiche d alimentation et faites contr ler l appareil par un r parateur professionnel agr L utilisation d accessoires non pr conis s par le fabricant est...

Страница 4: ...tement branch Cet appareil n cessite une prise standard 220 240 volts AC 50 Hz murale avec trois fiches Faites v rifier votre installation lectrique par un professionnel pour vous assurer que la prise...

Страница 5: ...ur des pieds r glables au dessous de la cave Pour obtenir le meilleur de votre appareil avec la plus faible consommation d nergie ne placez pas votre appareil proche d une source de chaleur chauffage...

Страница 6: ...NT La porte de la cave vin assure une herm ticit presque compl te de l installation une fois encastr e L air chaud doit tre puls par la ventilation de l appareil vers l arri re du caisson d encastreme...

Страница 7: ...perc s pour la fixer 2 Installez la poign e comme indiqu ci dessus avec les deux vis la rondelle plate et la rondelle de serrure fournies 3 Remettez le joint en place INVERSER LE SENS D OUVERTURE DE L...

Страница 8: ...ont au del de cette plage de temp rature les performances de l appareil peuvent en tre affect es les temp ratures souhait es non atteintes et remettre en cause les conditions de garantie NOTE Lorsque...

Страница 9: ...Appuyez sur le bouton SET une fois L afficheur gauche du compartiment haut va clignoter Appuyez sur les boutons UP ou DOWN pour choisir la temp rature que vous voulez Si vous appuyez une seconde fois...

Страница 10: ...ons une humidit ambiante trop basse C est pourquoi le bac est placer sur la clayette du haut afin d apporter une humidit minimale Attention contr ler le niveau d eau si vous stockez vos vins sur une l...

Страница 11: ...et de fa on r guli re de nettoyer l int rieur comme l ext rieur face avant lat rales et dessus avec un m lange d eau ti de et de produit de lavage doux Rincez l eau pure laissez s cher totalement ava...

Страница 12: ...t un service agr de la marque ou du revendeur Dans tous les cas il doit tre remplac par un personnel qualifi pour viter tout risque de blessure Si ces contr les ne donnent rien contactez alors le serv...

Страница 13: ...rature d application de la cave La cave est ouverte trop souvent La porte n est pas bien ferm e Le joint de la porte n est pas tanche Le compresseur d marre et s arr te fr quemment La temp rature ext...

Страница 14: ...14...

Страница 15: ...ween the AC outlet receptacle and plug may cause overheating and a distortion of the plug Contact a qualified electrician to replace loose or worn outlet Locate the unit away from direct sunlight and...

Страница 16: ...tlet is encountered it is your responsibility and obligation to have it replaced with a properly grounded 3 pins wall outlet The cord should be secured behind the appliance and not left exposed or dan...

Страница 17: ...enough to support it when it is fully loaded To level your Wine Cooler adjust the front leveling leg at the bottom of the Wine Cooler This appliance must be fixed at the top and the bottom using the...

Страница 18: ...square centimeters in cross section WARNING To ensure the proper functioning of the appliance air vents should never be blocked or covered Attention Store wine in sealed bottles Do not overload the c...

Страница 19: ...e the right top hinge plate by unscrewing the four screws and get the left top hinge plate from the plastic bag that includes the instruction manual then install it at the designated position on the o...

Страница 20: ...be a few degrees variance between the temperature you select and the one indicated on the LED readout This is normal and it is due to the length of the activation time Once the Wine Cooler is running...

Страница 21: ...he temperature will increase 1 C or 1 F if you touch the UP mark once or the temperature will decrease 1 C or 1 F if you touch the DOWN mark once To view the set temperature in either zone at any time...

Страница 22: ...les and the practical side of the daily use of a cabinet limits the number of bottles stored Most probably a few less bottles will be stored than the indicated amount For example if the cellar is fill...

Страница 23: ...dors and mold IF THE CABINET MUST BE MOVED Remove all the bottles in the cabinet and securely fasten all moveable parts To avoid damaging the levelling screws on the feet screw them completely into th...

Страница 24: ...on the environment on health and contributes to the recycling of materials of which the appliance is made For more detailed information on the recycling opportunities please contact your local office...

Страница 25: ...ure control is not set correctly The door gasket does not seal properly The light does not work Not plugged in The circuit breaker tripped or a blown fuse The light switch is OFF Vibrations Check to a...

Страница 26: ...26...

Страница 27: ...r oder wenn es irgendeinen Schaden oder Sto spuren aufweist Sollte Ihr Ger t Sch den erleiden starker Sto oder bei einem Schadensfall besch digt werden berspannung durch Blitzschlag berschwemmung Bran...

Страница 28: ...er t gelieferten Steckers Um f r Ihre Sicherheit zu sorgen muss dieses Ger t richtig angeschlossen werden Das Ger t muss an eine Standard Wandsteckdose zu 220 240 Volt Wechselstrom 50 Hz mit 3 Buchsen...

Страница 29: ...ellt werden Stellen Sie den Weinschrank an einem Ort auf der dem Gewicht des gef llten Weinschranks standh lt Zum Nivellieren brauchen Sie nur die verstellbaren F e unterhalb des Ger ts nachzustellen...

Страница 30: ...n Sie sicher dass die Stromsteckdose und der Ein Ausschalter nach dem Anschlie en des Ger ts gut zug nglich sind ANWEISUNGEN F R DAS EINBAUEN Die T r des Weinschranks sorgt f r ein fast v lliges herme...

Страница 31: ...DES GRIFFS 1 Nehmen Sie die T rdichtung auf der Seite an der Sie den Griff installieren wollen ab Zum Befestigen sind zwei vorgebohrte ffnungen vorhanden 2 Montieren Sie den Griff wie oben gezeigt mi...

Страница 32: ...n der oberen und unteren Scharnierplatte verwendet haben FUNKTIONSWEISE DES WEINSCHRANKS Der Temperaturbereich des Raums in dem das Ger t steht muss zwischen 18 C und 32 C liegen berschreiten die Umge...

Страница 33: ...e SET um die Innentemperatur der einzelnen Zonen einzustellen Die Temperaturen erscheinen in Grad auf jedem Display und entsprechen den einzelnen Zonen f r das obere Fach und das untere Fach Wenn Sie...

Страница 34: ...er Roste Zum Entfernen eines der Roste aus seiner Schiene zieht man an dem Rost bis seine Ausschnitte mit den Kunststoffanschl gen ausgerichtet sind Heben Sie den Rost jetzt an Stellen Sie sicher dass...

Страница 35: ...weine aus der Provence neuer Wein 10 12 C Trockene Wei weine und rote Landweine 10 12 C Wei e Landweine 8 10 C Champagner 7 8 C Lik rweine 6 C ENTEISEN KONDENSAT Das Ger t f hrt automatische Enteisung...

Страница 36: ...in die Basis des Ger ts schrauben Kleben Sie die geschlossene T r mit Klebeband zu Bewegen Sie das Ger t nur in senkrechter Stellung Sch tzes Sie es mit Decken oder hnlichem vor Sch den ENERGIESPAREN...

Страница 37: ...st nicht dicht Der Kompressor startet und stoppt h ufig Die Raumtemperatur um den Weinschrank ist hoch Sie haben soeben viele neue Flaschen eingelegt Der Weinschrank wird zu oft ge ffnet Die T r wird...

Страница 38: ...nutzer ist f r die Abgabe des Ger ts am Lebensende bei den entsprechenden Sammelstellen verantwortlich Selektives und sachgem es Sammeln zum Weiterleiten des nicht verwendeten Ger ts an das Recycling...

Страница 39: ...evaar opleveren Haal de stroom van het apparaat en laat het controleren door een erkende professionele monteur Het gebruik van accessoires die niet erkend worden door de fabrikant wordt sterk afgerade...

Страница 40: ...Dit apparaat behoeft een standaard muurstopcontact 220 240 volt AC 50 Hz met aarde Laat uw elektrische installatie controleren door een vakkundige om er zeker van te zijn dat uw muurstopcontact goed...

Страница 41: ...verstelbare poten van de kast aan om hem waterpas te zetten Dit apparaat moet aan de boven en onderzijde worden vastgezet met behulp van het speciale meegeleverde profiel om ieder gevaar voor omkantel...

Страница 42: ...INGEN De deur van de wijnkast zorgt voor een bijna volledig hermetische afsluiting als de installatie is ingebouwd De warme lucht moet door de ventilatie van het apparaat naar de achterkant van inbouw...

Страница 43: ...vat wilt monteren naar achteren U ziet nu drie voorgeboorde gaten om het handvat op te bevestigen 2 Monteer het handvat zoals hierboven aangegeven met de bijgeleverde twee schroeven het platte ringetj...

Страница 44: ...laatje vast te zetten FUNCTIONEREN VAN DE WIJNKAST De omgevingstemperatuur van de ruimte waarin de wijnkast wordt geplaatst moet tussen 18 C en 32 C liggen Als de omgevingstemperatuur buiten dit berei...

Страница 45: ...e zones voor het bovenste compartiment en voor het onderste compartiment Als u voor de eerste keer op de toets SET drukt geven de LED displays de voorgeprogrammeerde fabriekstemperaturen aan voor het...

Страница 46: ...F rekening gehouden met de gevoeligheid van kurken voor een te lage luchtvochtigheid Daarom moet de bak op de bovenste legger geplaatst worden om te zorgen voor de minimale vochtigheid Controleer het...

Страница 47: ...rne elementen leggers etc Wij raden u aan om voor het eerste gebruik en daarna regelmatig de binnen en buitenkant voorkant zijkanten en bovenkant schoon te maken met een mengsel wat lauw water en een...

Страница 48: ...dt veroorzaakt door een van de redenen die in de tabel aan het einde van deze handleiding worden genoemd BELANGRIJK Als de meegeleverde elektriciteitskabel beschadigd is moet hij worden vervangen door...

Страница 49: ...nkast start niet De stekker steekt niet in het contact De Aan Uit knop staat op de UIT positie Gesprongen zekering Controleer uw elektrische installatie De wijnkast wordt onvoldoende koud Controleer d...

Страница 50: ...50...

Отзывы: