Avigilon HD-NVR3-STD-24TB Скачать руководство пользователя страница 25

LED Indicators

The following tables describe what the LEDs on the recorder indicate.

Diagnostic Indicators

The diagnostic indicators on the front of the recorder highlight system issues during system startup.

NOTE:

The diagnostic indicators only light-up when the recorder is powered.
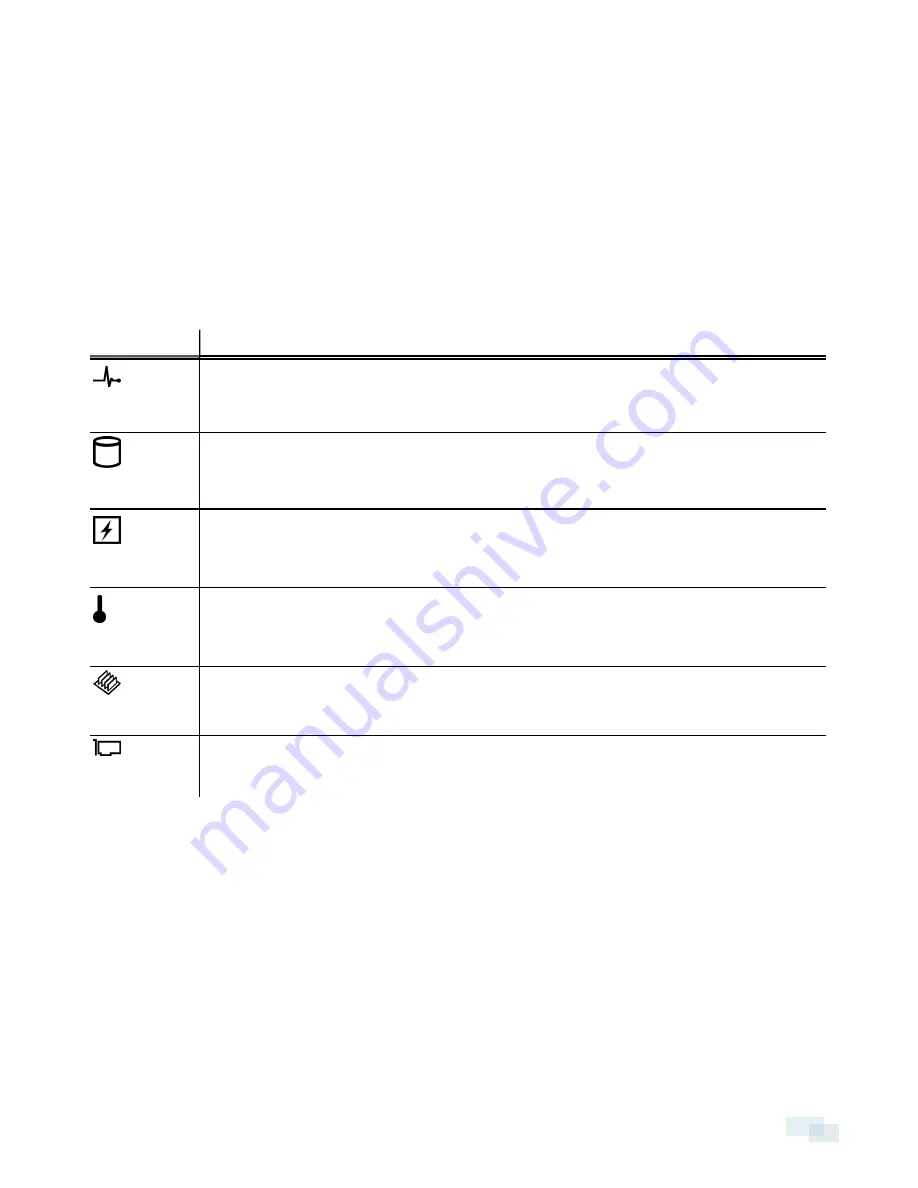
LED Indicator

Description

Health

l

Blue — the recorder is powered and is in good health.

l

Blinks orange — the recorder is powered but an error exists. Errors include: a failed fan
or hard drive.

Hard drive

l

Blinks orange — the hard drive is experiencing an error.

Electrical

l

Blinks orange — the recorder experiences an electrical error. Errors include: voltage out
of range, or failed power supply or voltage regulator.

Check the power status indicator to confirm if it is an issue with the power supply.

Temperature

l

Blinks orange — the recorder experiences a thermal error. Errors include: temperature
out of range or fan failure.

Check that the recorder fan is functioning correctly and the air vents are not blocked.

Memory

l

Blinks orange — the recorder experiences a memory error.

PCIe

l

Blinks orange — the recorder experiences a PCIe card error.

Restart the recorder then update the drivers for the PCIe card.

Power Status Indicators

The power button on the front of the recorder lights up when power is on.

Additional information about the power supply is provided by the power status indicator on the back of the
recorder. The following table describes what the LEDs indicate:

LED Indicators

21

Содержание HD-NVR3-STD-24TB

Страница 1: ...Installation Guide Avigilon HD Network Video Recorder HD NVR3 STD 16TB and HD NVR3 STD 24TB...

Страница 2: ...granted with respect to any copyright industrial design trademark patent or other intellectual property rights of Avigilon Corporation or its licensors This document has been compiled and published co...

Страница 3: ...r Software 8 Starting Up and Shutting Down the Avigilon Control Center Client Software 8 Starting Up the Client Software 8 Shutting Down the Client Software 8 Logging Into and Out of a Site 9 Logging...

Страница 4: ...ck Hard Drives 19 LED Indicators 21 Diagnostic Indicators 21 Power Status Indicators 21 Network Link Status Indicators 22 Hard Drive RAID Status Indicators 23 Specifications 24 Limited Warranty and Te...

Страница 5: ...or act as the base of a new site Overview Front View 1 Bezel The bezel protects the recorder from unauthorized physical access The bezel must be removed to access the front of the recorder 2 Power but...

Страница 6: ...erial connector Accepts connections to serial devices 2 Video connector Accepts a VGA monitor connection 3 USB connectors Accepts USB connections to external devices 4 1 Gigabit Ethernet ports Accepts...

Страница 7: ...le with square and round hole racks Connecting Cables Refer to the diagrams in the Overview section for the location of the different connectors Make any of the following connections as required 1 Con...

Страница 8: ...6 Set a password for the user name you entered on the previous screen When you are ready click Next 7 On the following page is the end user license agreement for the Windows operating system Review th...

Страница 9: ...rt while you perform this procedure but you will not be able to use any of the features until after license activation is complete 1 Click License Activation 2 On the following screen select one of th...

Страница 10: ...should download automatically If not allow the download to occur when you are prompted 10 Complete the product registration section to receive product updates from Avigilon then click Register 11 Find...

Страница 11: ...license to your current system Networking By default the HD Network Video Recorder acquires an IP address on the network through DHCP If you need to set up the recorder to use a static IP address or...

Страница 12: ...Avigilon Control Center Client Software After you install the Avigilon Control Center Client software start the application and access the HD Network Video Recorder Starting Up the Client Software Pe...

Страница 13: ...ur username and password for the selected sites 4 Click Log In You are logged into the selected sites If you want to be notified when new or disconnected sites come online select the Notify me when ad...

Страница 14: ...then click Connect Tip You can also drag the device to a server on the Connected Cameras list 3 In the Connect Camera dialog box select the server you want the device to connect to NOTE If you are co...

Страница 15: ...ngs Before you can assign a recording schedule you must create a template The template allows you to assign the same schedule to multiple cameras Creating a Recording Template The events that can be s...

Страница 16: ...ging that is available depends on the camera you have connected to your system l For JPEG2000 or JPEG compression cameras data aging is available at three rates l High Bandwidth keeps recordings at th...

Страница 17: ...ual recording time will be shorter than the Max Record Time 4 Click OK Adding Users and Groups If there will be other people using the system you may want to add them as separate users rather than giv...

Страница 18: ...a user in the Search field to locate specific users c Click Add The users are added to the Members list 6 Click OK to save the new group Adding Users 1 In the site Setup tab click 2 In the Users tab c...

Страница 19: ...ngs l To maintain the privacy of certain areas you can set Privacy Zones in the camera s field of view so that private spaces are never recorded l Corporate Hierarchy l If you are setting up an enterp...

Страница 20: ...ideo from a remote web browser or mobile device If the Gateway software is not set up you cannot access video outside of your local network l Install the ACC Mobile app on your mobile device so that y...

Страница 21: ...screen enter the Windows software administrator username and password that was configured for the recorder 3 On the Server Administrative home page the health of the system components are displayed i...

Страница 22: ...eft end of the bezel then unhook the right end to remove the bezel 2 Press the release button and slide the blank out of the hard drive slot 3 Insert the hard drive all the way into the recorder then...

Страница 23: ...w hard drive as a hot spare select Assign and Unassign Global Hot Spare from the Task list then click Execute If the new hard drive is not displayed in the Server Administrator try one of the followin...

Страница 24: ...in the carrier insert the hard drive back into the recorder 8 Once the hard drive is inserted all the way in push the handle against the hard drive to lock it into place The recorder immediately start...

Страница 25: ...ge out of range or failed power supply or voltage regulator Check the power status indicator to confirm if it is an issue with the power supply Temperature l Blinks orange the recorder experiences a t...

Страница 26: ...onnected to the network the recorder s connection status LEDs above the Ethernet port display the recorder s connection status to the network The following table describes what the LEDs indicate Figur...

Страница 27: ...ive is online Off The hard drive is disconnected from the recorder Two short green flashes every second The system is identifying a new hard drive or preparing a hard drive for removal Flashes green o...

Страница 28: ...mum dew point non condensing Operating Vibration 0 26 Grms at 5 Hz to 350 Hz all operation orientations Storage Vibration 1 88 Grms at 10 Hz to 500 Hz for 15 min all six sides tested Operating Shock S...

Страница 29: ...2010 EN 61000 3 2 2006 A1 2009 A2 2009 IEC 61000 3 2 2005 A1 2008 A2 2009 Class D EN 61000 3 3 2008 IEC 61000 3 3 2008 Electromagnetic Immunity EN 55024 2010 CISPR 24 2010 Directives RoHS Reach SVHC...

Страница 30: ...gents or employees shall create another warranty or modify this warranty This warranty states Avigilon s entire liability and your exclusive remedy against Avigilon for any failure of this product to...

Отзывы: