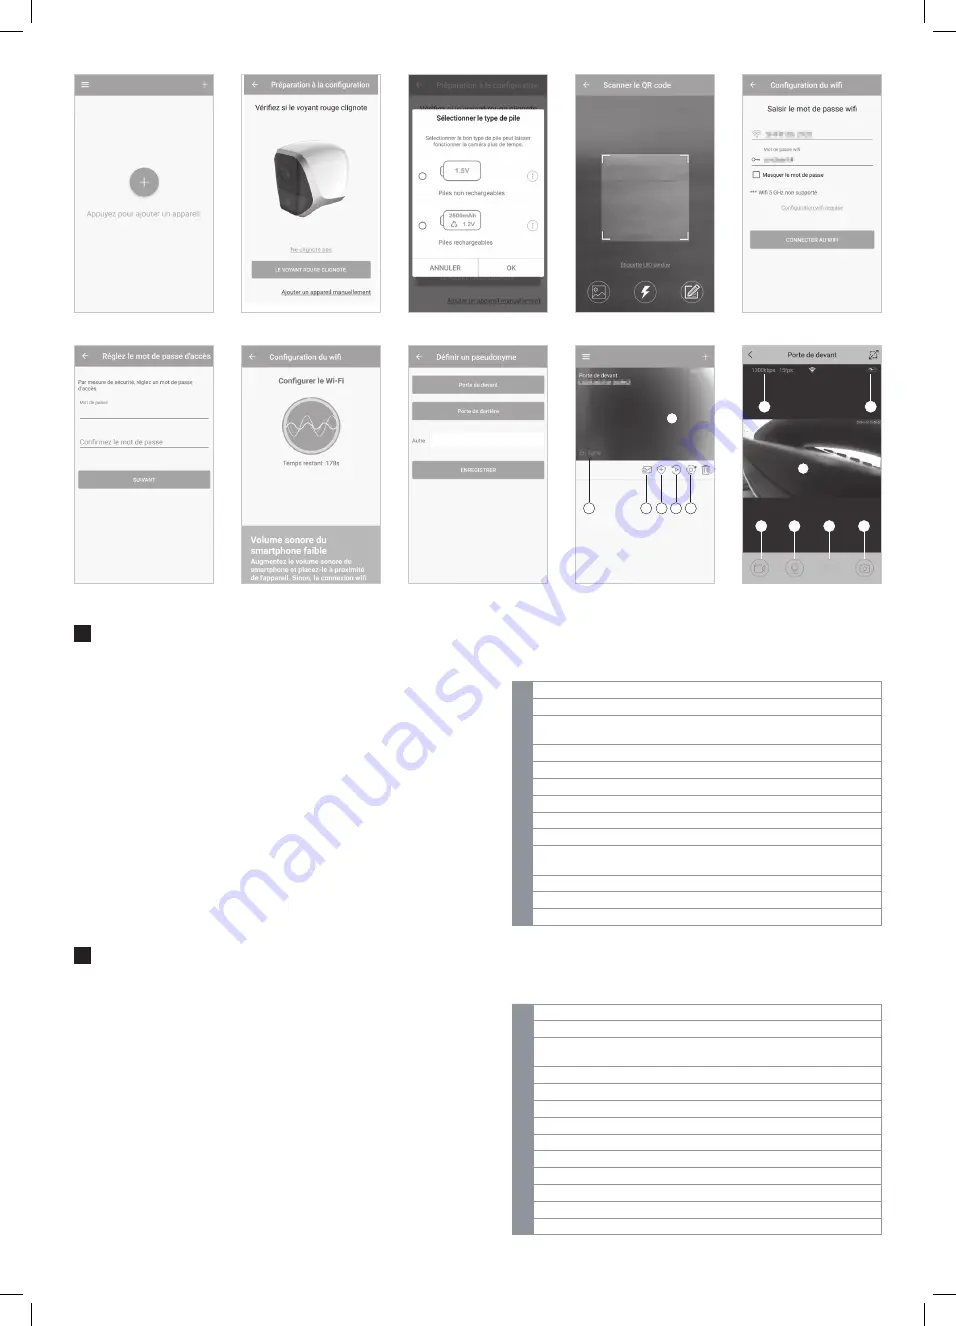
img. 1
img. 6
img. 2
img. 7
img. 3
img. 8
img. 4
img. 9
img. 5
img. 10
Lancez l’application puis cliquez sur le symbole « + » pour y associer votre caméra
(img 1)
A ce stade, votre caméra doit être alimentée et en attente (témoin rouge clignotant
en façade). Cliquez sur « Le voyant rouge clignote » pour poursuivre. (img 2)
L’application vous demande ensuite le type de piles ou batteries (rechargeables
ou non) insérées dans la caméra pour adapter la jauge de batterie à l’écran. Peu
importe votre choix si vous souhaitez utiliser la caméra en l’alimentant par un
adaptateur secteur. (img 3)
L’appareil photo de votre smartphone s’ouvre, et l’appli vous invite à scanner le
QRCode présent sous la caméra. (img 4)
Indiquez ensuite à quel réseau la caméra devra se connecter, ainsi que la clé
correspondante (img 5)
L’accès à chaque caméra nécessite un mot de passe. Renseignez celui que vous
souhaitez utiliser. La combinaison de lettres et chiffres est fortement recommandée
pour plus de sécurité (img 6)
Activez le son de votre smartphone, approchez-le du micro de la caméra puis
cliquez sur « Connecter au WiFi » (img 7)
Le témoin clignotant en façade va passer du rouge clignotant au vert clignotant,
puis au vert fixe une fois le réseau WiFi rejoint. Patientez jusqu’à l’écran suivant :
indiquez le nom que vous souhaitez donner à votre caméra. (img 8)
Votre caméra est configurée et connectée. Cliquez sur son image pour afficher
l’image en direct (img 9 et img 10)
1
Miniature de l’image de la caméra
2
Statut de la caméra
3
Accès au mode « Ne pas déranger » : ne coupe pas les enregistrements
mais coupe les notifications dans l’appli
4
Réglages de la détection de mouvement
5
Relecture des vidéos enregistrées sur carte mémoire (non fournie)
6
Réglages complets de la caméra
7
Débit et nombre d’images par seconde actuels
8
Jauge de charge des piles ou batteries
9
Image en direct de la caméra
10
Démarrage d’un enregistrement en direct avec enregistrement en mémoire
du smartphone
11
Activation du micro de la caméra
12
Activation du haut-parleur de la caméra
13
Prise d’une photo en direct avec enregistrement en mémoire du smartphone
FR
1
9
7
10
11
12
13
8
2
3
4
5
6
Launch the application and click on the "+" symbol to associate your camera (img
1)
At this stage, your camera should be switched on and in standby (flashing red
indicator light on front). Click on “Le voyant rouge clignote” (The red indicator is
flashing). (img 2)
Next, the application will ask you what type of batteries (rechargeable or not) are
in the camera to adapt the battery indicator on the screen. You can choose either
option if you want to power the camera with a mains adapter. (img 3)
The camera on your smartphone opens and the app prompts you to scan the QR
Code on the bottom of the camera. (img 4)
Next, indicate which network the camera should connect to, as well as the
corresponding key. (img 5)
A password is required to access each camera. Enter the one you want you use.
A combination of letters and numbers is highly recommended for better security.
(img 6)
Turn on the sound of your smartphone, bring it closer to the camera microphone
and click on “Connecter au WiFi” (Connect to WiFi). (img 7)
The flashing indicator light on the front will go from flashing red to flashing green,
then to solid green once connected to the WiFi network. Wait until the next screen
appears: enter the name you want to give your camera. (img 8)
Your camera is configured and connected. Click on its image to display the live
video. (img 9 and img 10)
1
Camera image thumbnail.
2
Camera status
3
Access to « Ne pas déranger » (Do not disturb) mode: does not stop
recordings, but mutes notifications in app
4
Movement detection settings
5
Playback videos recorded on memory card (not included)
6
All camera settings
7
Current speed and number of images per second
8
Battery level indicator
9
Live video from the camera
10
Start recording live and save to smartphone memory
11
Activate the camera microphone
12
Activate the camera loudspeaker
13
Take photo immediately and save to smartphone memory
EN


