manualshive.com logo in svg
background image

12

Step 1 (Binding Storage to the System Director):

For additional help in the next few steps (or for any help with the Management 
Console) please refer to the 

ISIS Administration Guide

. This Guide is available 

in the software kit, or via download at: 

http://www.avid.com/US/support

. Click 

the link titled Knowledgebase on the right side of the screen and search for 

ISIS 

Administration Guide

.

• 

From the ISIS System Launch Pad at the top-right corner of the System Director 
desktop, click the “Management Console” button.

• 

Log in using the Administrator user name and leave the password field blank. 
(Changing the default password once you log in is recommended).

• 

Click the icon labeled “Storage Managers” from the 
main menu, or the “Home” menu pull-down.

• 

You should see a list of all of the ISIS 5000 Engines that 
you have set up and configured in the previous steps. 
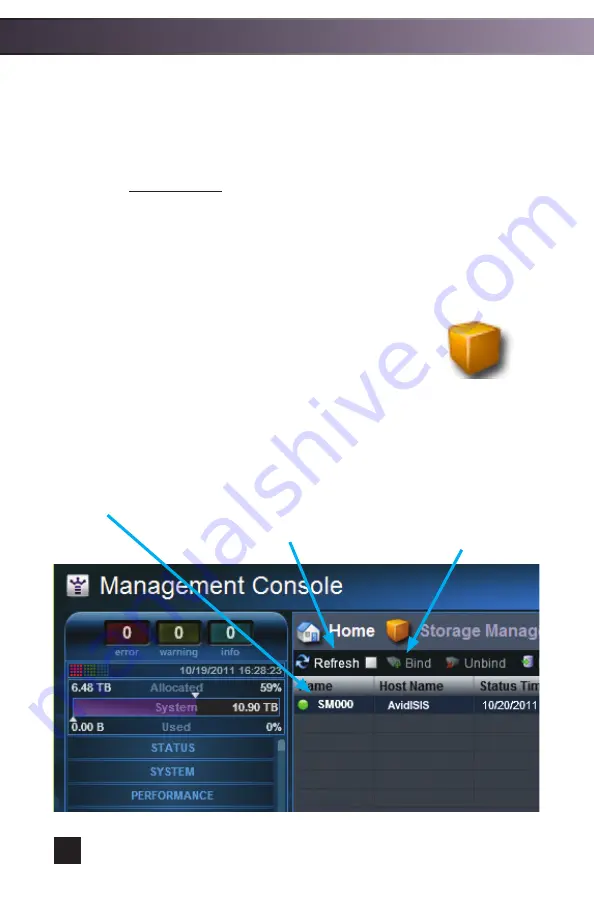
Select them all and click the “Bind” Button 

• 

Click “yes” when prompted. You must click the “Refresh” button to see the 
change take effect. 

Select by clicking on available storage.

Click the“Bind” button 
to assign storage to this 
System Director.

Click “Refresh” to see changes.

Storage Managers

Software Installation

System Configuration

Содержание ISIS 5000

Страница 1: ...ide of the screen and search for ISIS 5000 Setup Guide You will need to download Adobe s Acrobat Reader or a similar PDF viewer before viewing the guide Unpack and make sure you have all of the compon...

Страница 2: ...They are reserved for Storage Engine Resiliency If you have purchased the optional 4 port Ethernet board see the ISIS 5000 Setup Guide for installation instructions To Clients Connect four Ethernet c...

Страница 3: ...t or use Diagram B for 1 x 10 Gb Ethernet Continue with Step 2 page 5 Rear view of the ISIS Engine P28 27 XFP26 AC XFP25 DC Alarm STACK ID S25 01 GE 24V x x To Clients Front view of the Force10 S25 sw...

Страница 4: ...he ISIS Engine P28 27 XFP26 AC XFP25 DC Alarm STACK ID S25 01 GE 24V To Ethernet Clients Rear view of two stacked Force10 S25 switches To Optical Clients SFP required P28 27 XFP26 AC XFP25 DC Alarm ST...

Страница 5: ...front of the drive is in the open position before insertion by pushing the locking button on the front Repeat this step for each additional Engine The drive once inserted should not move or wiggle at...

Страница 6: ...e finished with the Hardware Setup The next steps will guide you through the Software Installation For more detailed help with any of the steps in this section problems or questions please reference t...

Страница 7: ...e following Username Administrator Password is admin Avid recommends changing the defaults as soon as possible Drag the contents of the 4 GB USB Drive on to the ISIS 5000 System and click the file nam...

Страница 8: ...m Directors please refer to the ISIS 5000 Setup Guide Click Apply Select ISIS 5000 Engine System Director to make this Engine a System Director Avid strongly encourages you to make a System Restore ba...

Страница 9: ...rnet Setup 10 Gb Setup Use the populate with defaults button to use the Avid Default Configuration If you wish to use your own IP scheme contact your system administrator Click OK Let the installation...

Страница 10: ...I am connected to the Internet and will use this computer and click Continue For additional help or instructions for activating the license without the Internet please refer to the ISIS 5000 Setup Gui...

Страница 11: ...pop up Click OK Wait until the process completes The System Director will restart itself You can now close the Control Panel window Press the Stop System Director button first then press the button l...

Страница 12: ...nagement Console button Log in using the Administrator user name and leave the password field blank Changing the default password once you log in is recommended Click the icon labeled Storage Managers...

Страница 13: ...ls section on the right side of the screen enter the name for your new storage group Select the ISIS Engine you just bound in the previous step from the Storage Elements list Click the Add button Clic...

Страница 14: ...or your new workspace Enter a capacity or leave it at the default You can always resize a Workspace later Choose from the user access list any users that you want to have access to this workspace You...

Страница 15: ...e the name of the user you want to have access in the name field Type a password in the password field and verify that it is correct Passwords are not required Set any permissions and select the Works...

Страница 16: ...ttp 192 168 11 10 Enter your username and password to login If you choose not to create users you can use the Administrator or Guest accounts Click on the Installers icon from the home screen or the H...

Страница 17: ...nch after installation If not click the Client Manager icon in the System Tray Windows or Dock Macintosh The ISIS System in the subnet should be listed double click the ISIS System name to Login Clien...

Страница 18: ...list Congratulations you can start reading and writing to the ISIS System Three important manuals were referenced to create this guide Please refer to them for in depth explanations or additional help...

Отзывы: