Avery Dennison FreshMarx 9417 Скачать руководство пользователя страница 15

Setting Up the Printer  

3-5


S e t t i n g   t h e   O p t i o n s  

The options allow users to recreate an old label, use “end of day” expiration, or print “use first” 
labels on the Right printer. 

Recreate Label 

Users may need to reprint a freshness label if a label is torn or missing 
from a product. The user enters the 

original 

Use By time and date.  


Note:

   An asterisk (*) prints after the date or time, indicating a 

reprinted label. 

“End of Day” 
expiration mode 


Prints freshness labels or use-first labels with the words “End of Day” 
and the date, no time. Use for products that expire at the end of each 
day or in a set number of days from the first use. End of day expiration 
mode expires earlier than the normal date/time mode. 
Enter product expiration values in multiples of 1 day. For example,  
1 day expires today; 2 days expires tomorrow, etc.   

  Note:

   If the expiration time contains any hours and/or minutes, the 

printer uses 

normal date/time mode 

for that product. 


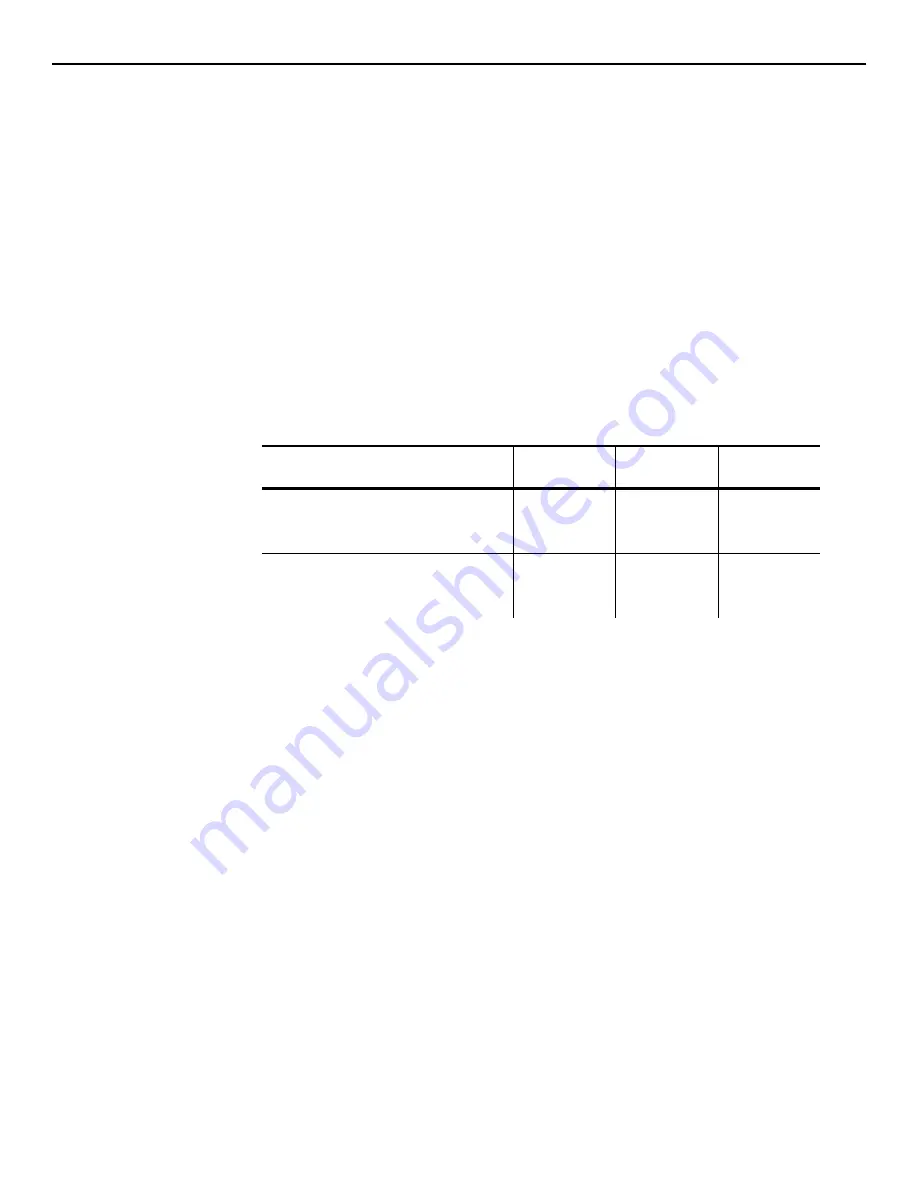
For more information about expiration dates, see the table 
below. 


Mode 

1 Day 
Expiration 

2 Day 
Expiration 

3 Day 
Expiration 

Normal Date/Time Mode


Current date/time: 
May 1 10 AM 

10 AM 
5/2/13 
 

10 AM 
5/3/13 
 

10 AM 
5/4/13 
 

End of Day Expiration Mode 

Current Date:  
May 1 

End of Day 
5/1/13 
 

End of Day 
5/2/13 
 

End of Day 
5/3/13 


Print “Use First” 
labels on the Right 
printer.


Prints “Use First” labels on the Right printer instead of the Left printer.  
All “Use First” labels print on the Right printer until this option is 
disabled. 


Содержание FreshMarx 9417

Страница 1: ...System Administrator s Guide 2013 Avery Dennison Corp All rights reserved TC9417SA Rev AA 7 13 28028 0 Monarch 9417 Printer FreshMarx...

Страница 2: ...easonable protection against harmful interference when the equipment is operated in a commercial environment This equipment generates uses and can radiate radio frequency energy and if not installed a...

Страница 3: ...Address To enter an IP Address Selecting your Network Time Server USING EDIT MODE Entering Edit Mode Adding and Removing Products To add a product button To remove a product button Editing Product De...

Страница 4: ...duct Data File via USB Updating Your Application Software via USB PERFORMING MAINTENANCE Printing Diagnostic Labels Version Information Network Information Gray Scale Checkerboard Copying a Data File...

Страница 5: ...k time server 4 Using Edit Mode Making changes to your product menu at the printer 5 Using the Edit Utility Creating and editing your product menu by using your PC 6 Updating the Printer via USB Updat...

Страница 6: ...could print Format 1 and Format 8 The Right printer could print Format 5 and Format 7 See Appendix A Label Formats for the size and content of each format If your dual printer application only uses on...

Страница 7: ...om the examples in this manual The screens and labels shown are for reference only of the dual printer Adjusting the Time and Date You can set the system time and date format the time and date select...

Страница 8: ...4 Press Set Time Date Use and to set the time and date Touch AM PM to toggle the setting between AM and PM 5 Press OK when you are finished 2 2 System Administrator s Guide...

Страница 9: ...the time date appears on printed labels 1 From the Admin Tools screen press System Settings 2 Press Format Time Date 3 Select the checkbox if you want to use a 24 hour clock For example 4 00 p m would...

Страница 10: ...the date format 5 Use the and buttons to select your Time Zone 6 Select the checkbox if you want the printer to automatically adjust the time for Daylight Saving Time 7 Press OK when you are finished...

Страница 11: ...on that differs slightly from the examples in this manual The screens and labels shown are for reference only of the dual printer Adjusting the Print Settings You can adjust the horizontal X and verti...

Страница 12: ...3 Enter the Admin password and press Enter The default password is 1234 4 Press System Settings 3 2 System Administrator s Guide...

Страница 13: ...oves the printed text up Decreasing the value moves the printed text down The range is 128 to 127 and the default is 0 8 Use the and buttons to adjust the Contrast Increasing the value makes the print...

Страница 14: ...ress Return when you are finished Changing the Administrator s Password To change the administrator s password 1 From the Admin Tools screen press System Settings 2 Press Change Admin Password 3 Enter...

Страница 15: ...e End of day expiration mode expires earlier than the normal date time mode Enter product expiration values in multiples of 1 day For example 1 day expires today 2 days expires tomorrow etc Note If th...

Страница 16: ...3 6 System Administrator s Guide 1 From the Admin Tools screen press System Settings 2 Press Options 3 Select the options you need 4 Press OK when you are finished...

Страница 17: ...the network settings or set an IP Address The printer s current network settings are displayed 1 Press the Tools button 2 Press Admin 3 Enter the Admin password and press Enter The default password is...

Страница 18: ...settings appear To automatically obtain an IP Address You can use DHCP to automatically obtain the printer s IP Address 1 From the Network Settings screen select Use DHCP to obtain IP Add automaticall...

Страница 19: ...From the Network Settings screen select Use a Static IP Address 2 Touch the text box next to each field to enter the information as needed on the keypad 3 Press Enter on the keypad each time you compl...

Страница 20: ...ver press Add Use the keypad to enter the server address Press Enter on the keypad each time you complete a field To edit an existing Network Time Server select the server name from the box then press...

Страница 21: ...e is only for Managers and Supervisors Entering Edit Mode You can make changes to the product buttons On the printer use Edit mode or on your PC use the Edit Utility see Chapter 5 Using the Edit Utili...

Страница 22: ...creen The background color of the screen changes and EDIT MODE appears at the bottom right of the screen After five minutes of inactivity Edit Mode closes The countdown is shown at the bottom right of...

Страница 23: ...o add or remove product buttons To add a product button 1 Press any empty product button 2 Fill in the fields as needed Touch the text box next to each field to open the keypad 3 Press Enter on the ke...

Страница 24: ...pad The default MUST USE BY appears 5 Press Clear Field to clear the field and enter the new data for example BEST BEFORE Press Enter When this item is printed the new Use By description prints For ex...

Страница 25: ...8 Press Save when you are finished The new product appears on the selected button To remove a product button 1 Press the product button you want to remove 2 Press Clear All All existing product inform...

Страница 26: ...rmation 1 Press the product button to edit 2 Edit the product information fields as needed Touch the text box next to each field to open the keypad 3 Press Enter on the keypad each time you complete a...

Страница 27: ...nter the Button Name 3 Enter the Label Data This field is printed on labels when the Use First button is pressed If this field is left blank the default text Use First prints on labels Note This field...

Страница 28: ...Formats for the size and content of each format Note If you select a format larger than the loaded labels some information may not print 4 Select either the Left or Right printer to print the product...

Страница 29: ...Edit Mode To exit Edit Mode 1 Press the Tools button 2 Press Exit Edit Mode Or press Continue Editing to remain in Edit Mode and make additional changes You return to the Product screen Using Edit Mo...

Страница 30: ...4 10 System Administrator s Guide...

Страница 31: ...recommended Memory RAM 1 GB minimum recommended Hard Disk Space 1 GB minimum recommended Installing the Edit Utility To install the Edit Utility on your computer 1 Download the Edit Utility from our...

Страница 32: ...your printer s IP Address Entering the Printer s IP Address in the Edit Utility 1 Connect the printer to your computer using an Ethernet cable 2 Turn on the printer 3 Start the Edit Utility 4 Click S...

Страница 33: ...one so See Entering the Printer s IP Address in the Edit Utility for more information 5 Click Update then Upload Product Data If you already have a product data file open in the Edit Utility you are p...

Страница 34: ...tton Name 3 Select the Label Format for all products in this category Note If you select a format larger than the loaded labels some information may not print 4 Select which printer will print the pro...

Страница 35: ...First prints on labels For example USE FIRST 07 01 13 2 20 PM 4 Click OK Editing Tabs Tab names are entered in each category See Editing Category Buttons for more information Creating and Editing Prod...

Страница 36: ...entered for the Button Name is used 5 Enter the Use By Description The default is MUST USE BY 6 Set the product s duration expiration time See Setting the Options for more information about expiration...

Страница 37: ...information When you are done making changes to the Product Data file you can download it to the printer 1 Start the Edit Utility 2 Open the data file to transfer to the printer 3 Connect the printer...

Страница 38: ...the printer to your computer using an Ethernet cable 3 Turn on the printer 4 Click Update then Application Software 5 Select the 130444 FreshMarxVxx cab xx indicates the version number file you downl...

Страница 39: ...You can use a USB Flash Drive to transfer your updated product data file from your PC to your printer Save your data file in the root directory on a USB Flash Drive 1 Plug the USB Flash Drive into the...

Страница 40: ...ata files If you have more than one Product Data file stored on your USB Flash Drive select the file you want to install then press OK 7 A message appears when the file is loaded Press OK to continue...

Страница 41: ...rinter Save the latest application in the root directory of a USB Flash Drive 1 Turn on the printer 2 Plug the USB Flash Drive into the USB port on the side of the printer 3 Press the Tools button 4 P...

Страница 42: ...an one Application Software file stored on your USB Flash Drive select the file you want to install then press OK This may take several minutes When the update is complete the printer restarts 8 Remov...

Страница 43: ...printer Printing Diagnostic Labels Several diagnostic labels are available Version Information Network Information Gray Scale and Checkerboard To print any of the diagnostic labels 1 Press the Tools...

Страница 44: ...ork Information labels shows the method for obtaining an IP address the IP address Subnet mask Gateway address and MAC address Press The following label prints Network Information Gray Scale The gray...

Страница 45: ...Press Press The following label prints The following label prints Checkerboard Checkerboard Copying a Data File to a USB Flash Drive Copying a Data File to a USB Flash Drive You can copy the Product D...

Страница 46: ...rinter s Application Software Follow the on screen instructions to calibrate the touch screen The application runs automatically when you are finished Note Be sure that you only touch the screen in th...

Страница 47: ...current data files Note Before deleting the printer s data files you may want to upload the Product Data file to your computer or to a USB Flash Drive to save the product button information See Uploa...

Страница 48: ...les or press No to cancel The printer deletes all data files and loads the default data files The printer restarts Note All data files are deleted when you press Factory Reset and they cannot be recov...

Страница 49: ...owing information for each field Field Description Description 1 Prints up to 17 characters Description 2 Prints up to 17 characters Description 3 Prints up to 17 characters Must Use By Numbers only D...

Страница 50: ...s Enter the following information for each field Field Description Description 1 Prints up to 25 characters Description 2 Prints up to 25 characters Must Use By Numbers only Days 0 365 hours 0 23 minu...

Страница 51: ...Enter the following information for each field Field Description Description 1 Prints up to 15 characters Description 2 Prints up to 15 characters Must Use By Numbers only Days 0 365 hours 0 23 minut...

Страница 52: ...bels Enter the following information for each field Field Description Description Prints up to 16 characters Shelf Life Prints up to 13 characters Must Use By Numbers only Days 0 365 hours 0 23 minute...

Страница 53: ...characters Description 2 Prints up to 23 characters Description 3 Prints up to 23 characters Ingredients Prints up to 875 characters Note Does not print semicolons or returns Must Use By Prints the d...

Страница 54: ...to 6 characters numbers 0 9 and period only Cholesterol mg Prints up to 6 characters numbers 0 9 and period only Sodium mg Prints up to 6 characters numbers 0 9 and period only Total Carbs g Prints u...

Страница 55: ...k expiration Enter the following information for each field Field Description Description 1 Prints up to 17 characters Description 2 Prints up to 17 characters Description 3 Prints up to 17 characters...

Страница 56: ...28028 0 Avery Dennison 170 Monarch Lane Miamisburg OH 45342 1 800 543 6650 In the U S A 1 800 387 4740 In Canada www monarch com...

Отзывы: