background image


English - 16 

or 


-

  Press 

 to  pause  the  playback. 

Press 

 to  go  to  previous  frame; 

press 

 to go to next frame.           

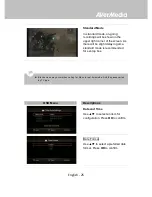
Step 2:    

-

  Press 

 to  capture  your  desired 

image.  


Disk Information  

Press 

 then press 

OK

 to display 

the disk information. Press again to 

hide it.  


Chapter 6 

OSD Menu 

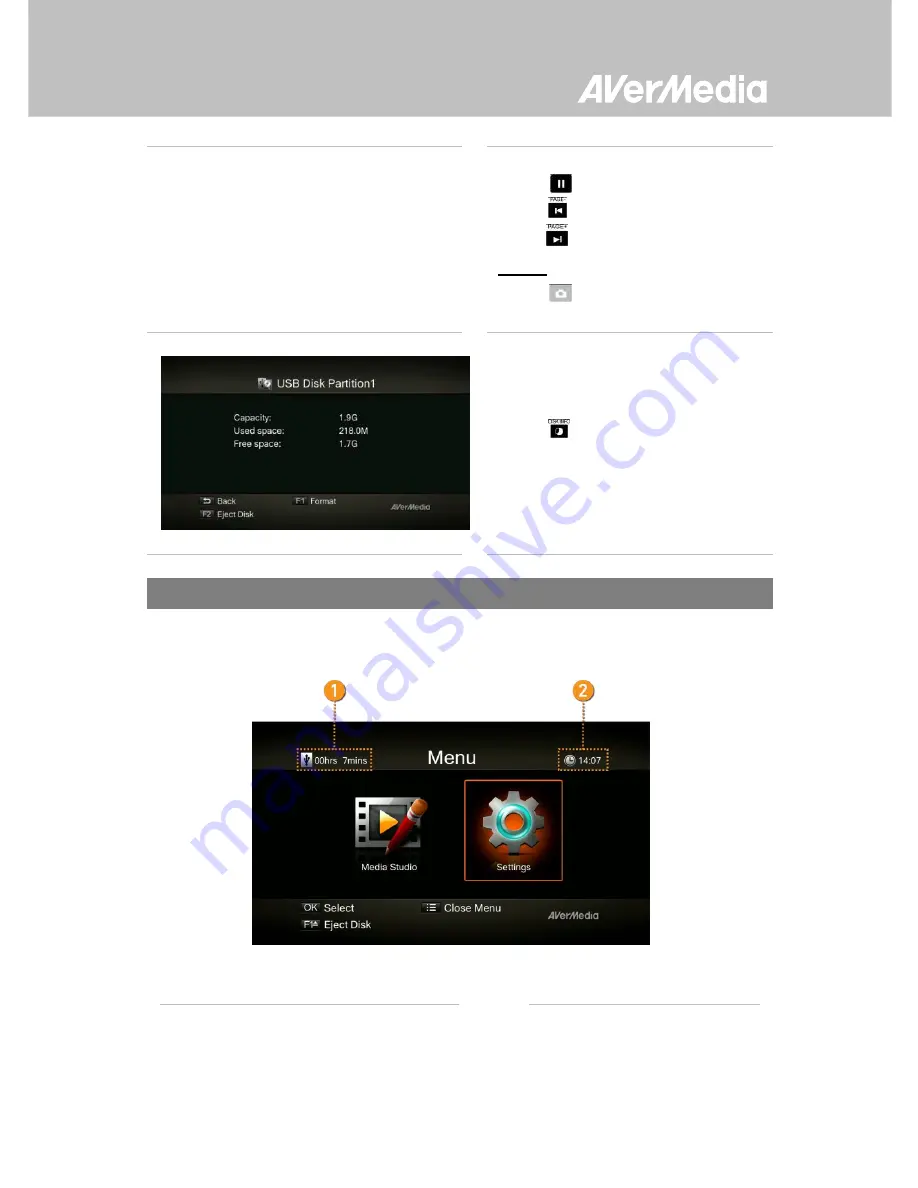
Under  the  menu,  you  can  check  and  manage  both  your  recorded  files  and 

snapshots, and customize your preferences. 


1   Remaining Time for Recording 


2  Current Time 

Содержание ER130

Страница 1: ...User Manual EzRecorder 130 ER130 Nederlands English Français Deutsch Italiano Español Português Pусский Magyar Česky 한국어 ...

Страница 2: ......

Страница 3: ...handing it over to a designated collection point for the recycling of waste electrical and electronic equipment For more information about where to drop off your waste equipment for recycling please contact your household waste disposal service or the shop where you purchased the product Battery Safety Information Use of carbon zinc battery for remote control is strongly recommended Use of other t...

Страница 4: ...ove or enhance its products and to make changes in the content without obligation to notify any person or organization of such changes Please visit avermedia com to get the updates of the operation and use of AVerMedia products AVerMedia is trademark and logo of AVerMedia Technologies Inc Other trademarks used herein for description purpose only belong to each of their companies Picture shown may ...

Страница 5: ...m D Weight 176 g Environmental Condition Operating Temperature 5 40 System Requirements TV monitor with HDMI input TV monitor with 720p or 1080p resolution recommended Video device game console with HDMI output A NTFS formatted hard drive with capacity greater than 500 GB is recommended The supported maximum storage capacity of the hard drive is 2TB A hard drive is highly preferred over a flash dr...

Страница 6: ......

Страница 7: ...ntains the following items If any of the package contents are missing or damaged please contact the distributor immediately EzRecorder 130 Capture Box Power Adapter 5V 2A Power Adapter Outlet Module DC to Mini USB Cable User Manual Remote Control Batteries Included English ...

Страница 8: ... sales regions Please use the power adapter included in this box Using other power sources can cause damage to the device The Capture Box is made for recording and capturing media materials that are legally owned or licensed by the user only Any violation of copyrights or other intellectual property rights is not allowed AVerMedia regularly releases the latest version of firmware for the Capture B...

Страница 9: ... device Record Stop When the device is on press REC once to start the recording and press REC again to stop the recording 2 2 Infrared Sensor When using the remote control aim it at the infrared IR sensor located at the front panel of the unit The remote control must be held at an angle within 30 degrees perpendicular to the IR sensor to function correctly The distance between the remote control a...

Страница 10: ... solid green Recording Flashes red in breathing pace Take a snapshot Flashes red once Unable to record snapshot Flashes red twice No source Flashes red twice Source is available Glows solid green Power off in progress Flashes green Pause recording Glows solid red Record finish in progress Flashes red rapidly Low power Flashes red and green alternately A V pass through Glows solid orange ...

Страница 11: ... 2 Rear View USB slot is for flash drive storage device connection as well as for firmware upgrade via storage device USB hub is not supported There will be no function or reply when connecting the Capture Box to the computer via USB When power is low the Capture Box will not record or take snapshot properly ...

Страница 12: ...ttons Descriptions 1 Press to turn the unit on into stand by mode 2 Press to access the main menu Press again to exit 3 Press the navigation keys to move among options Press OK to confirm a selection Press OK to mark unmark segment in post editing 4 Press to play the latest recorded file or view the last captured image ...

Страница 13: ...safely remove USB disk drive in Menu Follow the on screen instruction 12 Follow the on screen instruction 13 Follow the on screen instruction 14 Not Supported 15 Press to display onscreen information including mode source and audio sources 16 Press to exit the current page and return to the previous page 17 Press to take a snapshot during gameplay or video playback 18 Press to pause the playback P...

Страница 14: ...The EzRecorder 130 supports HDMI input resolutions as follows HDMI 480i 576i 480p 576p 720p 50 60Hz 1080i 50 60Hz 1080p 50 60Hz The EzRecorder 130 records the exact display resolution under most circumstances Exceptions can only be found when the input resolution is set as 1080p Source Resolutions Display Resolutions Recorded Resolutions 1080p 60fps 1080i 60fps 1080p 30fps 1080p 50fps 1080i 50fps ...

Страница 15: ...s 200 hrs 2TB 200 hrs 250 hrs 400hrs HD 1080i Optimal 15 Mbps Good 12 Mbps Maximum Recording Length 10 Mbps 1TB 125 hrs 150 hrs 200 hrs 2TB 250 hrs 300 hrs 400 hrs SD 480i 576i 480P 576P Optimal 7 5 Mbps Good 5 Mbps Maximum Recording Length 3 Mbps 1TB 250 hrs 400 hrs 650 hrs 2TB 500 hrs 800 hrs 1300 hrs Recording with higher video quality takes up more disk space Video Quality Storage Capacity Vid...

Страница 16: ...English 10 4 2 Hardware Installation 4 2 1 Connect to the Source Device and TV When capturing from PS3 make sure the Capture Box is connected to the HDMI 1 port on your TV to avoid a blank screen ...

Страница 17: ...eil de la source vidéo AVANT Come PRIMA cosa alimentare il dispositivo NAJPIERW włącz źródło sygnału Porniţi ÎNTÂI dispozitivul sursă NEJPRVE zapněte zdroj napájení ELŐSZÖR kapcsolja be a videó forrás eszközt Ligue o dispositivo de origem PRIMEIRO ÖNCE kaynak cihazınızı açın 4 2 2 Power On Your Source Device First 4 2 3 Connect to A Wall Outlet for Power Supply ...

Страница 18: ...o Your USB Hard Drive 4 2 5 Turn On the Device To prevent data loss always press F1 in menu to eject USB hard drive safely Please use the power adapter included in the box Using other power sources can cause damage to the device ...

Страница 19: ...ough signal from your source device to TV even when it is Off Go to Menu Settings A V Management A V Pass Thru to enable singal pass through when EzRecorder 130 is Off The default is set Off to meet the 2013 erp Lot 6 power saving regulation ...

Страница 20: ... and resume recording You can skip unwanted footages and resume recording Only the footages you recorded will be saved and those skipped clips will be deleted automatically Press to pause recording Press or to continue recording The Capture Box displays video in real time and standard mode You can change the default real time mode to standard mode Go to Menu Settings Display Mode Refer to Chapter ...

Страница 21: ...ne time Instant Playback Press to play the latest recorded file or view the last captured image Press to stop the playback Press to skip forward 30 seconds Press to skip backward 10 seconds Image Capture During Video Playback Way 1 Press to capture current image Way 2 Step 1 Press to play the video in slow motion 1 2x Press again to view the video frame by frame ...

Страница 22: ...2 Press to capture your desired image Disk Information Press then press OK to display the disk information Press again to hide it Chapter 6 OSD Menu Under the menu you can check and manage both your recorded files and snapshots and customize your preferences 1 Remaining Time for Recording 2 Current Time ...

Страница 23: ...he storage device The upper left corner shows your current default storage device and available remaining recording time 6 1 Media Studio You can check both recordings and snapshots captured by the Capture Box in Media Studio Capture Format Video MP4 Codec H 264 format with AAC audio Image JPEG It is recommended that you view only videos and snapshots that are recorded by the Capture Box Attempt t...

Страница 24: ...nd thumbnail mode Press to go to the next page Press return to the previous page Press to directly access the main menu Video Playback Press or OK to start playing the selected video Press or OK to pause the playback Press or OK to resume playback Press to play the video in slow motion 1 2x Press torewind at 2x 4x 8x 16x 32xspeed Press to fast forward at 2x 4x 8x 16x 32x speed Press to play the fi...

Страница 25: ...name Only video files captured by the Capture Box are supported Snapshots Viewing Press or OK to view the selected image Press or to return Only image files captured by the Capture Box are supported 6 1 1 Post Edit Capture Box Recorded Videos This section shows you how to cut and recombine videos recorded by the Capture Box OSD Menu Descriptions Select a Video Select the file you would like to edi...

Страница 26: ...elect characters numerals or symbols Use the navigations keys to go to the next last character Press F1 to switch between characters numerals and symbols Press to go back to cancel the change you made Press OK to save the edited file name Press to clear all How to Edit An instruction on how to edit a video will be displayed press OK to start editing ...

Страница 27: ... or to search the scene You can also use navigation keys to search scene by specific hour minute and second on the left hand side of the screen Press OK to mark or unmark the scene Step 2 Repeat Step 1 so as to create a segment Press OK to keep or delete the segment Press F1 to switch between Search Scene and Segment search Press F2 to clear all marks you made on the video Press F3 to export the v...

Страница 28: ...me varies by different storage disks Refer export time to the actual use of your storage disk Press OK to export the video Press to continue editing OSD Menu Descriptions Exporting The bar in the middle shows the progress of video exporting and estimated time Click on to cancel exporting Click on to hide the exporting information ...

Страница 29: ... Basic Operation Use to select a preferred category Press OK to make a selection Press to return to the previous page Press to directly access the main menu Press F1 to safely remove the storage device The recommended length of each video should be less than 1 hour The Capture Box is made for record and capture media materials that are legally owned or licensed by the user only ...

Страница 30: ...eal time mode Use to switch between real time and standard mode Real Time Mode Real time mode lets you play games with zero delay No recording or snapshot status will be shown on screen All capture work will run in the background However if any problem occurs during the capturing process OSD will automatically jumps out Press to check OSD and track capture status ...

Страница 31: ... be slight delay in game standard mode is recommended for set top box OSD Menu Descriptions Date and Time Use to select an item for configuration Press OK to confirm Date Format Use to select a preferred date format Press OK to confirm Black screen may occur when calling for Menu in real time mode And the pause varies by TV type ...

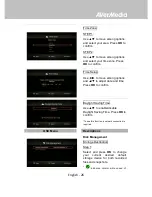
Страница 32: ... options and to adjust date and time Press OK to confirm Daylight Saving Time Use to enable disable Daylight Saving Time Press OK to confirm To use this function a network connection is required OSD Menu Descriptions Disk Management Storage Destination Step 1 Select and press OK to change your current desired default storage device for both recorded files and snapshots indicates normal write speed...

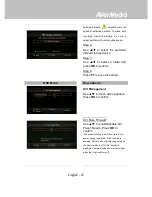
Страница 33: ...press OK to confirm Step 4 Press F1 to save the setting OSD Menu Descriptions A V Management Use to move among options Press OK to confirm A V Pass Through Use to enable disable A V Pass Through Press OK to confirm The default setting is set Off to yield to the power saving regulation If this function is enabled Capture Box still output signal when the Capture Box is off If this function is disabl...

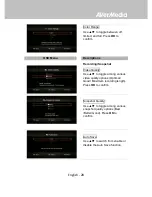
Страница 34: ...rding Snapshot Video Quality Use to toggle among various video quality options Optimal Good Maximum recording length Press OK to confirm Snapshot Quality Use to toggle among various snapshot quality options Best Better Good Press OK to confirm Auto Save Use to switch from enable or disable the Auto Save function ...

Страница 35: ...iptions Watermark Add your selected watermark to your videos You can customize the display of the watermark by setting up the type position and also scale Press to go back to last level Press OK to enter the next level Press F1 to preview the display Watermark Type Use to select from the listed watermark types Press OK to save the change Press to go back to last level ...

Страница 36: ...isplay Scale Use to select the display scale Press OK to save the change Press to go back to last level OSD Menu Descriptions Timer Recording Allows you to schedule the Capture Box to start recording at a particular time and record only a certain length of time Mode Use to select from the listed recording type Press OK to confirm ...

Страница 37: ...re binary package please go to www avermedia com and then enter the model name in Product Search field Firmware file is available on the product information page Step 2 Extract the files by unzipping the package Copy the firmware files to the root directory of your USB storage device and then connect it to the Capture Box Step 3 Press F1 to start the firmware upgrade process Press to abort the ope...

Страница 38: ...roduct name model no and firmware version Press F1 to edit the display name The firmware upgrade process takes up approximately 10 14 minutes Firmware upgrade requires at least 256MB free space of USB 2 0 flash drive If problems encountered during firmware upgrade please clear all the data stored on your USB storage device and repeat the process above NEVER power off the device or unplug the power...

Страница 39: ...t characters Press navigation keys Left and Right to shift to the former or later character Press to switch to the next input menu Press to delete the character Press OK to save the name To change product name go to Menu Product Name The display name will show up when you enable watermark function ...

Страница 40: ......

Страница 41: ...t un jeu ou la lecture d une vidéo 6 Appuyez pour démarrer la lecture du fichier sélectionné Appuyez pour lire le fichier à la vitesse normale 1x lorsque la fonction lecture au ralenti retour ou avance rapide est active 18 Appuyez pour mettre la lecture en pause Appuyez sur OK ou pour reprendre la lecture Appuyez pour mettre l enregistrement en pause 7 Appuyez pour arrêter la lecture Appuyez pour ...

Страница 42: ...inen Schnappschuss während des Spielens oder der Videowiedergabe auf 6 Startet die Wiedergabe der ausgewählten Datei Gibt die Datei bei normaler 1facher Geschwindigkeit wieder wenn Zeitlupe Rücklauf oder Schnellvorlauf aktiv sind 18 Unterbricht die Wiedergabe Mit OK oder setzen Sie die Wiedergabe fort Unterbricht die Aufnahme 7 Beendet die Wiedergabe Beendet die Aufnahme 19 Gibt das Video in Zeitl...

Страница 43: ...mere per avviare la riproduzione del file selezionato Premere per riprodurre il file a velocità normale 1x quando sono attivi slow motion riavvolgimento o avanzamento rapido 18 Premere per interrompere la riproduzione Premere OK o per riprendere la riproduzione Premere per interrompere la riproduzione 7 Premere per arrestare la riproduzione Premere per arrestare la registrazione 19 Premere per rip...

Страница 44: ...eo 6 Presione este botón para iniciar la reproducción del archivo seleccionado Presione este botón para reproducir el archivo a velocidad normal 1x cuando hay movimiento lento rebobinar o cuando el avance rápido está activo 18 Presione este botón para pausar la reproducción Presione u OK Aceptar para reanudar la reproducción Presione este botón para pausar la grabación 7 Presione este botón para d...

Страница 45: ... jogo ou reprodução de ví deo 6 Pressione para começar a reproduzir o arquivo selecionado Pressione para reproduzir o arquivo em velocidade 1x normal quando movimento lento retroceder ou avançar rapidamente está ativo 18 Pressione para pausar a reprodução Pressione OK ou para retomar a reprodução Pressione para pausar na gravação 7 Pressione para parar a reprodução Pressione para parar a gravação ...

Страница 46: ...ведение файла с нормальной скоростью 1x в режимах замедленного воспроизведения обратной или прямой перемотки 18 Пауза при воспроизведении Для возобновления воспроизведение нажмите кнопку OK 7 Остановка воспроизведения Остановка записи 19 Воспроизведения видео с замедленной скоростью 1 2x Нажмите повторно для перехода в режим покадрового воспроизведения 8 Обратная перемотка скорость 2x 4x 8x 16x 32...

Страница 47: ...a tartva sorozat kép készí tés másodpercenként két felvételes sebességgel 6 Kiválasztott videó lejátszása Nyomja meg ha normál 1x sebességgel szeretné nézni a videót amikor lassú lejátszás előre vagy hátra tekerés történik 18 Lejátszás szüneteltetése Nyomjon OK t vagy t a lejátszás folytatásához Nyomja meg felvétel szünethez 7 Lejátszás megállí tása Felvétel megállí tása 19 Videó lassú lejátszása ...

Страница 48: ... držením stisknutého tlačítka zachycuje více snímků obrazovky najednou při rychlosti dvou snímků za vteřinu 6 Přehrání zvoleného souboru Stisknutím v průběhu zpomaleného nebo zrychleného přehrávání změníte rychlost na standardní 1x 18 Zastavení přehrávání Stiskem OK nebo přehrávání obnovíte Stisknutí m se pozastavínahrávání 7 Ukončení přehrávání záznamu Ukončení nahrávání 19 Přehrávání videa ve zp...

Страница 49: ...스냅샷을 촬영합니다 누르고 있으면 초당 2 개의 이미지를 촬영하는 속도로 여러 장의 스냅샷을 촬영합니다 6 선택한 파일의 재생을 시작합니다 느린 동작 되감기 또는 빨리 감기가 작동 중일 때 눌러 파일을 보통 1x 속도로 재생합니다 18 재생을 일시정지합니다 OK 확인 또는 을 눌러 재생을 다시 시작합니다 7 재생을 정지시킵니다 녹화를 정지시킵니다 19 동영상을 느린 동작 1 2x 으로 재생합니다 다시 누르면 프레임 모드로 전환됩니다 8 되감습니다 2x 4x 8x 16x 32x 20 빨리 감습니다 2x 4x 8x 16x 32x 9 이전 페이지로 돌아갑니다 21 다음 페이지로 이동합니다 10 동영상 스냅샷 화질 조정 화면을 표시합니다 다시 누르면 종료합니다 22 선택한 파일 일정을 삭제합니다 11 화면 지시사항...

Страница 50: ......

Страница 51: ......

Страница 52: ...Model No ER130 P N 300AER130D5P M a d e i n Ta i w a n ...

Отзывы: