Avermedia AVerDiGi EXR 6004 WiFi Скачать руководство пользователя страница 6

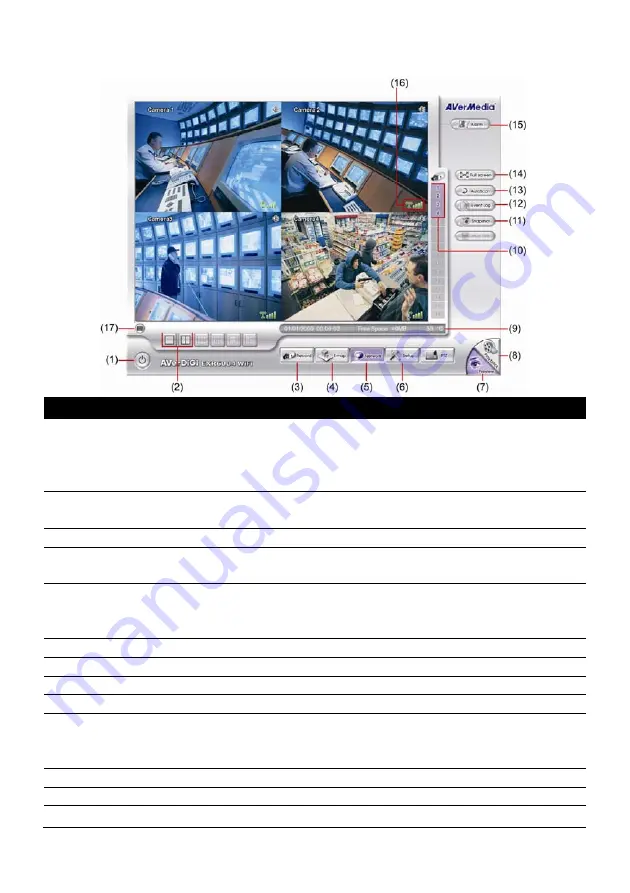
Familiarizing the Buttons in Preview Mode 


Name 

Function 

(1) Logout 

Reboot:

 To restart the DVR system. 

Power Off:

 To shutdown the DVR system. 

Login: 

To login DVR system with different user account. 

Cancel:

 Close the logout dialog box. 

(2) Split Screen Mode 

Select from 2 different split screen types to view all the camera, or one 

camera on a single screen. 

(3) Record 

Start/stop server and client site video recording. 

(4) EMap 

Display the map in each area, and the location of camera/ sensor/ relay 

and the warning. 

(5) Network 

Enable/disable remote system access. This feature allows you to access 

DVR server from a remote location via internet connection. The default is 

disabled. 

(6) Setup 

Configure the system settings.   

(7) Preview 

Switch to Preview mode. This allows you to view live camera display. 

(8) Playback 

Switch to Playback mode. This allows you to view the recorded video file. 

(9) Status bar 

Display the recoding date, time and hard disk space of DVR unit. 

(10) Camera ID 

Show the number of cameras that are being viewed. When you are in 

single screen mode, click the camera ID number to switch and view other 

camera. 

(11) Snapshot 

Capture and save the screen shot in *.jpg format.   

(12) Event log 

Show the record of activities that take place in the system. 

(13) AutoScan 

Start/Stop video screen cycle switch. 

Содержание AVerDiGi EXR 6004 WiFi

Страница 1: ...unit of the Wireless IP camera 1 or 4 in package may vary that depends on the model of DVR user has purchased 1 Wireless IP camera unit 2 Power Adapter The power cord varies depending on the standard...

Страница 2: ...by yourself Follow the steps to install the hard disk 1 Loosen all screws 2 Push the cover backward and lift 3 Secure the brackets on the hard disk 4 Connect the end of the SATA cable and the power co...

Страница 3: ...t LAN ports can connect with the IP cameras and allows user to remote access the DVR server The USB ports can connect the mouse and keyboard for more easily to operate DVR server Follow the illustrati...

Страница 4: ...button of IP camera until the power LED turns off about 5 seconds and then the LED will start to blink at every 2 seconds And then wait about 120 seconds for IP camera to communicate with the DVR uni...

Страница 5: ...Click System Click Switch to Advance Setup if the setup mode is in Basic Setup mode 3 Click Add to call out Disk Management windows Select the hard disk and click Format 4 And then click Start to for...

Страница 6: ...access This feature allows you to access DVR server from a remote location via internet connection The default is disabled 6 Setup Configure the system settings 7 Preview Switch to Preview mode This...

Страница 7: ...row icon When you switch to full screen in multiple screen mode Left click to toggle to only display one of the video in the multiple screen mode or all 15 Alarm Alert and display warning info 16 WiFi...

Страница 8: ...ame i The Hour buttons represent the time in 24 hour clock The blue bar on top of the hour button indicates that there is a recorded video file on that period of time While the red bar indicates that...

Страница 9: ...in dvr format to external USB storage device Backup Save the playback file to USB device or DVD ROM disk 11 Segment Keep a portion of the recorded video 1 Use the Playback Control buttons or drag the...

Страница 10: ...series of frames appear by date click on the frame to display another series of frames and search by every Hour of that date every Minutes of that hour and every Seconds of that minute Using and to go...

Отзывы: