background image

16 


WARNING


  To reduce the risk of fire or electric shock, do not expose this appliance to 

rain or moisture. Warranty will be void if any unauthorized modifications 
are done to the product. 

  Do not drop the camera or subject it to physical shock. 

  Use the correct power supply voltage to avoid the damaging camera. 

  Do not place the camera where the cord can be stepped on as this may 

result in fraying or damage to the lead or the plug. 

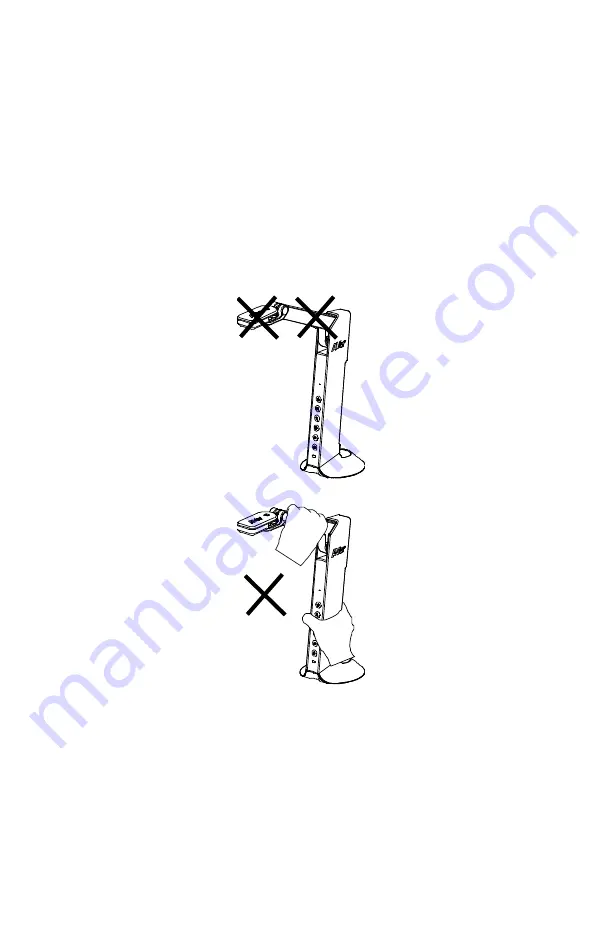
  Hold the bottom of the camera with both hands to move the camera. Do 

not grab the lens or arm to move the camera. 


  Do not pull the camera arm and camera part in the opposite direction. 


COPYRIGHT


©2020 AVer Information Inc. All rights reserved. 


Содержание M11-8M

Страница 1: ...M11 8M Instruction Manual ...

Страница 2: ...Control Panel 2 OSD Mode 3 Compound Key 3 LED Indicator 3 Device Connection 4 Power Connection to Wall Outlet 4 Power Connection to PC Laptop 5 HDMI Connection 6 USB Connection 6 Insert a Micro SD Card 7 Operate the Camera with AVerTouch 8 Playback Mode 9 Switch to Playback Mode 9 ...

Страница 3: ...ayback Menu Buttons 10 Slid Show 10 Interval 11 Storage 11 Delete File 11 Delete All 11 Using the Camera 12 Camera Head Angle 12 Camera Body Angle 12 Shooting Area 13 Object Position 14 Storage the Camera 14 Specification 15 ...

Страница 4: ...ents The items below are included with this product If any item is missing contact the dealer from whom you purchased this product M11 8M unit USB Cable QR Code Card Optional Accessories Carrying Bag Anti glare Sheet ...

Страница 5: ...DMI Out Port Function Buttons Control Panel Button Function Lamp on off Press and hold 3 seconds to call out OSD menu Zoom in Zoom out Rotate 0 180 Press and hold 3 seconds to freeze the screen Un freeze press and hold 3 seconds again Auto focus Press and hold 3 seconds to start recording To stop recording press and hold 3 seconds again Power on off ...

Страница 6: ...election enter Compound Key Press keys to operate the compound key function Button Function Back to factory default settings Capture image Note For Recording and Capture please change to Power Supply only mode LED Indicator Power Solid green Power on Solid red Standby Flashing red The camera is in start up process ...

Страница 7: ...ded USB cable Note Use the USB cable which included in package connects to mini USB Power port of M11 8M with USB power adapter not included to wall outlet User needs to purchase a 5V 1A USB power adapter not included to connect the USB cable to wall outlet When the camera is start up the power indicator is in flashing red 1 ...

Страница 8: ... cable which included in package connects to mini USB Power port of M11 8M with laptop PC When the camera is start up the power indicator is in flashing red USB power requirement of M11 8M is USB 3 0 5V 0 9A For Storage Format Capture Recording and Playback functions please change to Power Supply Only mode 1 ...

Страница 9: ...M to HDMI display with HDMI output port HDMI cable Not included Wall Outlet USB Power adapter Not included USB cable 1 Connect USB flash drive to USB port to save the capture and recording file Note The supported USB flash drive maximum is 32G FAT32 ...

Страница 10: ...7 Insert a Micro SD Card 1 Insert the card to micro SD card slot Note Micro SD card can storage capture images and recording files The supported micro SD card capacity maximum is 32G FAT32 ...

Страница 11: ...all the AVerTouch application AVerTouch USB cable AVerTouch Note Download AVerTouch application at https averusa com education support avertouch Please set the camera to USB mode Go to OSD menu Setting USB to PC USB Camera 2 Open AVerTouch application click to connect the camera ...

Страница 12: ...enu 2 Use and button move to Setting USB to PC Power Supply Only 3 Use and button move to Playback selection 4 Then press confirm the selection and switch to playback mode 5 In Playback mode use and buttons to select image or video to view manually To play a video press button to start playback To pause playback press button again Press to stop playback ...

Страница 13: ...ons Button Function Image video selection Fast forward while playback video Back to 1x playback speed Zoom in image Zoom out image Play video Press and hold to pause while video is playback Stop play video Slid Show To automatically play all capture images and recorded videos but videos only display files and will not play video contents ...

Страница 14: ...ce of the images and videos Delete File Permanently delete the image or video in selected A Warning Message will appear Select Yes to continue and No to cancel the deletion Delete All Permanently delete all the data in selected memory source A Warning Message will appear Select Yes to continue and No to cancel the deletion ...

Страница 15: ... the camera head as figure shown CAUTION To avoid damage the camera head hold the edge of the camera head to rotation the camera head 9 0 4 5 2 5 Camera Body Angle CAUTION To avoid damage the camera unit DO NOT pull the arm angle over 107 1 0 7 ...

Страница 16: ...13 Shooting Area When camera position is 342 4mm high the shooting area will be A3 size 342 4mm 420mm 315mm A3 ...

Страница 17: ...14 Object Position The icon on top of camera head can help user to place objects in a positive direction Storage the Camera ...

Страница 18: ...s lamp off USB Bus Power Yes via mini USB port Lamp Type LED light USB USB2 0 Type A x1 5V 0 1A USB flash drive FAT32 32GB USB Type mini B x 1 Power USB Output 3168 x 2376 1920 x 1080 1280 x 720 1024 x 768 800 x 600 640 x 480 HDMI Output 1920 x 1080 1280 x 720 720 x 480 Image Capture 120 pictures 2 megapixel Built in MIC Yes Micro SD card slot FAT 32 32GB Operating 360 4mm H 116 7mm W 303 4mm D Fo...

Страница 19: ...al shock Use the correct power supply voltage to avoid the damaging camera Do not place the camera where the cord can be stepped on as this may result in fraying or damage to the lead or the plug Hold the bottom of the camera with both hands to move the camera Do not grab the lens or arm to move the camera Do not pull the camera arm and camera part in the opposite direction COPYRIGHT 2020 AVer Inf...

Страница 20: ...use undesired operation Warning This is a class A product In a domestic environment this product may cause radio interference in which case the user may be required to take adequate measures THE MARK OF CROSSED OUT WHEELED BIN INDICATES THAT THIS PRODUCT MUST NOT BE DISPOSED OF WITH YOUR OTHER HOUSEHOLD WASTE INSTEAD YOU NEED TO DISPOSE OF THE WASTE EQUIPMENT BY HANDING IT OVER TO A DESIGNATED COL...

Страница 21: ...and instruction manual download please visit https www averusa com education support Contact Information AVer Information Inc www averusa com 668 Mission Ct Fremont CA 94539 USA Toll free 1 877 528 7824 Local 1 408 263 3828 Support usa aver com V1 00 ...

Страница 22: ......

Отзывы: