background image

12 


Manual W.B Blue: 

cette fonction ne s'affiche que si vous avez sélectionné 

Manual

  sous 

White 

Balance Setup

. réglez la valeur (de 0 à 255).


Manual W.B Red: 

Cette fonction ne s'affiche que si vous avez sélectionné 

Manual

  sous 

White 

Balance Setup

. réglez la valeur (de 0 à 255).


Focus: 

réglez la valeur de mise au point (de 0 à 1023).


Incrustation (Picture In Picture) 

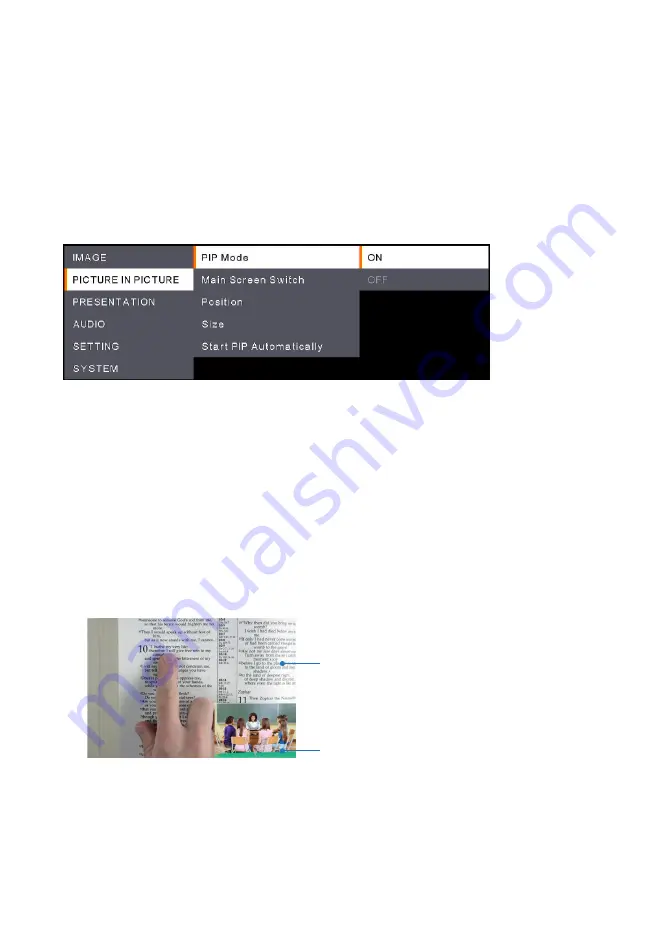
La fonction  Picture In Picture (PIP) permet d'afficher sur l'écran deux flux de caméra : celui de l'A30 
et celui d'une caméra USB. Elle sert au présentateur pour afficher en même temps le contenu de 
matériels didactiques et le présentateur ou le public. 


PIP Mode: 

activation/désactivation manuelles du mode   

PIP

. Pour activer manuellement le 

mode PIP: 

1.  Connectez une caméra USB au port USB type   A de l'A30. 
2.  Allez au menu OSD > 

Picture in Picture

 > 

PIP Mode

 et sélectionnez 

On 

(activé). Le mode   

PIP devrait s'afficher sur l'écran. 

3.  Vous pouvez alors commuter la vue principale, ou régler la position et la taille de la vue 

secondaire. 

4.  Pour désactiver le mode PIP, allez au menu OSD > 

Picture In Picture

 > 

PIP mode

 et 

sélectionnez 

Off 

(désactivé). 


Main Screen Switch: 

Les options sont 

A30

 ou 

External Source

 (une caméra connectée au port 

USB type A de l'A30).   

Vue Principale

Vue Secondaire


Position: 

sélectionnez une position pour la vue secondaire. Les options sont 

Bottom Left

Top 

Left

Top Right

Bottom Right 

ou 

Manual

. En sélectionnant 

Manual

, vous pouvez positionner la 

vue secondaire manuellement. Sélectionnez la position à l'aide des boutons 

 de la 

télécommande.


Size: 

sélectionnez une taille pour la vue secondaire. Les options sont 

Large

 ou 

Small

.


Содержание AVerVision A30

Страница 1: ...AVerVision A30 Universal Camera User Manual ...

Страница 2: ...uld void the user s authority to operate this equipment This device complies with part 15 of the FCC Rules Operation is subject to the following two conditions 1 This device may not cause harmful interference and 2 this device must accept any interference received including interference that may cause undesired operation Warning This is a class A product In a domestic environment this product may ...

Страница 3: ...rmation Inc Other trademarks used herein for description purpose only belong to each of their companies COPYRIGHT 2022 AVer Information Inc All rights reserved September 1 2022 All rights of this object belong to AVer Information Inc Reproduced or transmitted in any form or by any means without the prior written permission of AVer Information Inc is prohibited All information or specifications are...

Страница 4: ...s illustrated below Remote Control Battery Safety Information Store batteries in a cool and dry place Do not throw away used batteries in the trash Properly dispose used batteries through specially approved disposal methods Remove the batteries if they are not in use for long periods of time Battery leakage and corrosion can damage the remote control Dispose of batteries safely and through approve...

Страница 5: ...F No 157 Da An Rd Tucheng Dist New Taipei City 23673 Taiwan Tel 886 2 2269 8535 USA Branch office AVer Information Inc Americas https www averusa com 668 Mission Ct Fremont CA 94539 USA Tel 1 408 263 3828 Toll free 1 877 528 7824 Technical support support usa aver com Europe Branch office AVer Information Europe B V https www avereurope com Westblaak 134 3012 KM Rotterdam The Netherlands Tel 31 0 ...

Страница 6: ...2 Overview 2 Function Buttons 3 Operation Angles 4 Connections 5 Remote Control 6 Auto Rotate 8 Camera Setup 9 OSD Menu 9 Image 10 Picture In Picture 11 Presentation 12 Audio 13 Setting 14 System 15 OSD Menu Tree 16 Specification 18 Troubleshooting 20 ...

Страница 7: ... Unit Power Adapter Power Cord 12V 2A Remote Control USB 2 0 Type C to Type A Cable 1 8M QR Code Card Warranty Card The power cord will vary depending on the standard power outlet of the country where it is sold Only for Japan ...

Страница 8: ...tton Note 3 12 LED Lamp 13 Camera Lens 14 Foldable Arm 15 Function Buttons 16 Tripod Screw Hole Screw 1 4 20 not included Notes 1 The USB Type A Port can be used to connect to an USB camera or an external storage USB camera Connect an USB camera to perform the PIP function External storage Support up to 32GB FAT32 USB storage for capturing images and recordings 2 To power on the unit use the suppl...

Страница 9: ...ut Press and hold the button to zoom out continuously Short press to turn on off the LED lamp Long press for 3 seconds to manually rotate 0 180 of the live view Short press to volume up Press and hold the button to increase the volume continuously Short press to volume down Press and hold the button to decrease the volume continuously Simultaneously press the two buttons to turn on off the Auto Ro...

Страница 10: ...or 3 seconds to bring up the OSD menu To exit the OSD menu long press the button again Back to previous level page Up The Up Down Left Right buttons can be used when Selecting items in the OSD menu If Manual is selected for PIP mode use these buttons to select a position of the Sub View window Performing operations during Presentation function setup Down Left Right Enter Operation Angles ...

Страница 11: ...when an external microphone is connected Because video conferencing software such as Google Hangouts Windows Skype Mac or Teams Windows and Mac can automatically adjust volume the user might experience randomly unstable volume while using the unit Note The audio can be output from the built in speaker 4 For USB device connection You can connect to an USB camera or an external storage USB camera Co...

Страница 12: ... Visor button to enter the Visor setup page in OSD menu 2 Select On and press to enable Visor the upper left part of the camera view will be exposed 3 Use the buttons to reveal more of the covered camera view 4 To exit Visor mode press the Visor button again 6 Rotate Rotate the image by 0 180 7 Menu Enter or exit the OSD menu 8 Select options in OSD menu Enter the previous next level page in OSD m...

Страница 13: ...ss the Spotlight button again 16 Split Screen Divide the screen into two One side displays the camera live view and the other side displays the captured image or recorded video thumbnails from the USB flash drive The split options include Left Right Top and Bottom After selecting a split option use to select a capture image or video Press to display the image or playback the video 17 Mode Press to...

Страница 14: ...rsal Camera can be used as a document camera or a Webcam the Auto Rotate function is able to ensure the live images to be displayed with the right orientration which will automatically flip the images when they appear upside down Below are 2 scenarios for your reference Scenario 1 When a presenter is shooting on a document at the beginning and then turn the Camera Head upward to shoot him herself ...

Страница 15: ...d Remote Control or the Function Buttons on the unit to operate the OSD Menu The content in this chapter describes the OSD operations using the supplied Remote Control Press the Menu button on the Remote Control to bring up the OSD menu and Use to select among pages or options Press to make a selection or enter submenu Use to adjust the setting or make a selection Press to confirm settings ...

Страница 16: ...on to automatically rotate 0 180 of the images Exposure Setup Select an option Auto Select to automatically adjust the exposure setting Manual Select to manually adjust the exposure setting Adjust the Manual Exposure below Manual Exposure This function only appears when Manual is selected in Exposure Setup Adjust the exposure value 0 99 White Balance Setup Select an option Auto Select to automatic...

Страница 17: ...f Main Screen Switch Select a video source to be displayed on the Main View Options include A30 and External Source camera connected to the USB Type A port of A30 Main View Sub View Position Select a position for the Sub View Options include Bottom Left Top Left Top Right Bottom Right and Manual If Manual is selected you can position the Sub View manually Use the buttons on the Remote Control to s...

Страница 18: ... exposed 2 Use the buttons on the Remote Control to reveal more of the covered part 3 To disable the Visor function press the Visor button on the Remote Control Split Screen Divide the screen into two One side displays the camera live view and the other side displays the captured image or recorded video thumbnails from the USB flash drive The split options include Left Right Top and Bottom After s...

Страница 19: ...ion function Echo Cancellation Enable or disable the Echo Cancellation function Microphone Volume Adjust the microphone volume 0 32 Speaker Volume Adjust the speaker volume 0 15 Audio Input Source Select an audio input source Options include MIC In and LINE In ...

Страница 20: ...automatically detect whether an USB drive has been connected If an USB drive is connected the unit will automatically assign USB Drive to store data 2 The internal Embedded storage can only store images with a maximum of 200 frames If you want to store videos please connect an USB drive to the unit Format To set up this funcion remove the USB cable from the unit first You can format the Embedded o...

Страница 21: ...ntrast and etc as a profile Up to 3 profiles can be configured To do this after configuring all the settings select a profile and then press the button on the Remote Control to save the settings as a profile To clear a setup profile refer to Recall Setting below Recall Setting You can erase the settings of the setup profiles in the Save Setting above To do this select a profile and then press the ...

Страница 22: ...nce Setup Auto Manual Manual W B Blue This function only appears when Manual is selected in White Balance Setup 0 255 Manual W B Red This function only appears when Manual is selected in White Balance Setup 0 255 Focus 0 1023 Picture In Picture PIP Mode On Off Main Screen Switch A30 External Source Position Bottom Left Top Left Top Right Bottom Right Manual Size Large Small Start PIP Automatically...

Страница 23: ...selected in Capture Type 1 600 sec Storage Embedded USB Drive Format Embedded USB Drive USB to PC Camera Storage USB Streaming Resolution Max to 4K Max to 1080P Flicker 50Hz 60Hz System Language English Traditional Chinese Japanese German French Spanish Simplified Chinese Italian Russian Indonesia Finland Polish Output Display 3840x2160 60 3840x2160 30 1920x1080 1280x720 1024x768 Backup USB Drive ...

Страница 24: ...840x2160 1920x1080 1280x720 1024x768 Optical Mechanism Lens Rotation mechanical Right 90 with rotation base Left 90 with rotation base Shooting Area A3 or above Zoom 23x digital zoom Focus Auto focus manual via software Interface HDMI Output 1 support up to 4K display output USB Type A Port 1 for USB flash drive and USB camera streaming input USB Type C Port 1 connect to PC for USB camera streamin...

Страница 25: ...pport FAT32 32GB USB storage Auto Rotation Yes Audio Function AEC background noise suppression technology AI noise reduction General Power Source 100 240VAC 50 60Hz 12VDC 2A Power Input Lamp on 12VDC 1 25A 15W max Lamp off 12VDC 1 21A 14 5W max Dimensions W x D x H Operating 96 9 x 239 04 x 348 4mm Folded 96 9 x 98 1 x 184 5mm Net Weight 737g Specifications are subject to change without prior noti...

Страница 26: ...display device and the unit to sync up Wait for around 4 to 7 seconds until you see the camera image on the screen The picture on the presentation screen is distorted or the image is blurry 1 Reset all changed settings if any to the original manufacturer default setting Press MENU then go to SYSTEM Default and select YES in the OSD menu 2 Use the Brightness and Contrast menu functions to reduce th...

Страница 27: ...AVer A30 多功能攝影機 使用手冊 ...

Страница 28: ...情況下 使用者會被要求 採取某些適當的對策 警告 如果更換的電池類型不正確 可能會有爆炸的風險 應使用正確安全的方法丟棄電池 遙控器電池安全資訊 請將電池存放在涼爽與乾燥的位置 不要將電量用盡的電池棄置在家庭廢棄物中 請將電池棄置在特定回收處 或送回原 購買的商店 如果長時間不使用電池 請將其取出 電池漏液與腐蝕可能會損壞遙控器 請以安全 方式棄置電池 不可混用新舊電池 不可混用不同類型的電池 鹼性 標準 碳鋅 或可充電 鎳鎘 電池 不可將電池棄置於火源中 請勿嘗試讓電池端子短路 ...

Страница 29: ...另行通知 若因使用或不當使用本產品或本文 導致任何直接 間接 特殊 意外或後續損害 即使本公司已 事先告知此類損害之可能性 亦不負任何賠償責任 商 標 AVer 為圓展科技股份有限公司之商標 因本內容之描述出現的商標分屬個別公司所有且均受智慧 財產權相關法令保護 本文內所有提及之產品或企業名稱僅供識別與說明用途 且為各自擁有者之 商標或註冊商標 著 作 權 2022 圓展科技 版權所有 2022 年 6 月 30 日 本內容相關權利係圓展科技股份有限公司所有 任何人未得事先書面同意不得就本內容為一部或全 部之重製 改作 或任何型式之散布行為 圓展科技股份有限公司保留變更產品規格及內容的權利 無須另為通知 ...

Страница 30: ...勿將機器放在容易被踩到電源線的地方 否則可能會導致電源線或插頭磨損或損 壞 下圖為機械臂可彎曲角度之圖示 限用物質含有情況標示資訊參考下列網址 https tw aver com page RoHS 支援 軟體和使用手冊下載 請連結下面網址 https www aver com download center 技術問題 技術支援 請連結下面網址 https www aver com technical support 連絡資訊 圓展科技股份有限公司 https www aver com 23673 新北市土城區大安路 157 號 8 樓 電話 886 2 2269 8535 ...

Страница 31: ...1 目錄 產品介紹 3 功能按鍵 4 轉動角度 5 連接設備 6 遙控器 7 自動旋轉 9 OSD 選單 10 影像 Image 11 子母畫面 Picture In Picture 12 簡報 Presentation 13 音訊 Audio 14 設定 Setting 15 系統 System 16 OSD 選單列表 17 規格 19 常見問題 21 ...

Страница 32: ...2 包裝內容物 A30 多功能攝影機 變壓器 電源線 12V 2A 遙控器 USB 2 0 連接線 Type C 轉 Type A 1 8 公尺 產品資訊卡 保固卡 變壓器類型視販售國家之標準電源插座而異 只在日本使用 ...

Страница 33: ...6x6 公尺 5 音訊輸入 3 5mm Line in 麥克風輸入 6 防盜插槽 7 USB Type A 埠 註 1 8 USB Type C 埠 9 直流電源連接孔 註 2 10 HDMI 輸出連接埠 11 電源鍵 註 3 12 LED 燈 13 攝影機鏡頭 14 機械臂 15 功能鍵 16 三腳架螺絲孔 螺絲 1 4 20 需自行購買 註 1 您可將一台 USB 攝影機或是外接式儲存裝置 插到 USB Type A 埠 USB 攝影機 插上一台 USB 攝影機 便能使用子母畫面功能 外接式儲存裝置 USB 隨身碟最高支援 32GB FAT32 可儲存擷取的影像或是錄製的視訊 2 將電源變壓器與電源線的一端接到攝影機 另一端接到電源插座 此時 LED 指示燈會恆亮紅光 3 按下電源鍵 在啟動的過程中 LED 指示燈會閃爍紅光 啟動完成便會恆亮藍光 再次按下電源鍵便 能關機 此時 LED...

Страница 34: ...能敘述 短按一下可自動對焦 長按三秒鐘可開啟 OSD 選單 再長按一次可離開 OSD 選單 短按一下可放大影像 長按此鈕便能持續放大影像 短按一下可縮小影像 長按此鈕便能持續縮小影像 短按一下可打開 關閉 LED 燈 長按三秒鐘可手動翻轉即時影像 0 180 短按一下可調高音量 長按此鈕便能持續調高音量 短按一下可調低音量 長按此鈕便能持續降低音量 同時按下此二鍵便能開啟 關閉自動旋轉功能 自動旋轉功能能確保即時影像的 影像方向是正確的 當影像上下顛倒時 會自動旋轉影像 詳請見 自動旋轉 章節 功能按鍵 ...

Страница 35: ... OSD 選單操作 您可透過功能鍵操作 OSD 選單 您可至 OSD 選單 章節詳讀 OSD 選單功能 按鍵 功能敘述 長按三秒鐘可開啟 OSD 選單 再長按一次可離開 OSD 選單 回到上一層 往上 往上 往下 往左 往右鍵可使用於 選擇 OSD 選單的功能項目 倘若在 PIP 模式下選擇了 Manual 則可使用此四鍵調整子視窗的位 置 可使用此四鍵設定簡報功能 往下 往左 往右 確認選擇 轉動角度 ...

Страница 36: ...最大輸入電壓 1Vrms 麥克風最大輸入電壓 50mVrms 電壓 2 5 0 5 V 若接上外接式麥克風 則內建麥克風會停用 由於 Google Hangouts Windows Skype Mac Teams Windows 與 Mac 等視訊軟體會自 動調整音量 音量有可能會有自動變動的情況 註 內建式喇叭能輸出音訊 4 連接 USB 裝置 您可連接 USB 攝影機或是外接式儲存裝置 USB 攝影機 連接 USB 攝影機便能使用 PIP 功能 外接式儲存裝置 最高支援 32GB FAT32 USB 儲存裝置 可儲存擷取的影像與錄製的視訊 5 連接 USB 纜線 將所附的 USB 2 0 Type C 轉 Type A 纜線的一端插到攝影機上 另一端插到桌上型電腦 筆記型 電腦後 便能搭配 Teams 或 Skype 等視訊會議軟體使用 ...

Страница 37: ...住某部份的攝影機畫 面 只露出欲展示的畫面 請依下列步驟啟動遮罩功能功能 1 按下 Visor 鍵便能進入 OSD 選單的遮罩功 能設定頁面 2 選擇 開啟 接著按下 便能啟用 遮 罩功能 您會看到攝影機畫面的左上角 3 您可使用 鍵來調整欲展示的 攝影機畫面的範圍 4 再次按下 Visor 鍵便能退出遮罩功能模式 6 Rotate 在攝影機模式中將影像旋轉 0 或 180 7 Menu 開啟與離開 OSD 選單 8 在 OSD 選單中選擇選項 進到 OSD 選單的 上一層或下一層 在縮放模式下 您可使用 鍵 來調整攝影機即時影像的範圍 在播放模式下 您可使用 及 來增減音量 在播放模式下 您可使用 及 來倒轉或快 轉影像 9 Auto Focus 可自動調整焦距 10 Zoom 在攝影機即時影像模式 分割畫面模式 即時影 像 以及播放模式 影像 您都能用 Zoom 鍵來調整影像大小 11...

Страница 38: ...燈功能設定頁面 2 選擇 開啟 並按下 便能啟用聚光燈 功能 您將看到攝影機畫面的中心區域 3 如有需要 您可使用遙控器上的 鍵來調整顯示的範圍 4 再次按下 Spotlight 鍵便能退出聚光燈功 能模式 16 Split Screen 此功能將畫面一分為二 二分割畫面中的一個 顯示攝影機的即時畫面 另一個播放 USB 隨 身碟內儲存的擷取圖像或是錄製視訊之縮圖 分割畫面的選項有左 右 上及下 選擇分割畫面的選項後 您可使用遙控器上的 鍵來選擇擷取的影像或視訊 接著按下 播放之 17 Mode 按下 MODE 鍵便能切換於一般模式 高畫質 模式及運動模式 18 Timer 按下 Timer 鍵 您便能進入 OSD 選單的簡報 計時器設定頁面 您可選擇開始 暫停 停止來 控制計時器 您可選擇計時器間隔來設定計時 器間隔 19 確認選取 進入 OSD 選單的子選單 播放或暫停播放視訊 播放擷...

Страница 39: ...像 章節的自動旋轉相關敘述 當攝影機頭的角度小於 30 度時 即時影像畫面會旋轉到 0 當攝影機頭的角度大於 60 度時 即時影像畫面會旋轉到 180 A30 多功能攝影機既是一台實物攝影機 亦能作為網路攝影機使用 自動旋轉功能會在即時影像上下顛 倒時 自動旋轉即時影像 以確保即時影像的方向正確 以下列出兩種常用情境 情境 1 啟用自動旋轉功能後 講者可以先拍攝文件 接著將攝影機頭往上翻來拍攝講者自己 攝影機 便會自動將即時影像上下旋轉 情境 2 啟用自動旋轉功能後 講者可以先拍自己 將著將攝影機頭往下壓來拍攝文件 攝影機便會自 動將即時影像上下旋轉 ...

Страница 40: ...單 您可透過 OSD 選單設定攝影機的所有功能 將攝影機以 HDMI 傳輸線連接到螢幕或是電視後 您便可使用產品所附的遙控器來操作 OSD 選單 您 亦可使用攝影機上的功能鍵來操作 OSD 選單 本章節闡述如何使用產品包裝所附的遙控器來操作 OSD 選單 按下遙控器上的 Menu 鍵便能開啟 OSD 選單 按 可來回於 OSD 選單上的各個頁面與選項 按 以選取所需功能 或進入子選單 使用 可調整設定或進行選取 按 以改變設定 ...

Страница 41: ...或關閉此功能 開啟後便能將影像往右或左翻轉 Auto Rotate 您可開啟或關閉此功能 開啟後影像會自動旋轉 0 180 Exposure Setup 選擇曝光設定 Auto 自動調整曝光設定 Manual 手動調整曝光等級 請於下一個功能 Manual Exposure 進行設定 Manual Exposure 需先將 Exposure Setup 功能設定為 Manual 後 才能設定此功能 手動調整 曝光等級 範圍從 0 到 99 White Balance Setup 選擇任一功能 Auto 自動調整白平衡 Manual 手動調整白平衡 可使用以下兩個功能來調整藍色與紅色色階 Manual W B Blue 需先將 White Balance Setup 功能設定為 Manual 後 才能設定此功能 色階 可調整範圍值為 0 255 Manual W B Red 需先將 Whit...

Страница 42: ...In Picture PIP Mode 並選擇 Off Main Screen Switch 任選 A30 或 External Source 插到 A30 的 Type A 埠的攝影機 為主畫面的 影像來源 Main View Sub View Position 您可任選一處放置子畫面 Bottom Left Top Left Top Right Bottom Right 或 Manual 如您點選 Manual 您可使用遙控器上的 鍵來調整子畫面的位置 Size 您可任選 Large 或 Small 來決定子畫面的大小 Start PIP Automatically 開啟此功能後 如您將一台 USB 攝影機接到 A30 則 A30 會自動進入 PIP 模式 使用步驟如下 1 於 OSD 選單選擇 Picture In Picture PIP Mode On 2 於 OSD 選單選擇 P...

Страница 43: ...示的畫 面 請依下列步驟啟動 Visor 功能 1 於 OSD 選單選擇 Presentation Visor On 您會看到攝影機畫面的左上角 2 您可使用遙控器上的 鍵來調整欲展示的攝影機畫面的範圍 3 您可按下遙控器上 Visor 鈕來取消 Visor 功能 Split Screen 此功能將畫面一分為二 二分割畫面中的一個顯示攝影機的即時畫面 另一個播放 USB 隨身碟中儲存的擷取影像或是視訊縮圖 分割畫面的選項有 Left Right Top 及 Bottom 選擇分割畫面的選項後 您可使用遙控器上的 鍵來點選儲存的影像或視訊 接著按 下 播放之 Timer 您可點選 Start Pause 或 Stop 來控制計時器 如有需要 您可在下一個功能設定 Timer Interval 如您點選 Start 計時器會顯示在即時影像的中間偏上處 如您欲暫停或停止 Timer 您 可先按下...

Страница 44: ...4 音訊 Audio Noise Reduction 開啟或關閉 Noise Reduction 功能 Echo Cancellation 開啟或關閉 Echo Cancellation 功能 Microphone Volume 調整麥克風音量 0 32 Speaker Volume 調整喇叭音量 0 15 Audio Input Source 從 MIC In 與 LINE In 中 任選一音源輸入 ...

Страница 45: ...定此功能 選擇一個儲存空間來儲存擷取的 影像或是錄製的視訊 您可選擇 Embedded 或 USB Drive 註 1 攝影機會自動偵測是否已接上 USB 隨身碟 如果有 攝影機會自動選擇 USB Drive 來儲存資料 2 內建的 Embedded 儲存空間只能儲存最多 200 張影像 如果您需儲存視訊 請將 USB 隨身碟接 到攝影機上 Format 您需先移除攝影機上的 USB 連接線 才能設定此功能 格式化 Embedded 或 USB Drive 之後 便會永久刪除其中的資料 USB to PC 您需先移除攝影機上的 USB 連接線 才能設定此功能 將 USB 連接線的一端插上電腦 另一端插上攝影機後 您可選擇 Camera 並把 A30 當作網路攝影機使用 您亦可選擇 Storage 來 將影像或視訊從攝影機傳到您的電腦 USB Streaming Resolution 您需先...

Страница 46: ...高解析度 Backup 選擇一個儲存空間來備份內建儲存的影像 Save Setting 將目前設定 亮度 預覽模式 對比度等等 儲存在所選擇的設定檔編號中 您可儲存 多至三個設定檔 其儲存方式如下 在您完成各項設定後 請使用遙控器點選一個設定檔編號 並 按下 鈕來儲存設定檔 如欲清除一個設定檔 詳請見下一個功能 Recall Setting 之說明 Recall Setting 您可清除上一個功能 Save Setting 中儲存的設定 請使用遙控器點選一個設定檔 並按下 鈕來清除設定檔 Information 顯示產品資訊 Default 將所有設定還原為原始出廠預設值 ...

Страница 47: ... Balance Setup Auto Manual Manual W B Blue 需先將 White Balance 功能設定為 Manual 後 才能設定此功能 0 255 Manual W B Red 需先將 White Balance 功能設定為 Manual 後 才能設定此功能 0 255 Focus 0 1023 Picture In Picture PIP Mode On Off Main Screen Switch A30 External Source Position Bottom Left Top Left Top Right Bottom Right Manual Size Large Small Start PIP Automatically On Off Presentation Spotlight On Off Visor On Off Split Scre...

Страница 48: ...定此功能 1 600 sec Storage Embedded USB Drive Format Embedded USB Drive USB to PC Camera Storage USB Streaming Resolution Max to 4K Max to 1080P Flicker 50Hz 60Hz System Language English Traditional Chinese Japanese German French Spanish Simplified Chinese Italian Russian Indonesia Finland Polish Output Display 3840x2160 60 3840x2160 30 1920x1080 1280x720 1024x768 Backup USB Drive Save Setting Profile...

Страница 49: ...0x1200 1280x960 1024x768 640x480 1280x1024 1280x800 YUV 640x360 640x480 320x180 320x240 輸出顯示 HDMI 3840x2160 1920x1080 1280x720 1024x768 光學機制 鏡頭翻轉 硬體 向右 90 相對於攝影機基座 向左 90 相對於攝影機基座 攝影範圍 A3 或大於 A3 縮放 23x 數位變焦 對焦 自動對焦 或透過軟體手動對焦 介面 HDMI 輸出 1 輸出顯示最高支援到 4K USB Type A 埠 1 可以插上隨身碟儲存影像 USB Type C 埠 1 連接到電腦 將 USB 攝影機串流影像傳至電腦 音訊輸入 1 Line in 麥克風輸入 3 5mm 音源線 Line in 最大輸入電壓 1Vrms 麥克風最大輸入電壓 50mVrms 電壓 2 5 0 5 V 喇...

Страница 50: ...可儲存擷取之影像為 200 張 XGA 1024x768 外部儲存空間 支援 FAT32 32GB USB 隨身碟 自動旋轉 支援 音訊功能 回音消除功能 抑制背景雜音 AI 降噪技術 一般 電源變壓器 100 240VAC 50 60Hz 12VDC 2A 電源輸入 開燈 12VDC 1 25A 15W 最大值 關燈 12VDC 1 21A 14 5W 最大值 產品尺寸 寬 x 深 x 高 使用時 96 9 x 239 04 x 348 4mm 收起後 96 9 x 98 1 x 184 5mm 淨重 737g 規格如有變更 恕不另行通知 ...

Страница 51: ...接線 是否妥適如本手冊內容所示 2 確認輸出影像裝置的設定 3 如您使用 HDMI 輸出顯示裝置 可能略有延遲 需待四至七秒讓顯示裝置與攝影機同步 攝影機畫 面才能投影至螢幕上 簡報畫面上的圖片失真或是模糊 1 如您改過設定 您可將攝影機回歸至其出廠預設值 您可按下MENU鈕 在OSD 選單上點選SYSTEM Default YES 2 調整 OSD 選單上的 Brightness 與 Contrast 功能 亦有可能減輕圖片失真 3 倘若影像模糊或失焦 您可按下遙控器上的 Auto Focus 鈕 ...

Страница 52: ...https jp aver com AVerVision A30 ユニバーサルカメラ ユーザーマニュアル ...

Страница 53: ...点での製品情報と仕様を編集および公開したものです 本文書の内容と文書 内で説明されている製品の仕様は事前の通知無く変更される場合があります AVer は 予告なくそのよ うな変更を行う権限を有します AVer やその関連会社は 1 この文書は情報の完全性もしくは正確性を 保証するものではありません 2 本書の情報について利用や信頼について責任を負いません AVer は 本書の情報を信頼したことによるいかなる損害 間接損害を含む に責任を負いません 商標 AVer は AVer Information Inc の登録商標です 本書記載の その他の商標については説明を目的として おり その他の登録商標は各権利元に帰属します 著作権 本書は AVer Information Inc が著作権を保有します 本書は AVer Information Inc 及び アバー インフォメ ーション株式会社...

Страница 54: ...定の上ご使用ください 下図に表記された可動範囲内でアームを動かし 撮影範囲を調整してください リモコンの電池に関する安全上の注意 電池は湿気のない涼しい場所に保管してください 使用済みの電池をゴミ箱に捨てないでください 使用済みの電池は 各自治体の指定する処分 方法に従って適切に処分してください 長時間にわたって電池を使用していない場合は取り外してください 漏電と腐食により リモコン が破損する恐れがあります 古い電池と新しい電池を一緒に使用しないでください 異なる種類の電池を一緒に使用しないでください アルカリ マンガン 炭素亜鉛 またはニッケ ルカドミウム 電池を火で燃やして処分しないでください 電池の端子をショートさせないでください ...

Страница 55: ...ては 次の Web サイトをご覧ください テクニカルサポート https jp aver com technical support 製品資料 ダウンロードセンター https jp aver com download center 連絡先 アバー インフォメーション株式会社 HP https jp aver com 160 0023 東京都新宿区西新宿 3 2 26 立花新宿ビル 7 階 TEL 81 0 3 5989 0290 テクニカル サポート Support EDU JP aver com ...

Страница 56: ...目次 パッケージ同梱物 1 製品紹介 2 製品概要 2 操作ボタン 3 アーム可動範囲 4 機器との接続 5 操作リモコン 6 カメラの自動回転 8 カメラ設定 9 OSD メニュー 9 イメージ 10 ピクチャーインピクチャー 11 プレゼンテーション 12 オーディオ 13 設定 14 システム 15 OSD メニュー階層表 16 製品仕様 18 トラブルシューティング 20 ...

Страница 57: ...1 パッケージ同梱物 カメラ本体 電源アダプタ 電源ケーブル 12V 2A 操作リモコン USB 2 0 ケーブル 約 1 8 m Type C Type A QR コード印字カード 製品保証書 電源コードの形状は 販売される地域のコンセント形状により異なります 日本のみ同梱 ...

Страница 58: ...ントンロック取付口 7 USB Type A 端子 Note 1 8 USB Type C 端子 9 電源差込口 Note 2 10 HDMI 出力端子 11 電源ボタン Note 3 12 LED ランプ 13 カメラレンズ 14 折りたたみアーム 15 機能ボタン 16 1 4 インチ三脚取付穴 Notes 1 USB Type A 端子は USB カメラまたは外部ストレージへの接続に使用できます USB カメラの場合 USB カメラの映像を取り込み PIP 表示時に使用できます 外部ストレージの場合 最大 32GB FAT32 の映像 静止画の撮影データを保存できます 対応フォ ーマット FAT32 2 付属電源アダプタを使用しカメラへの給電が必要です カメラ通電時 LED は赤点灯します 3 電源ボタンを押し カメラを起動します 起動中は LED は赤点滅し 起動が完了すると LE...

Страница 59: ... メニュー表示 再度長押しで OSD メニュー非表示 短押し ズームイン 拡大 長押し 連続ズームイン 短押し ズームアウト 縮小 長押し 連続ズームアウト 短押し LED ランプのオン オフ 3 秒長押し ビデオ映像の 0 180 回転 短押し スピーカーの音量を上げる 長押し スピーカーの音量を連続で上げる 短押し スピーカーの音量を下げる 長押し スピーカーの音量を連続で下げる 2 つのボタン同時押しで 自動回転機能のオン オフを切り替えます 自動回転機能により ビデオ映像が正しい向きで表示され 映像が上下逆に表示 された場合 画像が自動的に反転します 詳細については 自動回転 の章を 参照してください ...

Страница 60: ...ンを使用して OSD メニューの操作を行います OSD メニューの詳細については OSD メニュー の章を参照してください ボタン 操作内容 3 秒長押しで OSD メニュー表示 再度長押しで OSD メニュー非表示 前の階層に戻る 上 上 下 左 右のボタンは 次の場合に使用できます OSD メニューで項目を選択 PIP モードで 手動 を選択中 サブカメラ表示位置の位置調整 プレゼンテーション機能設定中の操作 下 左 右 決定 アーム可動範囲 ...

Страница 61: ...最大 50mVrms 供給電圧 2 5 0 5 V 外部マイクを接続した場合 内蔵マイクは無効になります Google ハングアウト Windows Skype Mac Teams Windows および Mac などのビデオ会議ソフト ウェアは自動的に音量を調整するため 音量ボリュームが均一にならない場合があります 4 USB Type A 端子 の接続 USB カメラの場合 PIP 機能で使用する USB カメラを接続します 外部ストレージの場合 撮影保存に使用する最大 32GB FAT32 の USB 外部ストレージを接続しま す 5 USB Type C 端子 の接続 製品付属の USB2 0 ケーブル TypeC TypeA を使用し Teams や Zoom などの Web会議に使用する パソコンと接続します ...

Страница 62: ... 180 回転します 7 メニュー OSD メニューの表示 非表示 8 OSD メニューで項目を選択 または OSD メニュ ーで前 次の階層を表示 移動します ズーム時 上下左右に表示位置を調整します 再生モード時 で音量を調整 再生モード時 をビデオ再生位置を調整 9 オートフォーカ ス オートフォーカスを実行します 10 ズーム カメラ映像表示 またはプレイバック時のズームイ ン ズームアウト 11 ズームリセット ズーム倍率を 1 倍に戻します 12 再生 USB ドライブに保存されたビデオ 静止画を再生し ます で再生するビデオ 静止画を選択 します ボタンでビデオ 静止画を表示します ボタンを再度押した場合ビデオ一時停止 Freeze Stop ボタンを押すとプレイバック終了 13 PC 1 2 PIP モード時 メイン画面の切替 14 フリーズ 停止 カメラ映像表示時 カメラ...

Страница 63: ...リか ら表示します 17 モード 撮影モードを切り替えます ノーマル 高品質 動 画 18 タイマー タイマーボタンを押して OSD メニューのプレゼン テーションタイマー設定ページに入ります タイマ ーカウントダウンの開始 一時停止 停止を選択し ます タイマー間隔を選択して タイマー期間を設定しま す 19 決定 選択 再生モード OSD メニュー使用時 ビデオ再生 一時停止 再生モード時 ビデオ選択 後 20 照明 カメラヘッド LED ライトをオン オフにします 21 明るさ カメラ映像の明るさを調整します 22 初期化 工場出荷時設定にリセットします 23 削除 再生モード時に 選択された写真 ビデオ を削除します ...

Страница 64: ...ライブ画像は 0 の状態です 回転しません カメラヘッドの角度が 60 を超えた場合 ライブ画像は自動的に 180 回転します A30 ユニバーサルカメラは書画カメラやウェブカメラとして使用できるため 自動回転機能により ライブ画像 が正しい向きで表示されるようになり 画像が上下逆に表示されたときに自動的に反転します 以下は 参 考のために 2 つのシナリオです シナリオ 1 プレゼンターが最初にドキュメントを撮影し 次にカメラヘッドを上に向けて自分自身を撮影する場 合 自動回転機能がオンになっていると ライブ画像が自動的に反転します シナリオ 2 プレゼンターが最初に自分自身を撮影し 次にカメラヘッドを下に向けてドキュメントを撮影する場 合 自動回転機能がオンになっていると ライブ画像が自動的に反転します ...

Страница 65: ...らすべてのカメラ設定を構成できます OSD メニューにアクセスするには HDMI ケーブルを 使用してユニットをモニターまたはテレビに接続します 次に ユニットに付属のリモコンまたは機能ボタンを 使用して OSD メニューを操作できます この章の内容は 付属のリモコンを使用した OSD 操作について説明しています リモコンのメニューボタンを押して OSD メニューを表示します 選択メニューの上下左右移動 項目の選択 決定 メニュー項目の移動 設定を決定 ...

Страница 66: ...します 画像効果 画像効果を選択します カラー カメラ映像を通常の色状態で表示します モノクロ カメラ映像をモノクロ表示にします ネガ カメラ映像をネガ反転表示にします ミラー 映像の左右反転を有効または無効にします 自動回転 上下の自動回転を有効または無効にします 露出制御 自動 露出を自動調整します 手動 露出を手動調整します 露出手動調整 露出を値 0 99 の範囲で調整します ホワイトバランス 自動 ホワイトバランスを自動調整します 手動 ホワイトバランスを手動調整します 手動 WB 青 ホワイトバランス 青 を値 0 255 の範囲で調整します 手動 WB 赤 ホワイトバランス 赤 を値 0 255 の範囲で調整します フォーカス フォーカスを値 0 1023 の範囲で調整します ...

Страница 67: ...を調整します 4 PIP モードを無効にするには OSD メニュー ピクチャーインピクチャー PIP モードの項目をオフに 設定します メイン画面切替 メイン画面に表示するビデオソースを選択します A30 のカメラまたは外部カメラ A30 の USB Type A 端子に接続された USB カメラ を選択できます 位置 サブ画面を表示する位置を指定します 手動の場合は ボタンを使用してサブ画面 を表示する位置を調整できます サイズ サブ画面の大きさを選択します 大または小の 2 種 PIP 自動起動 A30 に USB カメラが接続された際に A30 が自動的に PIP モードを起動させるには この 項目を有効にします この項目を機能するためには 1 OSD メニュー ピクチャーインピクチャー PIP モードの項目をオンに設定します 2 OSD メニュー ピクチャーインピクチャー PIP ...

Страница 68: ...マスクを有効にするには 1 OSD メニュー プレゼンテーション バイザー に移動し オン を選択すると カメラ左上の映像 が表示されます 2 リモコンの および ボタンを使用して 映像を隠す範囲を調整します 3 リモコンのマスクボタン再度押すと マスク機能は無効になります 画面分割 表示画面を2つに分割します 一方の側にはカメラのライブビューが表示され もう一方の側に はUSBドライブに保存された静止画またはビデオのサムネイルが表示されます 分割オプションには 左 右 上 下が含まれます 分割オプションを選択した後 リモコンの および ボタンを使用して キャプチャ画像または ビデオを選択します を押して画像を表示するか ビデオを再生します タイマー タイマーのカウントダウンを開始 一時停止 または停止するように選択します オプションで 以下のタイマー間隔を設定できます 開始 を選択すると...

Страница 69: ...13 オーディオ ノイズ抑制 ノイズリダクション機能を有効または無効にします エコーキャンセル エコーキャンセル機能を有効または無効にします マイク音量 マイク音量を値 0 32 の範囲で調整します スピーカー音量 スピーカー音量を値 0 15 の範囲で調整します 外部音声入力 オーディオ入力ソースを選択します MIC 入力と LINE 入力が選択できます ...

Страница 70: ...るストレージを選択します オプションには 内部ストレージまたは USB ドライブ が含まれます 注 1 本機は USB ドライブをを自動的に検出します USB ドライブが接続されている場合 データを保存す るため USB ドライブを自動的に割り当てます 2 カメラの内部ストレージには 最大 200 枚の画像のみを保存できます 動画を保存したい場合は 本 機に USB ドライブを接続してください フォーマット この機能を設定するには 最初にユニットから USB ケーブルを取り外します 内蔵または USB ドライブストレージをフォーマットして すべてのデータを完全に消去できます USB から PC へ この機能を設定するには 最初に USB ケーブルをユニットから取り外します USB ケ ーブルを介してユニットを PC に接続する場合は カメラを選択して Web カメラとして使用するか ユニッ...

Страница 71: ...像度を 検出し 最大解像度で設定します 保存 内部保存メモリから画像をバックアップする外部ストレージを選択します 設定内容保存 明るさ プレビューモード コントラストなどの設定内容をプロファイルとして保存します 最大 3 つのプロファイルを保存できます 設定を実施した後 プロファイルを選択し リモコンのボタンを 押して指定番号にプロファイルとして保存します 設定内容呼び出し 保存した設定プロファイルの呼び出し または削除を行います 機器情報 カメラの情報を表示します 初期化 すべての設定を工場出荷時のデフォルト設定に戻します ...

Страница 72: ... 露出設定で 手動 を選択した場 合にのみ表示されます 0 99 ホワイトバランス設定 自動 手動 マニュアル WB 青 この機能は ホワイトバランス設定で 手動 を 選択した場合にのみ表示されます 0 255 マニュアル WB 赤 この機能は ホワイトバランス設定で 手動 を 選択した場合にのみ表示されます 0 255 フォーカス 0 1023 ピクチャーインピクチ ャー PIP モード On Off メイン画面切替 A30 カメラ 外部カメラ 位置 左下 左上 右上 右下 手動 サイズ 大 小 PIP 自動起動 オン オフ プレゼンテーション スポットライト オン オフ マスク オン オフ 画面分割 左 上 右 下 タイマー 開始 一時停止 停止 タイマー間隔 1 120 秒 ...

Страница 73: ... ストレージ 保存メモリ USB ドライブ フォーマット 保存メモリ USB ドライブ USB から PC カメラ 外部ストレージ USB 出力解像度 最大 4K 最 1080P 電源周波数 50Hz 60Hz システム 言語 English Traditional Chinese 日本語 German French Spanish Simplified Chinese Italian Russian Indonesia Finland Polish 出力解像度 3840x2160 60 3840x2160 30 1920x1080 1280x720 1024x768 保存 USB Drive 設定内容保存 Profile 1 Profile 2 Profile 3 設定内容呼び出し Profile 1 Profile 2 Profile 3 機器情報 カメラ情報 初期化 いいえ はい ...

Страница 74: ...レイ出力 HDMI 3840x2160 1920x1080 1280x720 1024x768 カメラ調整 仕様 レンズ回転 右 90 左 90 フォーカス調整 A3 サイズ以上 レンズ回転 23 倍デジタルズーム 撮影範囲 オートフォーカス 手動フォーカス インターフェイス HDMI 出力 1 ポート 4K 出力対応 USB Type A 端子 1 ポート 外部 USB ドライブまたは外部カメラ接続用 USB Type C 端子 1 ポート USB カメラとして PC へ接続用 音声入力 1 ポート ライン入力 マイク入力 3 5mm ステレオ ライン入力レベル 1Vrms 最大 マイク入力レベル 50mVrms 最大 供給電圧 2 5 0 5 V スピーカー出力 6W スピーカー 6x6m 内蔵マイク 搭載 集音範囲 約 5m DC 12V 入力 電源差込口 機能 OSD メニュー表示...

Страница 75: ...C 環境音ノイズ低減 AI ノイズ減少 一般 電源 100 240VAC 50 60Hz 12VDC 2A 電源入力 ランプ点灯時 12VDC 1 25A 最大 15W ランプ消灯時 12VDC 1 21A 最大 14 5W 本体寸法 横 x 縦 x 高さ アーム展開中 96 9 x 239 04 x 348 4 mm アーム収納時 96 9 x 98 1 x 184 5 mm 本体重量 737g 仕様は予告なく変更する場合があります ...

Страница 76: ...端子の接続を確認してください 2 ディスプレイ出力側の解像度設定を確認してください 3 HDMI ディスプレイ出力の場合 ディスプレイデバイスとユニットの両方が同期するのを待つ間に遅延が 発生します 画面にカメラの画像が表示されるまで 約 4 7 秒お待ち下さい Q プレゼンテーション画面の画像が歪んでいるか 画像がぼやけています 1 変更された設定がある場合は初期化を行い すべてデフォルト設定にリセットしてください 2 必要に応じて 明るさとコントラストのメニュー機能を使用して歪みを低減します 3 画像がぼやけている または焦点が合っていない場合はリモコンのオートフォーカスボタンを押し フォー カスを再調整します ...

Страница 77: ...AVerVision A30 Universelle Kamera Bedienungsanleitung ...

Страница 78: ...ndere beiläufig entstandene oder kausal bedingte Schäden die im Zusammenhang mit der Nutzung oder Unmöglichkeit der Nutzung der Software oder der schriftlichen Unterlagen entstehen selbst wenn über die Möglichkeit solcher Schäden informiert wurde WARENZEICHEN AVer ist ein Warenzeichen von AVer Information Inc Andere in diesem Dokument genannten Warenzeichen dienen lediglich der Information und sin...

Страница 79: ...TTDESSEN MÜSSEN ALTGERÄTE ZUM RECYCLING VON ELEKTRISCHEN UND ELEKTRONISCHEN ALTGERÄTEN ZU SPEZIELLEN SAMMELSTELLEN GEBRACHT WERDEN WEITERE INFORMATIONEN ÜBER ANNAHMESTELLEN ZUR ENTSORGUNG VON ALTGERÄTEN ZU RECYCLINGZWECKEN ERHALTEN SIE VON IHREM ENTSORGUNGSDIENSTLEISTER ODER IN DEM GESCHÄFT IN DEM SIE DAS GERÄT ERWORBEN HABEN ...

Страница 80: ...ieren Fernbedienung Sicherheitshinweise für die Batterien Lagern Sie die Batterien an einem kühlen und trockenen Platz Werfen Sie gebrauchte Batterien nicht in den Hausmüll Beseitigen Sie die Batterien an den ausgewiesenen Sammelstellen oder bingen Sie sie gegebenfalls in den Laden zurück Entfernen Sie die Batterien aus dem Gehäuse falls Sie die Fernbedienung längere Zeit nicht benutzen Auslaufend...

Страница 81: ... Sie bitte Download Center https www avereurope com download center Technischer Support https www avereurope com technical support Kontaktinformationen AVer Information Europe B V https www avereurope com Westblaak 134 3012KM Rotterdam The Netherlands Tel 31 0 10 7600 550 Technischer support eu rma aver com ...

Страница 82: ... Bedienwinkel 4 Verbindung 5 Fernbedienung 6 Autom drehen 9 Kameraeinrichtung 10 OSD Menü 10 Bild Image 11 Bild In Bild Picture In Picture 12 Präsentation Presentation 13 Audio Audio 14 Einstellungen Setting 15 System System 16 OSD Menüstruktur 17 Technische Daten 19 Fehlerbehebung 21 ...

Страница 83: ...erumfang Kamera Netzteil Netzkabel 12V 2A Fernbedienung USB 2 0 Typ C auf Typ A Kabel 1 8M QR Code Karte Garantiekarte Das Netzkabel variiert abhängig von den im Verkaufsland üblichen Steckdosen Nur für Japan ...

Страница 84: ...Kameralinse 14 Faltbarer Arm 15 Funktionstasten 16 Stativschraubenloch Schraube 1 4 20 nicht beiliegend Hinweise 1 Der USB Typ A Port kann für den Anschluss einer USB Kamera oder eines externen Speichergerätes verwendet werden USB Kamera Für die Bild in Bild Funktion schließen Sie eine USB Kamera an Externes Speichergerät_ Unterstützt bis zu 32 GB FAT32 USB Speichergeräte für die Bilderfassung und...

Страница 85: ...Auszoomen die Taste gedrückt halten Kurz antippen um die LED Lampe ein auszuschalten 3 Sekunden antippen um die Live Ansicht manuell um 0 180 zu drehen Kurz antippen um die Lautstärke zu erhöhen Für kontinuierliches Erhöhen der Lautstärke die Taste gedrückt halten Kurz antippen um die Lautstärke zu verringern Für kontinuierliche Verringerung der Lautstärke die Taste gedrückt halten Drücken Sie die...

Страница 86: ...tes langes Antippen verlassen Sie das OSD Menü Zurück zur vorherigen Seite im Menü Nach oben Die Tasten Nach Oben Nach Unten Rechts Links können folgendermaßen verwendet werden Auswahl von Elementen im OSD Menü Mit der Auswahl Manual im PIP Modus wählen Sie mithilfe dieser Tasten die Position des Unteransicht Fensters aus Vorgänge während der Einrichtung der Präsentationsfunktion N Unten Links Rec...

Страница 87: ...das externe Mikrofon angeschlossen wird Videokonferenz Software wie Google Hangouts Windows Skype Mac oder Teams Windows und Mac kann die Lautstärke automatisch anpassen daher ist die Lautstärke während der Verwendung der Kamera gelegentlich instabil Hinweis Audio kann über den eingebauten Lautsprecher ausgegeben werden 4 USB Kabelverbindung Sie können eine USB Kamera oder ein externes Speicherger...

Страница 88: ... hier kann der Vorführer die gewünschten Inhalte anzeigen So aktivieren Sie den Visor 1 Drücken Sie die Visor Taste um auf die Visor Einrichtungsseite im OSD Menü zuzugreifen 2 Wählen Sie On und drücken Sie um den Visor zu aktivieren Der obere linke Bereich der Kameraansicht wird angezeigt 3 Mit den Taste und legen Sie einen größeren Bereich frei 4 Um den Visor Modus zu beenden drücken Sie erneut ...

Страница 89: ...ch der Kameraansicht Alle anderen Bereich werden abgedeckt So aktivieren Sie das Spotlight 1 Drücken Sie die Visor Taste um auf die Spotlight Einrichtungsseite im OSD Menü zuzugreifen 2 Wählen Sie Ein und drücken Sie um Spotlight zu aktivieren Der mittlere Bereich der Kameraansicht wird angezeigt 3 Sie können den angezeigten Bereich auch mit und anpassen 4 Um den Spotlight Modus zu beenden drücken...

Страница 90: ...tart Pausieren Stoppen des Timer Countdowns Auswahl des Timer Intervalls für die Festlegung der Timer Dauer 19 Auswahl bestätigen Zugriff auf das Untermenü im OSD Menü Start Pause Videowiedergabe Anzeige der erfassten Bilder 20 Lampe LED Beleuchtung ein ausschalten 21 Helligkeit Anpassen der Helligkeit 22 Standard Zurücksetzen auf die Werkseinstellungen 23 ENTF Markiertes Bild Video im Wiedergabem...

Страница 91: ...verwendet werden Die Funktion Autom drehen kann sicherstellen das Live Bilder mit der richtigen Ausrichtung angezeigt werden Daher werden Bilder die auf dem Kopf stehen automatisch gedreht Nachstehend wird dies anhand von 2 Szenarien erläutert Szenario 1 Wenn Präsentatoren zu Beginn ein Dokument aufnehmen und den Kamerakopf dann nach oben drehen um sich selbst aufzunehmen werden Livebilder automat...

Страница 92: ...g oder den Funktionstasten Einstellungen im OSD Menü vornehmen In diesem Kapitel wird die Bedienung des OSD Menüs mit der beiliegenden Fernbedienung erläutert Drücken Sie die Menü Taste an der Fernbedienung um das OSD Menü aufzurufen und verwenden Sie für die Auswahl von Bildern oder Optionen Mit treffen Sie Ihre Auswahl bzw greifen Sie auf das Untermenü zu Mit und passen Sie eine Einstellung an o...

Страница 93: ...für Bilder nach rechts oder links Auto Rotate Aktivierung oder Deaktivierung der Funktion mit der Bilder automatisch um 0 180 gedreht werden Exposure Setup Wählen Sie eine Option Auto Automatische Anpassung von Aufnahmeeinstellungen Manual Manuelle Anpassung von Aufnahmeeinstellungen Anpassung der nachstehenden Manual Exposure Manual Exposure Diese Funktion wird nur angezeigt wenn Manual in Exposu...

Страница 94: ... an 1 Verbinden Sie eine USB Kamera mit dem USB Ty A Anschluss der A30 2 Öffnen Sie OSD Menü Picture In Picture PIP Mode und wählen Sie On Auf dem Bildschirm sollte der PIP Modus angezeigt werden 3 Sie können auch zur Hauptansicht umschalten oder die Position bzw Größe der Teilansicht anpassen 4 Zum Deaktivieren des PIP Modus öffnen Sie das OSD Menü Picture In Picture PIP Mode und wählen Sie Off M...

Страница 95: ...Öffnen Sie OSD Menü Presentation Spotlight und wählen Sie On Der mittlere Bereich der Kameraansicht wird angezeigt 2 Sie können den angezeigten Bereich auch mit den Tasten und an der Fernbedienung anpassen 3 Drücken Sie die Spotlight Taste an der Fernbedienung um die Spotlight Funktion zu deaktivieren l Visor Aktivieren oder Deaktivieren der Funktion Der Visor verdeckt ein Teil des Präsentationsbi...

Страница 96: ... Timer zu starten oder zu stoppen drücken Sie die Timer Taste an der Fernbedienung Wählen Sie im OSD Menü dann Pause oder Stop Timer Interval Legen Sie ein Intervall für den vorstehenden Timer fest Audio Audio Noise Reduction Aktivierung oder Deaktivierung der Funktion Noise Reduction Echo Cancellation Aktivierung oder Deaktivierung der Funktion Echo Cancellation Microphone Volume Anpassung der Mi...

Страница 97: ...erst das USB Kabel vom Gerät abziehen Wählen Sie ein Speichermedium für die erfassten Bilder oder die aufgezeichneten Videos Die Optionen sind Embedded oder USB Drive Hinweis 1 Das Gerät erkennt ein angeschlossenes USB Laufwerk sofort Wenn das USB Laufwerk angeschlossen wird weist das Gerät automatisch ein USB Drive für die Speicherung der Daten zu 2 Der internen Embedded Speicher kann nur Bilder ...

Страница 98: ...s dem internen Embedded Speicher auf das gewählte Speichermedium zu übertragen Save Setting Speicherung der aktuellen Einstellungen z B Helligkeit Vorschaumodus Kontrast usw um diese dann als Profil zu verwenden Es können bis zu 3 Profile gespeichert werden Gehen Sie folgendermaßen vor Nach der Konfiguration aller Einstellungen wählen Sie ein Profil aus Drücken Sie dann die Taste an der Fernbedien...

Страница 99: ...nce Setup Auto Manual Manual W B Blue This function only appears when Manual is selected in White Balance Setup 0 255 Manual W B Red This function only appears when Manual is selected in White Balance Setup 0 255 Focus 0 1023 Picture In Picture PIP Mode On Off Main Screen Switch A30 External Source Position Bottom Left Top Left Top Right Bottom Right Manual Size Large Small Start PIP Automatically...

Страница 100: ...selected in Capture Type 1 600 sec Storage Embedded USB Drive Format Embedded USB Drive USB to PC Camera Storage USB Streaming Resolution Max to 4K Max to 1080P Flicker 50Hz 60Hz System Language English Traditional Chinese Japanese German French Spanish Simplified Chinese Italian Russian Indonesia Finland Polish Output Display 3840x2160 60 3840x2160 30 1920x1080 1280x720 1024x768 Backup USB Drive ...

Страница 101: ...80x720 1024x768 Optischer Mechanismus Linsendrehung mechanisch Nach rechts 90 mit Rotationssockel Nach Links 90 mit Rotationssockel Aufnahmebereich A3 oder mehr Zoom 23 fach Digitalzoom Fokus Autofokus manuell über Software Schnittstelle HDMI Ausgang 1 bis zu 4K Display Ausgabe USB Typ A Anschluss 1 für USB Flash Drive und USB Kamera Streaming Eingang USB Typ C Anschluss 1 Anschluss für PC und USB...

Страница 102: ...Speicher FAT 32 32 GB USB Speichergerät Autom drehen Ja Audio Funktion AEC Rauschunterdrückungstechnologie AI lärmminderung Allgemeines Stromquelle 100 240VAC 50 60Hz 12VDC 2A Leistungsaufnahme Lampe ein 12VDC 1 25A 15W max Lampe aus 12VDC 1 21A 14 5W max Abmessungen B x T x H Betrieb 96 9 x 239 04 x 348 4 mm Gefaltet 96 9 x 98 1 x 184 5 mm Gewicht netto 737g Alle Daten können ohne Bekanntmachung ...

Страница 103: ...zeigegerät und das Gerät synchronisiert werden Warten Sie ungefähr 4 bis 7 Sekunden bis zur Anzeige des Kamerabildes am Bildschirm Das Bild auf dem Präsentationsbildschirm ist verzerrt oder unscharf 1 Setzen ggf die veränderten Einstellungen auf die Werkseinstellungen zurück Drücken Sie MENU und wählen Sie dann im OSD Menü SYSTEM Default und YES 2 Verringern Sie die Störung ggf mit den Menüfunktio...

Страница 104: ...AVerVision A30 Caméra universelle Mode d emploi ...

Страница 105: ...Cámara universal AVerVision A30 Manual del usuario ...

Страница 106: ... aun cuando se haya advertido de la posibilidad de dichos daños Marcas comerciales AVer es una marca comercial propiedad de AVer Information Inc Otras marcas comerciales utilizadas en este documento con fines descriptivos pertenecen exclusivamente a sus empresas correspondientes COPYRIGHT 2022 AVer Information Inc Todos los derechos reservados June 28 2022 Todos los derechos de este objeto pertene...

Страница 107: ...L EN SU LUGAR ES NECESARIO DESHACERSE DEL EQUIPO DEPOSITÁNDOLO EN UN PUNTO LIMPIO DESIGNADO DE RECICLAJE DE EQUIPOS ELÉCTRICOS Y ELECTRÓNICOS PARA OBTENER MÁS INFORMACIÓN SOBRE LOS LUGARES EN LOS QUE PUEDE DEPOSITAR EL EQUIPO PARA RECICLARLO PÓNGASE EN CONTACTO CON EL SERVICIO DE RECOGIDA DE BASURAS O CON LA TIENDA DONDE ADQUIRIÓ EL PRODUCTO ...

Страница 108: ...estra a continuación Información de seguridad de las baterías del control remoto Almacene las baterías en un lugar frío y seco No deseche las baterías en la basura doméstica Deseche las baterías en puntos de recolección especial o devuélvalas a las tiendas respectivas si aplica Retire las baterías si no se utilizarán por un largo período de tiempo El ácido derramado por una batería o la corrosión ...

Страница 109: ...nes visite Centro de descargas https www avereurope com download center Soporte técnico https www avereurope com technical support Información de contacto AVer Information Europe B V https www avereurope com Westblaak 134 3012KM Rotterdam The Netherlands Tel 31 0 10 7600 550 Soporte técnico eu rma aver com ...

Страница 110: ...de funcionamiento 4 Conexión 5 Mando a distancia 6 Giro automático 9 Configuración de la cámara 10 Menú OSD 10 Imagen Image 11 Imagen En Imagen Picture In Picture 12 PRESENTACIÓN Presentation 13 Audio Audio 14 Ajuste Setting 15 Sistema System 16 Árbol del menú OSD 17 Especificaciones 19 Troubleshooting 21 ...

Страница 111: ...ptador de corriente y cable de alimentación 12V 2A Mando a distancia Cable USB 2 0 tipo C a tipo A 1 8M Tarjeta de código QR Tarjeta de garantía El cable de alimentación variará según la toma de corriente estándar del país de vent Solo para Japón ...

Страница 112: ...B Tipo A Nota 1 8 Puerto USB Tipo C 9 Conector de fuente de alimentación CC Nota 2 10 Puerto de salida HDMI 11 Botón de encendido apagado Nota 3 12 Luz LED 13 Objetivo de la cámara 14 Brazo plegable 15 Botones de función 16 Orificio para tornillo del trípode Tornillo 1 4 20 no incluido Notas 1 El puerto USB de tipo A se puede utilizar para conectar una cámara USB o una unidad de almacenamiento ext...

Страница 113: ... el enfoque automático Mantenga pulsado este botón durante 3 segundos para acceder al menú OSD Para salir del menú OSD mantenga pulsado el botón de nuevo Pulse este botón para acercar la imagen Manténgalo pulsado para acercarla de forma continua Pulse este botón para alejar la imagen Manténgalo pulsado para alejarla de forma continua Pulse este botón para encender apagar la luz LED Manténgalo puls...

Страница 114: ...ner más información sobre el Menú OSD consulte el capítulo Menú OSD Botones Descripciones Mantenga pulsado este botón durante 3 segundos para acceder al menú OSD Para salir del menú OSD mantenga pulsado el botón de nuevo Volver a la página del nivel anterior Arriba Los botones Arriba Abajo Izquierda Derecha se pueden utilizar para lo siguiente Seleccionar opciones en el menú OSD Si se selecciona M...

Страница 115: ...grado se desactivará cuando se conecte un micrófono externo Dado que los programas de videoconferencia como Google Hangouts Windows Skype Mac o Teams Windows y Mac pueden ajustar automáticamente el volumen el usuario podría experimentar un volumen inestable de forma aleatoria mientras utiliza la unidad Nota El audio puede emitirse por el altavoz integrado 4 Para la conexión de dispositivos USB Pue...

Страница 116: ...la cámara Para activar el visor 1 Pulse el botón Visor para entrar en la página de configuración del visor en el menú OSD 2 Seleccione On y pulse para activar el visor se mostrará la parte superior izquierda de la vista de la cámara 3 Utilice los botones y para revelar una mayor parte del área oculta 4 Para salir del modo de visor vuelva a pulsar el botón Visor 6 Rotate Gire la imagen 0 180 7 Menu...

Страница 117: ... Para activar Spotlight 1 Pulse el botón Spotlight para acceder a la página de configuración de Spotlight en el menú OSD 2 Seleccione On y pulse para activar Spotlight se mostrará la parte central de la vista de la cámara 3 También puede utilizar y para ajustar el área mostrada 4 Para salir del modo Spotlight vuelva a pulsar el botón Spotlight 16 Split Screen Divida la pantalla en dos Un lado mues...

Страница 118: ... para establecer la duración del temporizador 19 Confirme una selección Acceda al submenú del menú OSD Reproduzca Pause un vídeo Vea las imágenes capturadas 20 Lamp Encienda apague la luz LED 21 Brightness Ajuste el brillo 22 Default Restablezca los ajustes predeterminados de fábrica 23 DEL Elimine la imagen o el vídeo seleccionados en el modo de reproducción ...

Страница 119: ... A30 puede utilizarse como una cámara de documentos o una cámara web la función de rotación automática garantiza que las imágenes en directo se muestren con la orientación correcta lo que hará que las imágenes se giren automáticamente cuando aparezcan al revés A continuación se presentan dos escenarios a modo de ejemplo Escenario 1 Si el ponente está enfocando un documento y gira el cabezal de la ...

Страница 120: ...a incluido o los botones de función de la unidad para utilizar el menú OSD El contenido de este capítulo describe el uso del menú OSD utilizando el mando a distancia incluido Pulse el botón Menu del mando a distancia para acceder al menú OSD y Utilice para seleccionar las distintas páginas u opciones Pulse para hacer una selección o acceder al submenú Utilice para ajustar la configuración o hacer ...

Страница 121: ... o desactive la función para girar las imágenes 0 180 Exposure Setup seleccione una opción Auto seleccione esta opción para ajustar automáticamente la configuración de la exposición Manual seleccione esta opción para ajustar manualmente la configuración de la exposición Ajuste la opción Manual Exposure a continuación Manual Exposure esta función solo se muestra si se ha seleccionado Manual en Expo...

Страница 122: ...e y seleccione On El modo PIP debería de mostrarse en la pantalla 3 Se puede cambiar la vista principal o ajustar la posición o el tamaño de la vista secundaria 4 Para desactivar el modo PIP vaya a menú OSD Picture In Picture PIP Mode y seleccione Off Main Screen Switch seleccione una fuente de vídeo para que se muestre en la vista principal Opciones disponibles A30 y External Source cámara conect...

Страница 123: ... active o desactive esta función Visor cubre parte de la vista de la cámara y permite mostrar la parte deseada de la vista de la cámara Para activar la función Visor 1 Vaya a menú OSD Presentation Visor y seleccione On se mostrará la parte superior izquierda de la vista de la cámara 2 Utilice los botones y del mando a distancia para revelar una mayor parte del área oculta 3 Para desactivar la func...

Страница 124: ... para la opción Timer Audio Audio Noise Reduction active o desactive la función Noise Reduction Echo Cancellation active o desactive la función Echo Cancellation Microphone Volume ajuste el volumen del micrófono 0 32 Speaker Volume ajuste el volumen del altavoz 0 15 Audio Input Source seleccione una fuente de entrada de audio Opciones disponibles MIC In y LINE In ...

Страница 125: ...o desconecte el cable USB de la unidad Seleccione un almacenamiento para guardar las imágenes y vídeos capturados Opciones disponibles Embedded o USB Drive Nota 1 El dispositivo detectará automáticamente si se ha conectado una unidad USB Si hay una unidad USB conectada el dispositivo asignará automáticamente USB Drive a los datos de almacenamiento 2 El almacenamiento interno Embedded solo puede al...

Страница 126: ... almacenamiento para realizar una copia de seguridad de las imágenes del almacenamiento interno Embedded al almacenamiento seleccionado Save Setting guarde los ajustes actuales como el brillo el modo de vista previa el contraste etc como un perfil Se pueden configurar hasta tres perfiles Para ello después de configurar todos los ajustes seleccione un perfil y pulse el botón del mando a distancia p...

Страница 127: ...e Setup Auto Manual Manual W B Blue This function only appears when Manual is selected in White Balance Setup 0 255 Manual W B Red This function only appears when Manual is selected in White Balance Setup 0 255 Focus 0 1023 Picture In Picture PIP Mode On Off Main Screen Switch A30 External Source Position Bottom Left Top Left Top Right Bottom Right Manual Size Large Small Start PIP Automatically O...

Страница 128: ...selected in Capture Type 1 600 sec Storage Embedded USB Drive Format Embedded USB Drive USB to PC Camera Storage USB Streaming Resolution Max to 4K Max to 1080P Flicker 50Hz 60Hz System Language English Traditional Chinese Japanese German French Spanish Simplified Chinese Italian Russian Indonesia Finland Polish Output Display 3840x2160 60 3840x2160 30 1920x1080 1280x720 1024x768 Backup USB Drive ...

Страница 129: ...otación del objetivo mecánico Derecha 90 con base giratoria Izquierda 90 con base giratoria Área de disparo A3 o superior Zoom Zoom digital de 23x Enfoque Enfoque automático manual mediante software Interfaz Salida HDMI 1 admite salida de hasta 4K Puerto USB de tipo A 1 para entrada de la transmisión de la unidad flash USB y cámara Puerto USB de tipo C 1 conexión a PC para salida de la transmisión...

Страница 130: ...almacenamiento USB FAT32 de 32 GB Giro automático Sí Función de audio AEC tecnología de supresión del ruido de fondo AI reducción de ruido General Fuente de alimentación 100 240 VCA 50 60 Hz 12 V CC 2 A Entrada de alimentación Luz encendida 12 V CC 1 25 A 15 W máx Luz apagada 12 V CC 1 21 A 14 5 W máx Dimensiones ancho x largo x alto En uso 96 9 x 239 04 x 348 4 mm Plegada 96 9 x 98 1 x 184 5 mm P...

Страница 131: ...mientras se espera a que el dispositivo de visualización y la unidad se sincronicen Espere entre 4 y 7 segundos hasta que aparezca la imagen de la cámara en la pantalla La imagen en la pantalla de presentación se muestra distorsionada o borrosa 1 Si procede restablezca todos los ajustes modificados a los valores predeterminados de fábrica Pulse MENU vaya a SYSTEM Default y seleccione YES en el men...

Страница 132: ...produit ou cette documentation même s il a été prévenu de la possibilité de tels dommages MARQUES COMMERCIALES AVer est une marque commerciale propriété d AVer Information Inc Les autres marques commerciales mentionnées dans ce document à seule fin descriptive appartiennent à leurs sociétés respectives COPYRIGHT 2022 AVer Information Inc Tous droits réservés June 28 2022 Aucune portion de ce docum...

Страница 133: ...angles du bras réglable comme illustré ci dessous Information de sécurité sur les piles de la commande à distance Rangez les piles en un lieu frais et sec Ne jetez pas les piles avec les ordures ménagères Déposez les aux points de collecte spécifiques ou rapportez les au magasin le cas échéant Enlevez les piles en cas de non utilisation prolongée Une pile qui fuit peut corroder et endommager la co...

Страница 134: ...sur le site Centre de téléchargement https www avereurope com download center Assistance Technique https www avereurope com technical support Coordonnées de contact AVer Information Europe B V https www avereurope com Westblaak 134 3012KM Rotterdam The Netherlands Tel 31 0 10 7600 550 Assistance technique eu rma aver com ...

Страница 135: ...es d utilisation 4 Connexion 5 Télécommande 6 Pivotement automatique 9 Configuration de la caméra 10 Menu sur écran OSD 10 Image Image 11 Incrustation Picture In Picture 12 Presentation Presentation 13 Son Audio 14 Parametres Setting 15 SYSTÈME System 16 Arbre du menu OSD 17 Spécifications 19 Guide de dépannage 21 ...

Страница 136: ...ateur secteur Cordon d alimentation 12V 2A Télécommande Câble USB 2 0 de type C à type A 1 8 m Carte de code QR Carte de garantie La prise d alimentation diffère en fonction de la prise de courant standard du pays d achat Uniquement pour le Japon ...

Страница 137: ...arrêt remarque 3 12 Lampe LED 13 Objectif 14 Bras pliant 15 Boutons de fonctions 16 Taraudage pour trépied Vis 1 4 20 non fournie Remarques 1 Le port USB de type A permet la connexion à une caméra USB ou à un stockage externe Caméra USB connectez une caméra USB pour exécuter la fonction d incrustation PIP Stockage externe prend en charge un stockage FAT de jusqu à 32 Go pour la capture de photos o...

Страница 138: ...Maintenir appuyé pour un zoom arrière prolongé Appuyer brièvement pour allumer ou éteindre la lampe LED Maintenir appuyé pendant 3 secondes pour pivoter manuellement de 0 à 180 dans la vue en direct Appuyer brièvement pour augmenter le volume Maintenir appuyé pour augmenter le volume de manière continue Appuyer brièvement pour baisser le volume Maintenir appuyé pour baisser le volume de manière co...

Страница 139: ...ran OSD Réappuyer pendant 3 secondes pour le quitter Retour à la page du menu précédent Haut Les boutons Haut Bas Gauche et Droite peuvent être utilisés pour Sélectionner des éléments dans le menu OSD Si vous avez sélectionné Manuel pour le mode incrustation PIP ces boutons permettent de positionner la fenêtre incrustée Exécution d opérations pendant la configuration de la fonction Présentation Ba...

Страница 140: ... micro externe Du fait que les logiciels de visioconférence comme Google Hangouts Windows Skype Mac ou Teams Windows et Mac peuvent régler le volume automatiquement l utilisateur pourrait observer une instabilité aléatoire du volume pendant l utilisation de l appareil Remarque Le son peut être reproduit sur le haut parleur intégré 4 Pour brancher des périphériques USB Vous pouvez vous connecter à ...

Страница 141: ...r activer le viseur 1 Appuyez sur le bouton du viseur pour entrer à la page de configuration du viseur du menu OSD 2 Sélectionnez On et appuyez sur pour activer le viseur La partie supérieure gauche de la vue caméra s affichera 3 Utilisez les boutons et pour dévoiler plus de la partie couverte par la caméra 4 Pour quitter le mode Viseur réappuyez sur le bouton Visor 6 Pivotement Faire pivoter l im...

Страница 142: ...pour entrer à la page de configuration de la mise en valeur dans le menu OSD 2 Sélectionnez On et appuyez sur pour activer la mis en valeur La zone centrale de la vue caméra s affichera 3 Le cas échéant réglez la zone affichée à l aide des commandes et 4 Pour quitter le mode de mise en valeur réappuyez sur le bouton Spotlight 16 Écran divisé Divise l écran en deux Un côté affiche la vue caméra en ...

Страница 143: ...ez une sélection Entrez au sous menu du menu OSD Lecture Pause de la lecture vidéo Affichez les images capturées 20 Lampe Allumage extinction de la lampe LED 21 Luminosité Réglage de la luminosité 22 Paramètres par défaut Restaurez les paramètres d usine 23 SUP Effacez la photo ou la vidéo sélectionnée en mode lecture ...

Страница 144: ...niverselle A30 peut être utilisée en tant que caméra pour documents ou que Webcam la fonction de Pivotement automatique assure que l image en direct s affiche correctement en se retournant automatiquement en cas d inversion Vous pouvez vous reporter aux deux scénarios suivants Scénario 1 si la personne qui présente cadre d abord un document puis remet la caméra d aplomb pour se cadrer elle même l ...

Страница 145: ... depuis la télécommande fournie ou avec les boutons de fonctions de l appareil Cette section décrit l utilisation de l OSD depuis la télécommande fournie Appuyez sur le bouton Menu de la télécommande pour appeler le menu OSD Ensuite sélectionnez les pages et les fonctions à l aide des commandes et Appuyez sur pour faire une sélection ou pour entrer à un sous men Utilisez et pour paramétrer ou pour...

Страница 146: ...rror activation désactivation de la fonction de retournement des images vers la gauche ou la droite Auto Rotate activation désactivation de la fonction de pivotement automatique des images de 0 ou180 Exposure Setup sélectionnez une option Auto sélectionnez le réglage automatique de l exposition Manual sélectionnez le réglage manuel de l exposition Voir ci dessous pour Manual Exposure Setup Manual ...

Страница 147: ... mode PIP 1 Connectez une caméra USB au port USB type A de l A30 2 Allez au menu OSD Picture in Picture PIP Mode et sélectionnez On activé Le mode PIP devrait s afficher sur l écran 3 Vous pouvez alors commuter la vue principale ou régler la position et la taille de la vue secondaire 4 Pour désactiver le mode PIP allez au menu OSD Picture In Picture PIP mode et sélectionnez Off désactivé Main Scre...

Страница 148: ...ctivez ou désactivez cette fonction Le viseur masque une partie de la vue caméra et permet au présentateur de montrer la partie voulue de cette vue Pour activer Visor 1 Allez au menu OSD Presentation Visor et sélectionnez On activé La partie supérieure gauche de la vue caméra s affichera 2 Pour élargir la partie non masquée utilisez les boutons et de la télécommande 3 Pour désactiver la fonction V...

Страница 149: ...essus Son Audio Noise Reduction activez ou désactivez la fonction Noise Reduction Echo Cancellation activez ou désactivez la fonction Echo Cancellation Microphone Volume réglez le volume du micro de 0 à 32 Speaker Volume réglez le volume du haut parleur de 0 à 15 Audio Input Source sélectionnez une source pour l entrée audio Les options sont MIC In entrée micro ou LINE In entrée ligne ...

Страница 150: ...ction retirez d abord le câble USB de l appareil Sélectionnez un support de stockage pour stocker les images capturées ou les vidéos enregistrées Les options sont Embedded ou USB Drive Remarque 1 L appareil détecte automatiquement si une clé USB est connectée Si oui l appareil choisira automatiquement USB Drive pour stocker les données 2 Le stockage interne Embedded ne peut stocker qu un maximum d...

Страница 151: ...nnez un support de stockage pour sauvegarder les images enregistrées sur le support interne Embedded Save Setting enregistrement des paramètres actuels luminosité mode de prévisualisation contraste etc en qualité de profil Il est possible de configurer jusqu à trois profils Pour ce faire une fois tous les paramètres définis sélectionnez un profil et appuyez sur le bourton de la télécommande pour s...

Страница 152: ...nce Setup Auto Manual Manual W B Blue This function only appears when Manual is selected in White Balance Setup 0 255 Manual W B Red This function only appears when Manual is selected in White Balance Setup 0 255 Focus 0 1023 Picture In Picture PIP Mode On Off Main Screen Switch A30 External Source Position Bottom Left Top Left Top Right Bottom Right Manual Size Large Small Start PIP Automatically...

Страница 153: ...selected in Capture Type 1 600 sec Storage Embedded USB Drive Format Embedded USB Drive USB to PC Camera Storage USB Streaming Resolution Max to 4K Max to 1080P Flicker 50Hz 60Hz System Language English Traditional Chinese Japanese German French Spanish Simplified Chinese Italian Russian Indonesia Finland Polish Output Display 3840x2160 60 3840x2160 30 1920x1080 1280x720 1024x768 Backup USB Drive ...

Страница 154: ...24x768 Mécanisme optique Rotation de l objectif mécanique À droite 90 avec base de rotation à gauche 90 avec base de rotation Champ de vision A3 ou plus Zoom Zoom numérique x23 Mise au point Automatique manuelle via logiciel Interface Sortie HDMI 1 prend en charge jusqu à 4K en sortie d affichage Port USB de type A 1 pour clé USB ou entrée de streaming de caméra USB Port USB de type C 1 connexion ...

Страница 155: ...supports de stockage USB FAT32 32 Go Pivotement automatique Oui Fonction son AEC technologie de suppression du bruit de fond AI réduction de bruit General Source d alimentation 100 240 VCA 50 60Hz 12 VCC 2 A Entrée de puissance Lampe allumée 12 VCC 1 25 A 15 W max lampe éteinte 12 VCC 1 21 A 14 5 W max Dimensions La x P x H En service 96 9 x 239 04 x 348 4 mm Pliée 96 9 x 98 1 x 184 5 mm Poids net...

Страница 156: ...rd se produit pendant que la caméra et l afficheur se synchronisent Attendez de 4 à 7 secondes pour que l image caméra s affiche sur l écran L image sur l écran de présentation est déformée ou floue 1 Réinitialisez le cas échéant tous les paramètres modifiés aux valeurs d usine Appuyez sur MENU puis allez à SYSTEM Default et sélectionnez YES dans le menu OSD 2 S il y a lieu utilisez les fonctions ...

Страница 157: ...AVerVision A30 Telecamera Universale Manuale dell utente ...

Страница 158: ...anche qualora siano state fornite in formazioni relativamente alla possibilità dei summenzionati danni MARCHI COMMERCIALI AVer è un marchio registrato da AVer Information Inc Altri marchi commerciali qui usati unicamente a scopo descrittivo appartengono alle rispettive aziende COPYRIGHT 2022 Tutti i diritti di questo oggetto appartengono ad AVer Information Inc June 28 2022 La riproduzione o la tr...

Страница 159: ...i angoli del braccio regolabile secondo le illustrazioni indicate qui di seguito Informazioni sulla sicurezza delle batterie del telecomando Conservare le pile in un luogo fresco e secco Non smaltire le pile usate insieme ai rifiuti domestici Smaltire le pile presso gli specifici punti di raccolta o eventualmente riportarle in negozio Rimuovere le batterie se non vengono utilizzate per un lungo pe...

Страница 160: ... visitare Centro download https www avereurope com download center Assistenza tecnica https www avereurope com technical support Informazioni di contatto AVer Information Europe B V https www avereurope com Westblaak 134 3012KM Rotterdam The Netherlands Tel 31 0 10 7600 550 Assistenza tecnica eu rma aver com ...

Страница 161: ...mento 4 Collegamento 5 Telecomando 6 Rotazione automatica 9 Impostazione della telecamera 10 Menu OSD 10 Image Image 11 Picture In Picture Picture In Picture 12 Presentazione Presentation 13 Audio Audio 14 Setting Setting 15 System System 16 Struttura del Menu OSD 17 Specifiche 19 Guida alla risoluzione dei problemi 21 ...

Страница 162: ...di alimentazione cavo di alimentazione 12V 2A Telecomando Cavo USB 2 0 da Tipo C a Tipo A 1 8M Carta con codice QR Garanzia Il cavo di alimentazione varia a seconda della presa di corrente standard del paese in cui viene venduto il prodotto Solo per Giappone ...

Страница 163: ...ccensione Nota 3 12 Lampada LED 13 Obiettivo della telecamera 14 Braccio pieghevole 15 Pulsanti funzione 16 Foro per vite per treppiede Vite 1 4 20 non fornita in dotazione Note 1 La porta USB di Tipo A può essere usata per connettersi a una telecamera USB o a una memoria esterna Telecamera USB Collegare una telecamera USB per eseguire la funzione PIP Archiviazione esterna Supporta fino a 32GB di ...

Страница 164: ...ere premuto il pulsante per rimpicciolire in modo continuo Premere brevemente per accendere spegnere la lampada LED Premere a lungo per 3 secondi per ruotare manualmente 0 180 della vista dal vivo Premere brevemente per alzare il volume Tenere premuto il pulsante per aumentare il volume in modo continuo Premere brevemente per abbassare il volume Tenere premuto il pulsante per diminuire il volume i...

Страница 165: ... dal menu OSD premere di nuovo a lungo il pulsante Indietro alla pagina del livello precedente Su I pulsanti Su Giù Sinistra Destra possono essere usati quando Selezione delle voci nel menu OSD Se l opzione Manuale è selezionata per la modalità PIP usare questi pulsanti per selezionare una posizione della finestra Sub visualizzazione Esecuzione di operazioni durante l impostazione della funzione d...

Страница 166: ...à disattivato quando viene connesso un microfono esterno Dato che i software di videoconferenza come Google Hangouts Windows Skype Mac o Teams Windows e Mac possono regolare automaticamente il volume l utente potrebbe sperimentare un volume di tanto in tanto instabile mentre si serve dell unità Nota L audio può essere emesso dall altoparlante integrato 4 Per il collegamento del dispositivo USB Sar...

Страница 167: ... telecamera e consente al relatore di rivelare la parte desiderata della vista della telecamera Per abilitare il Visore 1 Premere il pulsante Visore per entrare nella pagina di impostazione del Visore nel menu OSD 2 Selezionare On e premere per abilitare il Visore la parte superiore sinistra della vista della telecamera sarà esposta 3 Usare i pulsanti per mostrare una porzione maggiore della vista...

Страница 168: ...odalità di Riproduzione interrompe la riproduzione del video 15 Spotlight Spotlight si concentrerà sull area centrale della vista della telecamera e coprirà tutte le altre aree Per attivare Spotlight 1 Premere il pulsante Spotlight per accedere alla pagina di impostazione Spotlight nel menu OSD 2 Selezionare On e premere per attivare Spotlight verrà visualizzata l area centrale della vista della t...

Страница 169: ...mettere in pausa fermare il conto alla rovescia del timer Selezionare l intervallo del Timer per impostare la durata del timer 19 Confermare una selezione Entrare nel sottomenu nel menu OSD Riprodurre mettere in pausa la riproduzione video Visualizzare le immagini acquisite 20 Lampada Attivare disattivare la lampada LED 21 Luminosità Regolare la luminosità 22 Predefinito Ripristinare l impostazion...

Страница 170: ...0 Dato che la Telecamera Universale A30 può essere usata come una telecamera per documenti o una webcam la funzione di Rotazione automatica è in grado di garantire che le immagini dal vivo vengano visualizzate con il giusto orientamento che capovolgerà automaticamente le immagini quando appaiono capovolte Qui sotto ci sono 2 scenari per il vostro riferimento Scenario 1 Quando un presentatore sta r...

Страница 171: ...ecomando in dotazione o i pulsanti funzione sull unità per azionare il menu OSD Il contenuto di questo capitolo descrive le operazioni OSD utilizzando il telecomando in dotazione Premere il pulsante Menu sul telecomando per aprire il menu OSD e Utilizzare per selezionare tra le pagine o le opzioni Premere per effettuare una selezione o accedere al sottomenu Usare per regolare le impostazioni o per...

Страница 172: ...are o disabilitare la funzione di rotazioneautomatica 0 180 delle immagini Exposure Setup Selezionare un opzione Auto Selezionare per regolare automaticamente l impostazione dell esposizione Manual Selezionare per regolare automaticamente l impostazione dell esposizione Regolare il valore di Manual Exposure qui di seguito Manual Exposure Questa funzione appare solo quando l opzione Manual è selezi...

Страница 173: ...e In Picture PIP Mode e selezionare On Si dovrebbe vedere la modalità PIP visualizzata sullo schermo 3 Cambiare opzionalmente la vista principale o regolare la posizione o le dimensioni della sotto visualizzazione 4 Per disattivare la modalità PIP andare sul menu OSD Picture In Picture PIP Mode e selezionare Off Main Screen Switch Selezionare una sorgente video da visualizzare nella vista principa...

Страница 174: ...itare o disabilitare la funzione Visor copre parte della vista della telecamera e permette al presentatore di rivelare la parte desiderata della vista della telecamera Per attivare Visor 1 Andare al menu OSD Presentation Visor e selezionare On la parte superiore sinistra della vista telecamera verrà esposta 2 Usare i pulsanti sul Telecomando per mostrare una porzione ancora maggiore della parte co...

Страница 175: ...sopra Audio Audio Noise Reduction Attivare o disattivare la funzione Noise Reduction Echo Cancellation Abilita o disabilita la funzione Echo Cancellation Microphone Volume Regolare il volume del microfono 0 32 Speaker Volume Regolare il volume dell altoparlante 0 15 Audio Input Source Selezionare una sorgente di ingresso audio Le opzioni includono MIC In e LINE In ...

Страница 176: ...funzione rimuovere prima il cavo USB dall unità Selezionate una memoria per memorizzare le immagini acquisite o i video registrati Le opzioni comprendono Embedded oppure USB Drive Nota 1 L unità rileverà automaticamente se è stato collegato un drive USB Se è collegato un drive USB l unità assegnerà automaticamente USB Drive per memorizzare i dati 2 L archiviazione interna Embedded può archiviare s...

Страница 177: ...iazione per il backup delle immagini dall archiviazione Embedded alla memoria selezionata Save Setting Salva le impostazioni correnti come luminosità modalità di anteprima contrasto e così via come profilo Sarà possibile configurare fino a 3 profili Per fare questo dopo aver configurato tutte le impostazioni selezionate un profilo e poi premete il pulsante sul telecomando per salvare le impostazio...

Страница 178: ...alance Setup Auto Manual Manual W B Blue This function only appears when Manual is selected in White Balance Setup 0 255 Manual W B Red This function only appears when Manual is selected in White Balance Setup 0 255 Focus 0 1023 Picture In Picture PIP Mode On Off Main Screen Switch A30 External Source Position Bottom Left Top Left Top Right Bottom Right Manual Size Large Small Start PIP Automatica...

Страница 179: ...selected in Capture Type 1 600 sec Storage Embedded USB Drive Format Embedded USB Drive USB to PC Camera Storage USB Streaming Resolution Max to 4K Max to 1080P Flicker 50Hz 60Hz System Language English Traditional Chinese Japanese German French Spanish Simplified Chinese Italian Russian Indonesia Finland Polish Output Display 3840x2160 60 3840x2160 30 1920x1080 1280x720 1024x768 Backup USB Drive ...

Страница 180: ...dell obiettivo meccanica Destra 90 con base di rotazione Sinistra 90 con base di rotazione Area di ripresa A3 o superiore Zoom zoom digitale 23x Messa a fuoco Messa a fuoco automatica manuale via software Interfaccia Uscita HDMI 1 l uscita display supporta fino a 4K Porta USB di Tipo A 1 per la chiavetta USB e l ingresso dello streaming da fotocamera Porta USB di Tipo C 1 collegare al PC per l usc...

Страница 181: ...oria USB Rotazione automatica Sì Funzione audio AEC tecnologia di eliminazione del rumore di fondo AI riduzione del rumore Generale Fonte di alimentazione 100 240V CA 50 60Hz 12V CC 2A Ingresso alimentazione Lampada accesa 12V CC 1 25A 15W max lampada spenta 12V CC 1 21A 14 5W max Dimensioni larghezza x profondità x altezza Dimensioni di funzionamento 96 9 x 239 04 x 348 4 mm Dimensioni da chiuso ...

Страница 182: ... che il dispositivo di visualizzazione e l unità si sincronizzino Attendere circa 4 7 secondi per vedere l immagine della telecamera sullo schermo L immagine sullo schermo di presentazione è distorta o l immagine è sfocata 1 Ripristina tutte le impostazioni modificate allo stato di default stabilito dal produttore Premere MENU poi andare su SYSTEM Default e selezionare YES nel menu OSD 2 Utilizzar...

Отзывы: