Avenview HDM3D-C6SW-R Скачать руководство пользователя страница 22

www.avenview.com|22 


Section 2: Specifications 
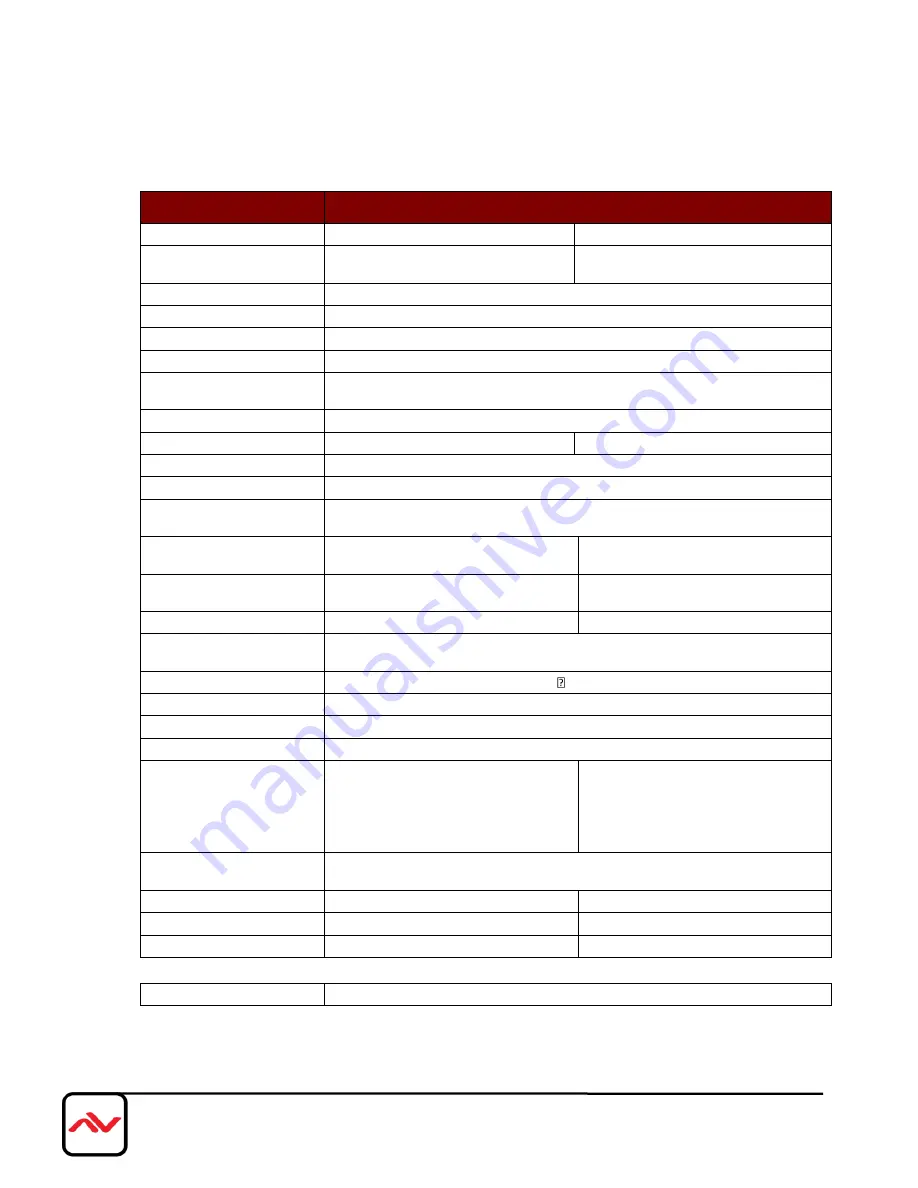
Item


Description


Units 

SW-HDM3D-C6-8x8E 

HDM3D-C6SW-R 

Unit Description 

8x8 HDMI Matrix Switch over CAT6 

with 3D Support 

HDMI Receiver over CAT5 with 3D 

Support 

HDMI Compliance 

HDMI Deep Color & Full 3D 

HDCP Compliance 

Yes 

Video Bandwidth


Single Link 225 MHz (6.75Gbps) 

Supported Resolutions 

480i / 480p / 720p / 1080i / 1080p60 

Resolution and Distance 

Full HD:

 (1080p) ~ 35meter (115feet) (CAT5e) / 40meter (130feet) (CAT6) 

HD:

 (720p/1080i) ~ 50meter (165feet) (CAT5e) / 55meter (180feet) (CAT6) 

Audio Support 

Surround Sound (up to 7.1 Ch.) or Stereo Digital Audio 

Equalization 

8 Level Digital Control 

Input TMDS Signal 

1.2 Volts (peak-to-peak) 

Input DDC Signal 

5 Volts (peak-to-peak, TTL) 

ESD Protection 

-    Human body model — ±15kV (air-gap discharge) & ±8kV (contact discharge) 
-    Core chipset — ±8kV 

Input 

8x HDMI / 1x RS-232 / 1x Ethernet 

1x IR socket for IR receiver 

1x RJ-45 /   

1x IR socket for IR receiver 

Output 

8x RJ-45 / 

5x IR socket for IR blaster 

1x HDMI / 

1x IR socket for IR blaster 

HDMI Input Selection 

Push Button / IR Remote / RS232 

Push Button / IR Remote 

HDMI Source Control 

Through IR Control Path from IR Receiver at Remote Receiver to IR Blaster at 

Matrix Switch 

IR Remote Control 

Electro-optical characteristics:   = 25° / Carrier frequency: 20~60kHz 

HDMI Connector 

Type A (19 pin female) 

RJ45 Connector 

WE/SS 8P8C with 2 LED indicators 

RS232 Connector 

DE-9 (9-pin D-sub Female) 

3.5mm Connector 

Earphone jack for IR blaster 

[IR Main]

 IR control on all source 

devices 

[IR PASS-THROUGH 1~8]

 IR control on 

individual source device 

Earphone jack for IR receiver 

[IR RECEIVER]

 Receives IR commands 

from remote control 

DIP Switch 

[SW1~SW8] 2-pin for EDID & audio mode 

[SW Main] 4-pin for operation & firmware update 

Dimensions (L x W x H) 

17” x 11” x 1.7” 

3.3” x 2.4” x 1” 

Power Supply 

5V 4A DC 

5V 2A DC 

Power Consumption 

20 Watts [max] 

1 Watt [max]   

Environmental


Operating Temperature 

32˚ ~ 104˚F (0˚ to 40˚C) 


Содержание HDM3D-C6SW-R

Страница 1: ...without notice No license whether express implied or otherwise to any intellectual property rights is granted by this publication Except as set forth in Avenview Standard Terms and Conditions of Sale...

Страница 2: ...n 4 1 5 Package Contents 5 1 6 Before Installation 5 1 7 Panel Description 6 1 7 1 SW HDM3D C6 8x8E Front Panel 6 1 7 2 SW HDM3D C5 8x8E Rear Panel 6 1 7 3 HDM3D C6SW R 7 1 8 IR Control Patch 8 HDM3D...

Страница 3: ...enview SW HDM3D C6 8x8E HDMI Matrix Switch over Single CAT6 with Full 3D Support and Ethernet has been tested for conformance to safety regulations and requirements and has been certified for internat...

Страница 4: ...the source site each remote module is easily installed without power supply Furthermore the built in IR extension function users can control the HDMI source devices such as Blu ray Disc Player Satell...

Страница 5: ...anual x 1 Software CD x 1 1 6 Before Installation Put the product in an even and stable location If the product falls down or drops it may cause an injury or malfunction Don t place the product in too...

Страница 6: ...anel push buttons used to select the number of input source LED display for input channels 1 7 2 SW HDM3D C5 8x8E Rear Panel 5 5V DC 5V DC power jack 6 ETHERNET Ethernet control port 7 RS 232 RS 232 c...

Страница 7: ...Level Signal Level 0 7 Adjust the 8 level equalization control to the received HDMI signals The HDMI signal level varies from 0 strongest to 7 weakest for respective transmission length from longest...

Страница 8: ...hat are setting at respective input channel from 1 to 4 System IR Receives IR commands from remote control HDM3D C6SW R IR BLASTER IR control on individual display device IR RECEIVER IR receiver conne...

Страница 9: ...build in IR receiver of the sources 4 Connect the 5V 6A DC power supply to the SW HDM3D C6 8x8E 5 Power on all HDMI sources 6 Power on the SW HDM3D C6 8x8E Receiver 1 Connect each HDMI output to HDMI...

Страница 10: ...ration 0 7 which you want to save current input output mapping 3 After you select the desired mapping configuration number the LED will blink twice and the mapping setting will be saved 4 If you push...

Страница 11: ...tting is effective 6 The LED will show 0 0 if the setting is success The LED will show F F if the setting is failure 5 EDID Learning Mode 1 Push input learn button to select the input channel which yo...

Страница 12: ...2 COM Port Selection 8 Network Button 3 Connection Status 9 Mapping Button 4 Connect Disconnect Button 10 Default Reset Button 5 Power On Off Button 11 In Out Switch Button 6 EDID Button 12 Mute Outpu...

Страница 13: ...om 13 2 COM Port Selection Click button to select COM Port 3 Connection Status 1 Connected Status 2 Connecting Status 3 Disconnected Status 4 Connect Disconnect Button Click this button to change conn...

Страница 14: ...ew com 14 5 Power On Off Button Click this button to power on off Power on status Blue Click this button to power off device Standby Mode Power off status Red Click this button to power on device 6 ED...

Страница 15: ...put c Click Learn button to learn default EDID 2 Load EDID File to Input a Select Input b Click Load button to select the EDID file 3 Learn EDID From Display a Select EDID Port b Select Input c Click...

Страница 16: ...avenview com 16 b Select the EDID content c Click Save EDID on Computer to save the generated EDID as a file View EDID Content a Select Input or From File b Click View button to read the EDID and anal...

Страница 17: ...EDID as a file on computer 7 Firmware Update Button 1 Click Load File to select the firmware file which you want to update 2 Click Break button 3 Quickly remove and reconnect the power input connecto...

Страница 18: ...IP address 2 Select Ethernet and then will be a pop up windows 3 Key in the device IP address to the pop up windows 4 Close the pop up windows 5 Click the connected button to connect 9 Mapping Button...

Страница 19: ...ing8 b Click Confirm button to confirm the change 10 Default Reset Button Click this button to do factory default reset The default reset process will take about 80 90 seconds 11 In Out Switch Button...

Страница 20: ...www avenview com 20 12 Mute Output Button Click the circle button to turn off output s video and audio Ex Mute Output 2...

Страница 21: ...video properly Because the HDMI source devices and displays may have various level of capability in playing audio and video the general principle is that the source device will output the lowest stan...

Страница 22: ...socket for IR receiver 1x RJ 45 1x IR socket for IR receiver Output 8x RJ 45 5x IR socket for IR blaster 1x HDMI 1x IR socket for IR blaster HDMI Input Selection Push Button IR Remote RS232 Push Butto...

Страница 23: ...ection CLEAR Clear the previous IR operation STATUS View Preset output Status PRESET Preset Mapping mode LEARN EDID Begin EDID learning from one output TAKE Trigger the previous setting INPUT Select t...

Страница 24: ...rage site Take Ex Save current mapping to 5 1 Press SAVE button d 2 Press number key 5 to select the storage site 5 d 5 3 Press TAKE button Preset Mapping Preset 1 8 1 8 storage site Take Ex Preset sa...

Страница 25: ...ng such products or this documentation for any interruption of service loss or interruption of business loss of anticipatory profits or for punitive incidental or consequential damages in connection w...

Отзывы: