


61
Alu-Legierung
Stahl
Alu-Legierung
Alu-Legierung
Alu-Legierung
Stahl
Alu-Legierung
Alu-Legierung
Alu-Legierung
Stahl
Alu-Legierung
Alu-Legierung
Beliebig
Alu-Legierung
Alu-Legierung
Alu-Legierung
Alu-Legierung
Alu-Legierung
Alu-Legierung
Alu-Legierung
Alu-Legierung
Alu-Legierung
Alu-Legierung
Alu-Legierung
Alu-Legierung
Alu-Legierung
Alu-Legierung
Alu-Legierung
Alu-Legierung
Alu-Legierung
Alu-Legierung
Alu-Legierung
Alu-Legierung
Rostfreier Stahl
Rostfreier Stahl
Rostfreier Stahl
Stahl
Stahl
Stahl
Stahl
Stahl
Stahl
Beliebig
Beliebig
Beliebig
Beliebig
Beliebig
Beliebig
Stahl
Stahl
Stahl
Stahl
Stahl
Rostfreier Stahl
Rostfreier Stahl
Rostfreier Stahl
Beliebig
Beliebig
Beliebig
Beliebig
Beliebig
Beliebig
Beliebig
Beliebig
Alu-Legierung
Alu-Legierung
Alu-Legierung/Stahl
Alu-Legierung/Stahl
Alu-Legierung
Alu-Legierung
Alu-Legierung/Stahl
Alu-Legierung/Stahl
1/8
1/8
1/8
–
5/32
5/32
5/32
3/16
3/16
3/16
3/16
1/4
3/16
5/32
3/16
–
–
–
–
–
–
–
–
–
–
–
–
–
–
–
–
3/16
1/4
1/8
5/32
3/16
–
3/16
1/8
5/32
3/16
–
1/8
5/32
3/16
3/16
1/4
3/16
1/8
5/32
3/16
3/16
3/16
1/8
5/32
3/16
1/8
5/32
3/16
1/4
3/16
1/4
3/16
1/4
3/16
3/16
3/16
3/16
1/4
1/4
1/4
1/4
6.35
3.3
2.9
6.35
3.3
2.8
3.3
2.8
3.3
3.3
4.1
3.3
4.1
3.3
2.8
4.9
6.9
4.7
6.9
5.3
7.2
5.4
7.3
5.4
7.3
5.5
7.3
5.6
7.3
5.6
7.3
4.1
4.4
3.3
2.8
4.8
3.3
3.3
3.3
2.8
4.8
3.3
6.35
3.3
5.7
5.7
3.3
2.8
3.3
2.8
2.8
3.3
2.8
3.3
2.8
2.8
6.35
3.3
3.3
3.3
3.3
3.3
4.8
4.8
6.35
6.35
6.35
6.35
6.65
6.65
6.65
6.65
12.7
12.7
12.7
12.7
12.7
12.7
12.7
12.7
19.0
12.7
12.7
12.7
12.7
12.7
12.7
12.7
12.7
12.7
12.7
12.7
12.7
12.7
12.7
12.7
12.7
12.7
12.7
12.7
12.7
12.7
12.7
12.7
12.7
12.7
12.7
12.7
12.7
12.7
12.7
12.7
12.7
12.7
12.7
12.7
12.7
12.7
12.7
12.7
12.7
12.7
12.7
19.0
12.7
12.7
12.7
12.7
12.7
12.7
12.7
12.7
12.7
12.7
12.7
12.7
12.7
12.7
12.7
12.7
12.7
12.7
12.7
12.7
71210-05002
71210-16070
07340-06401
2
71210-05002
71210-16070
07381-04701
07340-06501
2
07381-04701
07340-04800
07490-04401
07340-06601
2
07612-02001
71210-16020
71210-16070
07381-04701
71210-16001
71210-16006
3
71210-16002
71210-16007
3
71210-16003
71210-16008
3
71210-16004
71210-16009
3
71210-16005
71210-16010
3
71220-16006
71220-16011
3
71220-16007
71220-16012
3
71220-16008
71220-16013
3
07605-00220
71220-16080
71210-16070
07381-04701
07498-01401
07340-06201
07340-06201
71210-16070
07381-04701
07498-01401
07612-02001
71210-05002
71210-16070
07348-07001
71210-16050
71220-60001
07381-04701
71210-16070
07381-04701
07381-04701
07340-04800
07381-04701
71210-16070
07381-04701
07381-04701
71210-05002
07340-06201
07340-06201
07612-02001
07340-06201
07612-02001
71220-16060
71220-16061
703-A-25-6TA
703-B-21
703-A-25-6T
703-B-26
743-A-25-8TA
703-B-21
743-A-25-8T
743-B-26
3.2
3.2
3.2
3
4.0
4.0
4.0
4.8
4.8
4.8
4.8
6.4
4.8
4.0
4.8
4
4
5
5
6
6
6.5
6.5
7
7
8
8
9
9
10
10
4.8
6.4
3.2
4.0
4.8
4.3
4.8
3.2
4.0
4.8
6
3.2
4.0
4.8
4.8
6.4
4.8
3.2
4.0
4.8
4.8
4.8
3.2
4.0
4.8
3.2
4.0
4.8
6.4
4.8
6.4
4.8
6.4
4.8
4.8
4.8
4.8
6.4
6.4
6.4
6.4
AVEX
®
Breitflansch
MONOBOLT
®
BULBEX
®
AVSEAL
®
TLR
®
AVINOX
®
II
T-LOK
®
AVIBULB
®
AVDEL
®
SR
Senkkopf
INTERLOCK
®
STAVEX
®
Breitflansch-
Senkkopf
Q™ RIVET
CHERRYMATE™
KLAMPTITE™
T™ RIVET
Breitflansch
Breitflansch
Breitflansch
Breitflansch
… 0 0 1
… 0 0 4
… 0 0 3
… 0 0 1
… 0 0 4
… 0 1 0
… 0 0 9
… 0 1 0
… 0 1 6
… 0 1 7
… 0 1 5
… 0 2 1
… 2 0 0
… 0 0 4
… 0 1 0
… 1 6 0
… 1 8 0
… 1 6 1
… 1 8 1
… 1 6 2
… 1 8 2
… 1 6 3
… 1 8 3
… 1 6 4
… 1 8 4
… 1 6 5
… 1 8 5
… 1 6 6
… 1 8 6
… 1 6 7
… 1 8 7
… 1 4 0
… 1 4 1
… 0 0 4
… 0 1 0
… 0 8 2
… 1 2 0
… 1 2 0
… 0 0 4
… 0 1 0
… 0 8 2
… 0 2 1
… 0 0 1
… 0 0 4
… 0 6 2
… 0 6 4
… 0 6 3
… 0 1 0
… 0 0 4
… 0 1 0
… 0 1 0
… 0 1 6
… 0 1 0
… 0 0 4
… 0 1 0
… 0 1 0
… 0 0 1
… 1 2 0
… 1 2 0
… 0 2 1
… 1 2 0
… 0 2 1
… 4 3 0
… 4 3 5
… 3 8 0
… 3 8 1
… 3 8 3
… 3 8 4
… 3 8 5
… 3 8 6
… 3 8 7
… 3 8 8
A
B
COMPLETE TOOL
PART NUMBER :
precede with
71221-00
8
7
6 5
4
2
3
1
61
22.9
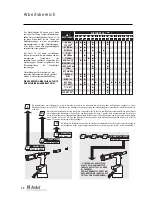
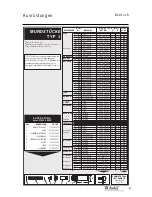
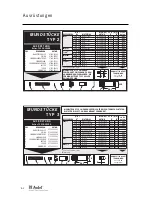
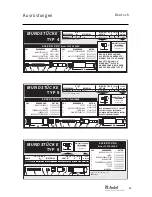
MUNDSTÜCKE
TYP 1
1
Zuerst in Zoll, dann in mm.
2
Mundstück-Vorderteil NUR mit Schrauben verwenden.
3
Langes Mundstück zum tiefen Einsetzen.
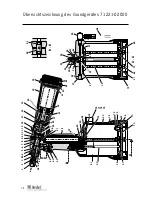
A U S R Ü S T U N G
Art-nr. 71210-15000
POS.
BENENNUNG
ART-NR.
1
MUNDSTÜCKHÜLSE
07340-00306
2
O-RING
07003-00067
3
SPANNBACKENPATRONE
07340-00304
4
SPANNBACKEN
71210-15001
5
SPANNBACKENSPREIZER
07498-04502
6
PUFFER
71210-05001
7
FEDER
07500-00418
8
KLEMMRING
07340-00327
* ZUSÄTZLICH zu der unten gezeigten kompletten
Ausrüstung steht eine extralange komplette
Ausrüstung für das Setzen von 1/4" Monobolts
®
in
Anwendungen mit beschränktem Zugang zur
Verfügung (siehe MUNDSTÜCK-Tabelle für Typ 4).
Ø
1
'A'
'B'
N I E T
MATERIAL
M U N D S T Ü C K ( m m )
siehe
unten
ART-NR.
BEZEICHNUNG
Ausrüstungen
Deutsch
Содержание Genesis G3 HD
Страница 2: ......
Страница 21: ...21 Notes English...
Страница 28: ......
Страница 47: ...47 Notes Fran ais...
Страница 54: ......
Страница 73: ...73 Anmerkungen Deutsch...
Страница 80: ......
Страница 99: ...99 Note Italiano...
Страница 106: ......
Страница 108: ......