background image

IP Office Basic Edition 1400 Series Phone User Guide

Page 63

- Issue 7a (30 January 2014)

IP Office Basic Edition

Phone Settings: Ringer Volume

8.6 Display Brightness

To adjust the display brightness: (1408/1416)

1. Press the 

 MENU button. 

2. Use the 

 up and down 

 arrow keys to locate Screen/Sounds or Screen & Sound Options. Press the Select

soft key. 

3. Use the 

 up and down 

 arrow keys to locate Brightness. Press the Select soft key.

4. Use the   up and down   arrow keys to adjust the brightness as required. 

5. When completed, press the Done soft key.

6. Press the Exit soft key to exit the menus.

To adjust the display brightness: (1403)

1. Press the 

 MENU button. 

2. Press # until Screens/Sounds is displayed. 

3. Press # until Bright is displayed. 

4. The current setting is shown. Use the – 

 + rocker button to adjust the brightness. 

5. Press the 

 MENU button to exit the menu. 

8.7 Display Contrast

To adjust the display contrast: (1408/1416)

1. Press the 

 MENU button. 

2. Use the 

 up and down 

 arrow keys to locate Screen/Sounds or Screen & Sound Options. Press the Select

soft key. 

3. Use the 

 up and down 

 arrow keys to locate the option Contrast. Press the Select soft key.

4. Use the   left and right   arrow keys to adjust the brightness as required. 

5. When completed, press the Done soft key.

6. Press the Exit soft key to exit the menus.

To adjust the display contrast: (1403)

1. Press the 

 MENU button. 

2. Press # until Screens/Sounds is displayed. 

3. Press # until Bright is displayed. 

4. The current setting is shown. Use the – 

 + rocker button to adjust the contrast. 

5. Press the 

 MENU button to exit the menu. 

Содержание IP Office 1400 Series

Страница 1: ... Issue 7a 30 January 2014 IP Office Basic Edition 1400 Series Phone User Guide IP Office Basic Edition ...

Страница 2: ...ASED FROM AVAYA INC ANY AVAYA AFFILIATE OR AN AUTHORIZED AVAYA CHANNEL PARTNER AS APPLICABLE UNDER A COMMERCIAL AGREEMENT WITH AVAYA OR AN AUTHORIZED AVAYA CHANNEL PARTNER UNLESS OTHERWISE AGREED TO BY AVAYA IN WRITING AVAYA DOES NOT EXTEND THIS LICENSE IF THE SOFTWARE WAS OBTAINED FROM ANYONE OTHER THAN AVAYA AN AVAYA AFFILIATE OR AN AVAYA AUTHORIZED AVAYA CHANNEL PARTNER AVAYA RESERVES THE RIGHT...

Страница 3: ...ch instance of a vAppliance must be separately ordered If the end user customer or Avaya channel partner would like to install two of the same type of vAppliances then two vAppliances of that type must be ordered Each Product has its own ordering code Note that each instance of a Product must be separately licensed and ordered Instance means one unique copy of the Software For example if the end u...

Страница 4: ... the Avaya Support website http support avaya com Contact Avaya Support See the Avaya Support website http support avaya com for product notices and articles or to report a problem with your Avaya product For a list of support telephone numbers and contact addresses go to the Avaya Support website http support avaya com scroll to the bottom of the page and select Contact Avaya Support ...

Страница 5: ...g Calls 36 3 3 Call Coverage 38 3 4 Locking Your Extension 39 3 5 Account Codes 40 3 6 Do Not Disturb 41 3 6 1 Do Not Disturb Exceptions Using Voicemail 4 45 4 1 Voicemail Coverage On Off Contacts 5 48 5 1 Viewing Contacts Details 49 5 2 Make a Call from the Directory 49 5 3 Editing a Contact 50 5 4 Adding a New Contact 50 5 4 1 Add a Contact from the Call Log 50 5 5 Deleting a Contact Call Log 6 ...

Страница 6: ......

Страница 7: ...IP Office Basic Edition 1400 Series Phone User Guide Page 7 Issue 7a 30 January 2014 IP Office Basic Edition Introduction Chapter 1 ...

Страница 8: ......

Страница 9: ...ternal calls Line Appearance Buttons The next buttons are set as line buttons by your system administrator These buttons are used to make and receive external calls Your system administrator can adjust the number of line appearance buttons on your phone and which lines they represent Other Buttons Any remaining buttons can be programmed for a range of features This is done by your system administr...

Страница 10: ...m left to right For systems running in key system mode the first two programmable buttons 01 and 02 are fixed as Intercom 1 and Intercom 2 buttons For systems running in PBX system mode the first three buttons 01 to 03 are fixed as call appearance buttons Button Numbering 01 02 03 Key System Mode Intercom 1 Intercom 2 03 PBX System Mode Call Appearance Call Appearance Call Appearance ...

Страница 11: ...ode the programmable buttons are numbered from 01 from left to right bottom to top The first two buttons are fixed as intercom buttons Intercom 1 and Intercom 2 For systems running in PBX system mode the programmable buttons are numbered from 01 from left to right top to bottom The first three buttons are fixed as call appearance buttons Key System Mode 05 06 07 08 Intercom 1 Intercom 2 03 04 PBX ...

Страница 12: ...or systems running in PBX system mode the programmable buttons are numbered from 01 from top to bottom The first three buttons are fixed as call appearance buttons Key System Mode PBX System Mode 16 15 14 13 12 11 10 09 08 07 06 05 04 03 Intercom 2 Intercom 1 Call Appearance Call Appearance Call Appearance 04 05 06 07 08 09 10 11 12 13 14 15 16 Additional buttons can be added by the addition of up...

Страница 13: ...ne if it is idle and then make a call using that line Active Line Pickup 68 Line Number Answer or seize the call on the specified line Loudspeaker Paging 70 Page the loudspeaker device attached to the system Simultaneous Paging 70 Page both the loudspeaker device attached to the system and the extensions in calling group 71 Group Calling Ring 7 Calling Group Call the available extensions in one of...

Страница 14: ...n on the phone Caller ID Inspect 17 This function allows you to see the caller ID of a call on another line without interrupting the current call to which you are connected Call Coverage 20 This function allows you to switch call coverage on or off When on any calls to you that ring unanswered also start ringing at your call coverage extension Station Lock 21 This function allows you to lock and u...

Страница 15: ...ing call barred status You will only be able to make internal calls while this is applied D Diverting Forwarding Calls A D is shown on your phone s idle display when you have forward unconditional enabled G Group Member In Group A G is shown on your phone s idle display when have been configured as a member of a hunt group While this is the case you may receive calls targeted to the hunt group N N...

Страница 16: ......

Страница 17: ...IP Office Basic Edition 1400 Series Phone User Guide Page 17 Issue 7a 30 January 2014 IP Office Basic Edition Call Handling Chapter 2 ...

Страница 18: ...Group Call the available extensions in one of the calling groups 1 to 4 Group Calling Page 7 Calling Group Page the available extensions in one of the calling groups 1 to 4 Group Hunting Ring 77 Hunt Group Call the available extensions in one of the hunt groups 1 to 6 Group Hunting Page 77 Hunt Group Page the first available extension in one of the hunt groups 1 to 6 2 You will hear the call progr...

Страница 19: ...number If using a Call Appearance button some systems may require you to dialing a specific prefix when making external calls Your system administrator will inform you if a prefix is required To dial a personal speed dial press FEATURE not on 1403 phone or and select the speed dial between 80 and 89 To dial a system speed dial press FEATURE not on 1403 phone or and select a speed dial between 600 ...

Страница 20: ...u hearing ringing then either the user called already has another call in progress or has a phone that does not support answer To make a page Call 1403 1408 1416 For a call to a group of extensions putting a in front of the extension number of the group being called make the call a page call The group type is ignored instead all users who are members of the group have phones that support auto answ...

Страница 21: ...ringer 3 If you pick up the handset or press SPEAKER or HEADSET not on 1403 phones you are connected to the incoming call To answer a call alerting on a specific line press that button 2 2 1 Answer a Page Call There are two type of calls which your phone will automatically answer the call so that you automatically hear the caller This will only happen if your phone is currently idle ie not on anot...

Страница 22: ... pickup button 1408 1416 1 Press the Admin soft key on the display If you access phone administration during a call only the SPEAKER MUTE and HEADSET buttons still affect the connected call 2 Use the up or down arrow buttons to scroll to Telephone Programming Press Select 3 Press the programmable button you want to change Alternatively Use the up or down arrows to scroll to Button Programming Pres...

Страница 23: ...ed Except in special cases which the system administrator can configure system speed dials do not override any dialing restrictions that apply to an extension Phone users except on 1403 phones can also view and use system speed dials through the phone s CONTACTS menu The first two extensions on the system can also edit the system speed dials through the CONTACTS menu To use a system speed dial 140...

Страница 24: ...on 2 Press FEATURE not on 1403 phone or and dial the two digit personal speed dial code between 80 and 99 3 The stored number is dialed To edit your personal speed dials 1408 1416 1 Press the Admin soft key on the display If you access phone administration during a call only the SPEAKER MUTE and HEADSET buttons still affect the connected call 2 Use the up or down arrow buttons to scroll to Telepho...

Страница 25: ...rammable button you want to change Alternatively Use the up or down arrows to scroll to Button Programming Press Select At the Button prompt press the button to edit or enter from the button number 4 The current setting of that button is displayed 5 Press Program and either press Intercom 2 or use the up or down arrow buttons to scroll the display to Auto Dial Other and press Select 6 At the AD O ...

Страница 26: ...erphone or headset at the time you use this process To adjust the call volume 1403 1408 1416 1 Use the up arrow and down arrow keys to change the volume On 1403 phones use the rocker button to adjust the volume 2 5 Mute While on a call you can temporarily turn off the microphone so that the caller cannot hear you You however will still be able to hear the caller To mute the microphone 1403 1408 14...

Страница 27: ...ing the button which the call is on 2 Press the button next to the fast flashing Green light You are connected to the call The light changes to steady 2 7 Parking Calls Use this feature to place a call on a special type of hold where it can be retrieved from any extension in the system You should park only one call at a time to ensure that you know which caller you are talking to when you retrieve...

Страница 28: ... the extension user is not present and has not set do not disturb You can program a voice mailbox transfer button to transfer a caller directly to a voice mailbox by pressing the button and then dialing the mailbox subscriber s extension number To transfer a caller to a mailbox 1408 1416 1 During the call press FEATURE 14 or press a Voice Mailbox Transfer button you have one programmed 2 Dial the ...

Страница 29: ...r or make another call during a conference you can hold in the same way as for normal calls When you put a conference call on hold the other parties can still talk to each other WARNING Only hold a conference that you know is taking place on your own telephone system If you hold a conference that you have joined on another telephone system that conference will hear hold music 1 Press the HOLD butt...

Страница 30: ...connected to a call Note Room acoustics and background noise can affect the proper operation of the speakerphone To ensure that your speakerphone works effectively follow these guidelines Avoid placing your telephone in areas with high background noise caused by sources such as motor vehicles manufacturing equipment loud voices radios printers copiers typewriters other noisy office equipment or he...

Страница 31: ...f to a call in progress You cannot Join an internal call or a conference call at another extension Join a call at any extension where the extension user has privacy enabled Put a joined call on hold You can Tell when someone has joined your call when you hear a single beep Use privacy to allow or prevent others from joining your calls Join a call that is being answered by the voice messaging syste...

Страница 32: ......

Страница 33: ...IP Office Basic Edition 1400 Series Phone User Guide Page 33 Issue 7a 30 January 2014 IP Office Basic Edition Other Features Chapter 3 ...

Страница 34: ...4 The current setting of that button is displayed 5 Press Program and either dial 28 or use the up or down arrow buttons to scroll the display to Absent Message and press Select 6 The current setting of the button will now be set to Absent Message Exit phone administration by pressing the PHONE button Alternatively use the Back button to move to another menu To activate an absent text message 1408...

Страница 35: ...nter you own extension number as the destination Exit phone administration by pressing the PHONE button Alternatively use the Back button to move to another menu To create a call forwarding button 1408 1416 1 Press the Admin soft key on the display If you access phone administration during a call only the SPEAKER MUTE and HEADSET buttons still affect the connected call 2 Use the up or down arrow b...

Страница 36: ...ng the covered extension Similarly if call coverage is on and a call begins to ring you can turn on Do Not Disturb to send that call immediately for coverage If an extension has call coverage and VMS Cover active calls ring at the covering extension If the covering extension does not answer the call is routed to the voice mailbox of the covered extension after the specified number of VMS Cover Rin...

Страница 37: ...he button to edit or enter from the button number 4 The current setting of that button is displayed 5 Press Program and either dial 20 or use the up or down arrow buttons to scroll the display to Call Coverage and press Select 6 At the Call Coverage Orig prompt enter the extension number for which the button is being programmed 7 At the Call Coverage Dest prompt enter the destination extension num...

Страница 38: ...k button 1408 1416 1 Press the Admin soft key on the display If you access phone administration during a call only the SPEAKER MUTE and HEADSET buttons still affect the connected call 2 Use the up or down arrow buttons to scroll to Telephone Programming Press Select 3 Press the programmable button you want to change Alternatively Use the up or down arrows to scroll to Button Programming Press Sele...

Страница 39: ...ccount Code Entry button 2 Enter an account code using the telephone s dial pad Press the Account Code Entry button again or press the Done button 3 Continue with the call To create an account code entry button 1408 1416 1 Press the Admin soft key on the display If you access phone administration during a call only the SPEAKER MUTE and HEADSET buttons still affect the connected call 2 Use the up o...

Страница 40: ...tter N is shown on your phone s idle display when you have Do Not Disturb enabled If you go off hook you will hear interrupted dial tone To manually switch do not disturb on off 1403 1408 1416 1 Dial FEATURE 01 On 1043 phones dial 01 and press DROP An N is shown on your phone s idle display when you have do not disturb enabled To create a do not disturb button 1408 1416 When Do Not Disturb feature...

Страница 41: ...y on the display If you access phone administration during a call only the SPEAKER MUTE and HEADSET buttons still affect the connected call 2 Use the up or down arrow buttons to scroll to Telephone Programming Press Select 3 Use the up or down arrow buttons to scroll the display to DND Exceptions When shown press Select 4 The current entries are displayed Use the up or down arrow buttons to scroll...

Страница 42: ......

Страница 43: ...IP Office Basic Edition 1400 Series Phone User Guide Page 43 Issue 7a 30 January 2014 IP Office Basic Edition Using Voicemail Chapter 4 ...

Страница 44: ...ogged in to a mailbox The modes are Intuity emulation mailbox mode and IP Office mailbox mode Your system administrator will inform you which mode your system is using and provide the appropriate embedded voicemail user guide for that mode To access your mailbox 1403 1408 1416 1 Press an idle intercom or call appearance button and dial 777 To access your mailbox from another extension dial 778 and...

Страница 45: ...xtension that activated Call Coverage Users with VMS Cover turned on can activate Do Not Disturb to send ringing calls immediately to their voice mailbox Note that when your voicemail cover is off you can still access the messages in your mailbox and other users can still use forwarding to send messages to your mailbox To create a VMS cover button 1403 1408 1416 1 Press the Admin soft key on the d...

Страница 46: ...IP Office Basic Edition 1400 Series Phone User Guide Page 46 Issue 7a 30 January 2014 IP Office Basic Edition ...

Страница 47: ...IP Office Basic Edition 1400 Series Phone User Guide Page 47 Issue 7a 30 January 2014 IP Office Basic Edition Contacts Chapter 5 ...

Страница 48: ...eed dials Users The names and numbers of other users on the telephone system Groups The names and numbers of hunt groups on the telephone system c Either press the List soft key to display all the directory entries or start dialing the name to display only matching entries d Use the up and down arrow keys to scroll through the matching entries To return to the start to match a different directory ...

Страница 49: ... scroll through the matching entries To return to the start to match a different directory selection press the Clear soft key 2 When the required entry is displayed press Call 3 Continue as for a normally dialed call 5 3 Editing a Contact You can edit the contacts in your own personal directory To edit a contact 1408 1416 1 Access your personal directory contacts a Press the CONTACTS key The direc...

Страница 50: ...ber c Use the up and down arrow keys to scroll through the records 2 Press the Details soft key The individual details of the currently selected call record are displayed 3 Press the Contact soft key 4 Use the up and down arrow keys to switch between the name and number details for the new contact 5 Using the telephone keypad and the Bksp soft key you can edit the name and the number When editing ...

Страница 51: ...IP Office Basic Edition 1400 Series Phone User Guide Page 51 Issue 7a 30 January 2014 IP Office Basic Edition Call Log Chapter 6 ...

Страница 52: ...me Call Make a call to the number stored in the currently displayed call log record Details Display more details about the current call log record You can then also add the caller details to your personal directory if required More Switch between the different sets of available soft key functions Delete Deletes the current displayed record Del All Delete all the call log records not just the curre...

Страница 53: ...the call details Duration The length of the call Name The name of the caller if known Number The number of the caller if available Reason The type of call record ie Answered Outgoing or Missed For missed calls the reason may be indicated for example Missed Lost Indicates a call where the caller hung up before they could be answered Missed Voicemail Indicates a call where the caller was redirected ...

Страница 54: ...roll through the records 2 Press the More soft key 3 Press the Del All soft key to delete all your call log records 6 6 Adding a Record to Your Contacts You can add a name and number shown in your call log to your contacts To add a call log record to your contacts 1408 1416 1 Access the call log a Press the CALL LOG or HISTORY button b The display will change to show your call log records The call...

Страница 55: ...IP Office Basic Edition 1400 Series Phone User Guide Page 55 Issue 7a 30 January 2014 IP Office Basic Edition Button Programming Chapter 7 ...

Страница 56: ...r the setting from the existing button To program a button 1408 1416 1 Press the Admin soft key on the display If you access phone administration during a call only the SPEAKER MUTE and HEADSET buttons still affect the connected call 2 Use the up or down arrow buttons to scroll to Telephone Programming Press Select 3 Press the programmable button you want to change Alternatively Use the up or down...

Страница 57: ...reated for each extension for which call pickup is required Call Screening This function allows you to switch call screening on or off When on if your phone is idle when a call rings it and then goes to voicemail you will hear the caller through the phone s handsfree speaker You can choose to ignore the call press Ignore on the display or to answer it press Answer on the display This button functi...

Страница 58: ...f the four digit code to unlock the extension Station Unlock This function can only be used by the first two extensions in the system It allows the user to unlock any extension without needing to know the code that was used to lock that extension VMS Cover This function allows the you to switch use of voicemail coverage for your extension on or off Voice Mailbox Transfer This function allows you t...

Страница 59: ...IP Office Basic Edition 1400 Series Phone User Guide Page 59 Issue 7a 30 January 2014 IP Office Basic Edition Phone Settings Chapter 8 ...

Страница 60: ...is displayed To remove the current name press Clear 5 To enter a new name press Enter and dial the characters using the dial pad buttons When finished press OK Enter a character by pressing the indicated button until that character is displayed If you pause more than 1 second after press a button the cursor will move onto the next space 1 1 2 abc2 3 def3 4 ghi4 5 jkl5 6 mno6 7 pqrs7 8 tuv8 9 wxyz9...

Страница 61: ... the MENU button 2 Press until Call Settings is displayed 3 Press until Visual Alert is displayed 4 The current setting On or Off is shown Press to change the setting 5 Press the MENU button to exit the menu 8 3 Audible Alerting The phone s audible ringer can be switched off This only affects the ring and does not affect the visual alerting To turn the phone s ringer on off 1408 1416 1 Press the M...

Страница 62: ...g pattern To make the currently displayed ring pattern the selected ring pattern for the phone press the Save soft key To leave the menu without making any changes press the Cancel soft key 4 When completed press the Done soft key 5 Press the Exit soft key to exit the menus To select the phone s ring sound 1403 1 Press the MENU button 2 Press until Screens Sounds is displayed 3 Press until Ring Ty...

Страница 63: ...ds is displayed 3 Press until Bright is displayed 4 The current setting is shown Use the rocker button to adjust the brightness 5 Press the MENU button to exit the menu 8 7 Display Contrast To adjust the display contrast 1408 1416 1 Press the MENU button 2 Use the up and down arrow keys to locate Screen Sounds or Screen Sound Options Press the Select soft key 3 Use the up and down arrow keys to lo...

Страница 64: ... 1416 1 Press the MENU button 2 Use the up and down arrow keys to locate the option Advanced Press the Select soft key 3 Use the up and down arrow keys to locate the option Language Press the Select soft key 4 Use the up and down arrow keys scroll through the different languages available 5 To select the language currently displayed press the Select soft key or OK 6 When completed press the Done s...

Страница 65: ...current setting On or Off is shown Press to change the setting 5 Press the MENU button to exit the menu 8 10 Button Clicks While using the phone menus the phone can provide a key press confirmation click sound This can be turned off if it is annoying To turn button clicks on off 1403 1408 1416 1 Press the MENU button 2 Use the up and down arrow keys to locate Screen Sounds or Screen Sound Options ...

Страница 66: ... a headset attached you can change the phone s behavior so the audio is played through the headset by default rather than the speaker To set the default handsfree audio path 1403 1408 1416 1 Press the MENU button 2 Use the up and down arrow keys to locate the option Call Settings Press the Select soft key 3 Use the up and down arrow keys to locate the option Audio Path 4 Use the left and right arr...

Страница 67: ...The use of those options is covered by the IP Office Basic Edition Phone Based Administration manual 3 Use the up and down arrow buttons to scroll through the menu options Button Programming This menu allows you to assign functions to the programmable buttons on your phone You cannot override any Intercom Call Appearance or Line Appearance buttons assigned by the system and your system maintainer ...

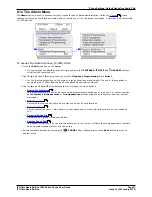
Страница 68: ... settings These settings are stored by the phone not the telephone system The following diagram summarizes the menu options on 1408 and 14016 phones The menu is navigated using the OK button and cursor keys Option shown in grey below are not support on IP Office Basic Edition systems For 1403 phones a reduced set of menus is available which is navigated using the and keys ...

Страница 69: ...IP Office Basic Edition 1400 Series Phone User Guide Page 69 Issue 7a 30 January 2014 IP Office Basic Edition Phone Settings The A MENU ...

Страница 70: ...key to exit the menus To erase reset the A menu options 1403 1 Press the MENU button 2 Press until Advanced is displayed 3 Press until Erase Options is displayed Press 4 Press the MENU button to exit the menu 8 15 Reset the Language The language setting applied to the phone can be reset back to the default English To erase reset the A menu options 1408 1416 1 Press the MENU button 2 Use the up and...

Страница 71: ... to exit the menus To erase reset the A menu options 1403 1 Press the MENU button 2 Press until Advanced is displayed 3 Press until Self Test is displayed Press to select 4 Press and hold the Test soft key The lamps on all the buttons with lamps are lit The whole display is black 5 Release the Test soft key to end the self test 8 17 A Menu Auto Exit The Show Phone Screen option only applies to the...

Страница 72: ......

Страница 73: ...IP Office Basic Edition 1400 Series Phone User Guide Page 73 Issue 7a 30 January 2014 IP Office Basic Edition Document History Chapter 9 ...

Страница 74: ...Issue 7a 30 January 2014 IP Office Basic Edition 9 Document History Date Issue Changes 30th January 2014 07a Addition of Self Test and Erase A menu functions Better indication of features supported for 1403 telephones Addition of 1403 processes to A menu features ...

Страница 75: ...ening 57 Call Settings Audible alerting on off 61 Audio Path 66 Visual alerting on off 61 Call Transfer Supervised 28 Call Transfer Unsupervised 28 Callback 18 Caller Details 53 Caller volume 26 Code Account 39 Lock 38 Conference Hold 29 Start 29 Contact Add 50 54 Edit 49 50 CONTACTS 48 49 50 Make call 49 Count 53 Coverage Call 36 Voicemail 45 D D 15 Details Call Log 53 Directory Add 50 54 Edit 49...

Страница 76: ...3 54 P Parking Calls 27 Persoanl Speed Dial 24 Personal 48 49 Please call 34 R Reason 53 Ring Again 18 Ring Back 18 Ring Time 53 Ringer Audible alerting on off 61 Ringer volume 26 S S 15 Screening 57 Speaker volume 26 Speakerphone 30 Speed Dial Personal 24 System 23 Status Letters 15 Supervised Call Transfer 28 System Alarm 15 System Speed Dial 23 T T 15 To VM 21 Transfer To Voicemail 28 Transfer ...

Страница 77: ...IP Office Basic Edition 1400 Series Phone User Guide Page 77 Issue 7a 30 January 2014 IP Office Basic Edition ...

Страница 78: ...endments to the detailed specifications at its discretion The publication of information in this document does not imply freedom from patent or other protective rights of Avaya or others All trademarks identified by the or are registered trademarks or trademarks respectively of Avaya Inc All other trademarks are the property of their respective owners This document contains proprietary information...

Отзывы: