background image


13 

CONTROL DE TEMPERATURA

:   

Se recomienda que Ud coloque su vinera en un lugar donde la temperatura ambiental se mantenga 
entre 23º-26ºC / 72º-78ºF. 
Si la temperatura ambiental oscila afuera de esos límites, pueda afectar la temperatura de la unidad. 
Por ejemplo, si su unidad está situada en lugares donde hay temperaturas muy frías o calientes 
también puede afectar la temperatura de la unidad y no alcanzará los límites(4º-18ºC/39º-63ºF).   


Temperaturas recomendadas para enfriar vinos: 


Vinos rojos 

15º - 19º C 

58 – 65º F 

Vinos blancos 

 9º - 14º  C 

48 – 57º F 

Vinos tintos 

10º - 11º C 

49 – 51º F 

Vinos espumantes 

   5º - 9º  C 

40 – 47º F 


Rango de Temperatura de su vinera 


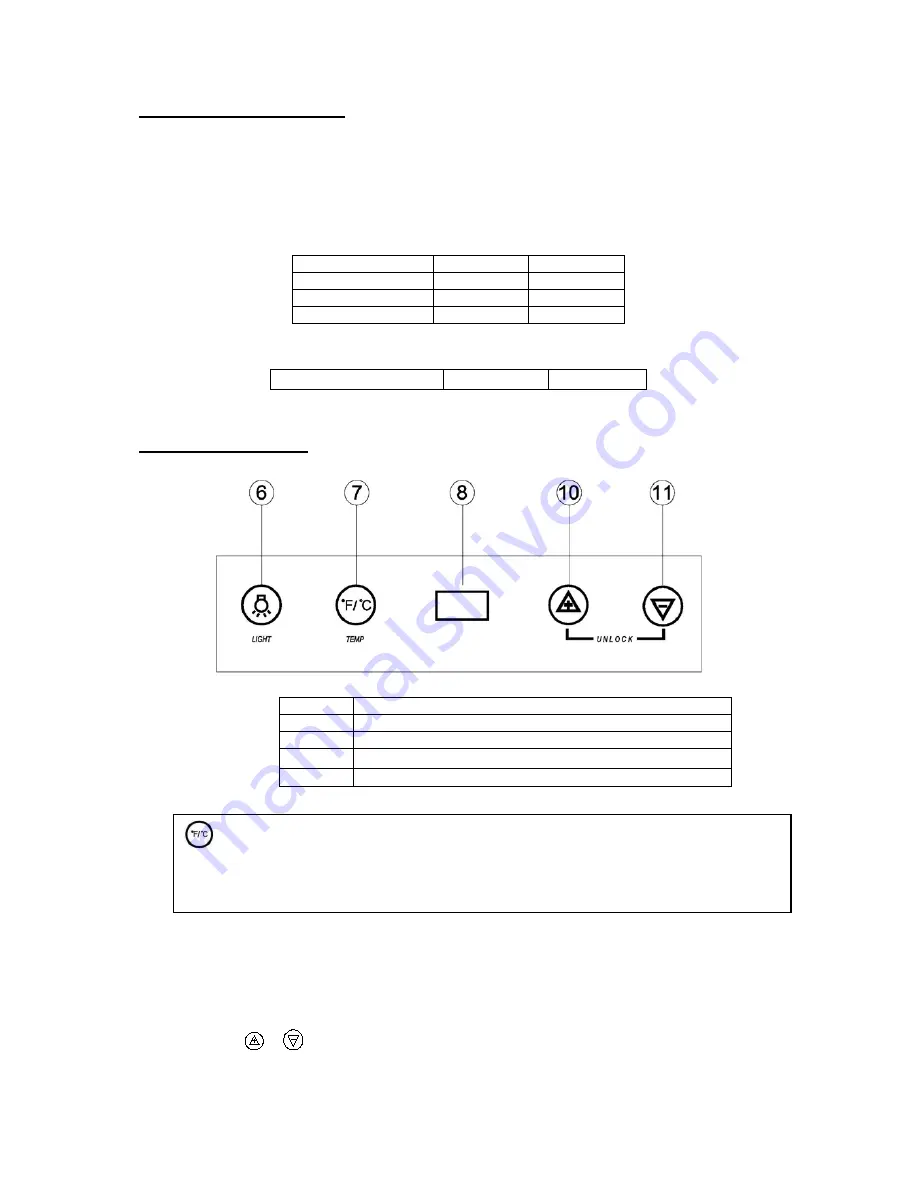
PANEL DE CONTROLES: 


Botón de la luz interior 

Botón para cambiar la pantalla digital de grados ºF a ºC 

Pantalla Digital 

Botón para subir la temperatura  

10 

Botón para bajar la temperatura 


PANEL DE CONTROL DE SEGURIDAD 


Su vinera está equipada con un Panel de Control de Seguridad de función automática.  Esta 
función previene cualquier cambio no deseado en el control de temperatura.  


La función de seguridad se activará automáticamente 12 segundos después de la última vez 
que cualquier botón del Panel de Control sea presionado.


Para poder hacer cambios en el Panel de Control, presione y mantenga presionados los 

botones 

  y 

 por 3 segundos, el Panel del Control emitirá un sonido de “Beep” y 

Rango de Temperatura 

4 - 18º C 

39 – 65º F 

Ud. puede seleccionar los grados centigrados ó Fahrenheit presionando el botón marcado  

(vea el # 7).  En la pantalla digital aparecerá el F ó C indicador en color blanco con sombra 
azul.


Содержание WC34TM

Страница 1: ...ETY RULES AND OPERATING INSTRUCTIONS La secci n en espa ol empieza en la p gina 12 Avanti Products has a policy of continuous improvement on its products and reserves the right to change materials and...

Страница 2: ...nsion Cord 6 Operating Your Wine Chiller 7 Temperature Control 8 Storage Capacity 8 Interior Light 8 Care and Maintenance 8 Cleaning Your Wine Chiller 8 Power Failure 9 Vacation Time 9 Moving Your Win...

Страница 3: ...orrespondence or service calls concerning your Wine Chiller If you received a damaged Wine Chiller immediately contact the dealer or builder that sold you the Wine Chiller Save time and money Before y...

Страница 4: ...4 PARTS FEATURES 1 Large Wine Shelves Total 6 2 Lower Storage Bar Total 1 3 Leveling Legs 4 Upper Door Hinge 5 Glass door with Integrated Handle...

Страница 5: ...and interior packing Before Using Your Wine Chiller Check to be sure you have all of the following parts 6 Shelves Storage Retainer Bar 1 Instruction Manual Clean the interior surface with lukewarm w...

Страница 6: ...as a voltage rating that matches the rating label on the appliance This provides the best performance and also prevent overloading house wiring circuits that could cause a fire hazard from overheated...

Страница 7: ...ON OFF Button 7 F C Display Selector Button 8 Digital Display Window 9 Temperature UP Button 10 Temperature DOWN Button Control Panel Lock Your Wine chiller is equipped with an AUTOMATIC control pane...

Страница 8: ...es and include bulk storage Interior Light You can turn the interior light ON or OFF by pushing the button marked with the bulb symbol You have to push the button marked with the bulb symbol again and...

Страница 9: ...anel does not work Press and hold the temperature UP and Down simultaneously for 3 seconds to unlock the panel Wine Chiller does not operate Not plugged in The circuit breaker tripped or a blown fuse...

Страница 10: ...S Product Information 800 323 5029 Whatever your questions are about our products help is available Part Orders 800 220 5570 You may order parts and accessories that will be delivered directly to your...

Страница 11: ...c housing Plastic cabinet liners Punctured evaporator that voids the warranty on the complete sealed system Shipping and handling costs associated with the replacement of the unit LIMITED SECOND THROU...

Страница 12: ...rosa para los ni os Saque todas las juntas pestillos tapas o puerta de todo electrodom stico que no est en uso o tome alguna medida para asegurar que no presente peligro INSTRUCCIONES DE INSTALACION S...

Страница 13: ...z interior 7 Bot n para cambiar la pantalla digital de grados F a C 8 Pantalla Digital 9 Bot n para subir la temperatura 10 Bot n para bajar la temperatura PANEL DE CONTROL DE SEGURIDAD Su vinera est...

Страница 14: ...use una soluci n de detergente suave luego s quelas con un pa o suave Limpie el exterior con un pa o h medo suave y un poco de detergente suave o productos de limpieza para electrodom sticos Per odo d...

Страница 15: ...___ _____________________________________ Address Date Purchased Store Dealer Name __________________________________ ______________________________________ City State Zip Occupation _________________...

Страница 16: ...16 PRINTED IN CHINA...

Отзывы: