background image

User Manual

www.AvantcoEquipment.com 5

Blade Sharpening

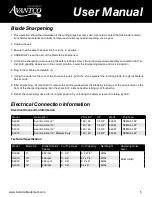
1.  This operation should be undertaken if the cutting blade becomes dull. It should be noted that the blade is made 

from hardened material and under normal use should only need sharpening once a year.

2. Unplug the unit. 

3. Ensure that the slice thickness knob is in the ‘0’ position.

4. CAREFULLY clean the part of the blade to be sharpened.

5.  Unlock the sharpening device using the safety locking screw. Lift up the sharpening assembly and rotate it 180° so 

that both grinding wheels are in the correct position. Lower the sharpening device and lock in position.

6. Plug in the machine and switch on.

7.  Using the button at the rear of the sharpening unit, push the stone against the rotating blade for approximately 

30 seconds.

8.  After sharpening, it is important to remove the grinding wheel from the blade by letting go of the push button on the 

front of the sharpening device. Run the slicer for 2-3 seconds after letting go of this button.

9.  Return the sharpening device to its original position by unlocking the safety screw and rotating by 180°.

Electrical Connection Information

Electrical Connection Information

Model

Description

Volts /HZ

HP

Watts

Plug Type

SL309

Avantco Slicer 9”

120 / 60

1/4 HP

200 W

NEMA 5-15P

SL310

Avantco Slicer 10”

120 / 60

1/4 HP

320 W

NEMA 5-15P

SL312

Avantco Slicer 12”

120 / 60

1/3 HP

420 W

NEMA 5-15P

SL512

Avantco Slicer 12” Medium Duty

120 / 60

1/2 HP

450 W

NEMA 5-15P

Technical Specification

Model

Blade Dia.

Blade Rotation 
Speed

Cut Thickness

Cut Capacity

Net Weight

Operating Noise 
Level

SL309

9”

532 rpm

0 - 0.4”

6.3 x 7.5”

29lbs

60-67 dB(A)

SL310

10”

465 rpm

0 - 0.4”

6.7 x 7.5”

32lbs

SL512

12”

300 rpm

0 - 0.6”

9.3”x 6” 

64lbs

SL312

12”

428 rpm

0 - 0.6”

9.4x 6”

54lbs

Содержание SL309

Страница 1: ...User Manual www AvantcoEquipment com 1 Meat Slicer Instruction Manual Models SL309 SL310 SL512 SL312 Please read and keep these instructions Indoor use only 05 2015 User Manual ...

Страница 2: ...t with a DAMP cloth using a neutral P H dish detergent Wipe and dry the machine See Cleaning instructions on page 3 of this manual 3 Set the thickness of slice required using the control knob adjacent to the on off switch 4 The meat support platform should be in the start position that is close to the operator Lift up the food pusher place the meat to be sliced on the support platform against the ...

Страница 3: ...othes It is essential when blade maintenance or cleaning is undertaken that suitable hand protection gloves are used 6 ALWAYS unplug the slicer before undertaking cleaning or maintenance of the unit 7 These machines are not suitable for cutting frozen products boned meat or cheese 8 These machines must be operated by trained personnel and should never be used by unskilled operators or children 9 T...

Страница 4: ...with a food safe lubricant like Lubriquik Cleaning and Sanitizing 1 Turn the slicer off and unplug 2 Turn the thickness control knob all the way to the right 3 Remove the product table locking knob and then remove the product table 4 Remove Slicer Deflector that is over the knife 5 Clean all removed parts slicer knife and base with hot water and detergent 6 Rinse with hot water and sanitize 7 Reas...

Страница 5: ... 30 seconds 8 After sharpening it is important to remove the grinding wheel from the blade by letting go of the push button on the front of the sharpening device Run the slicer for 2 3 seconds after letting go of this button 9 Return the sharpening device to its original position by unlocking the safety screw and rotating by 180 Electrical Connection Information Electrical Connection Information M...

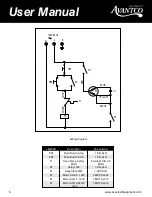
Страница 6: ...OT SL309 M Motor SL310 120V 1 MOT SL310 M Motor SL512 SL312 120V 1 MOT SL512 Wiring Diagram ven ps ne otor ch rting urface ays ent to the C1 CAPACITOR 20mF E RELAY 120V R1 WIRING DIAGRAM MODEL MEAT SLICER 120V 60Hz MODEL CODE SLR5009 SLR5010 SLR5012 SLR5312 LEGEND DESCIPTION PB1 PB2 T1 PUSH BUTTON STO PUSH BUTTON STA OVER TEMPERATUR N L 120V 60Hz PB1 R1 R1 C1 PB2 R1 T1 WHITE WHITE BLUE YELLOW RED ...

Страница 7: ...ndirect or consequential damages in connection with Avantco commercial products This warranty is not effective if damage occurs because of accident carelessness improper installation lack of proper set up supervision when required or if the equipment is installed or operated in any manner contrary to the installation and operating instructions In these cases repairs will be made at a reasonable co...

Отзывы: