background image

DV7560-Q45 

40 DV7560-Q45 User’s Manual


ON or puts the system in SLEEP or SOFT-OFF mode depending on the BIOS settings. 

Pressing the power switch for more than four seconds while the system is ON turns the 

system OFF. 

y


System Power LED connector (2-pin PWRLED) 

This 2-pin connector is for the system power LED. The system power LED lights up when 

you turn on the system power, and blinks when the system is in sleep mode. 

y


Reset button (Blue 2-pin RESET) 

This 2-pin connector is for the chassis-mounted reset button for system reboot without 

turning off the system power. 

y


Hard disk drive activity (Red 2-pin IDELED) 

This 2-pin connector is for the HDD Activity LED. Connect the HDD Activity LED cable to 

this connector. The IDE LED lights up or flashes when data is read from or written to the 

HDD. 


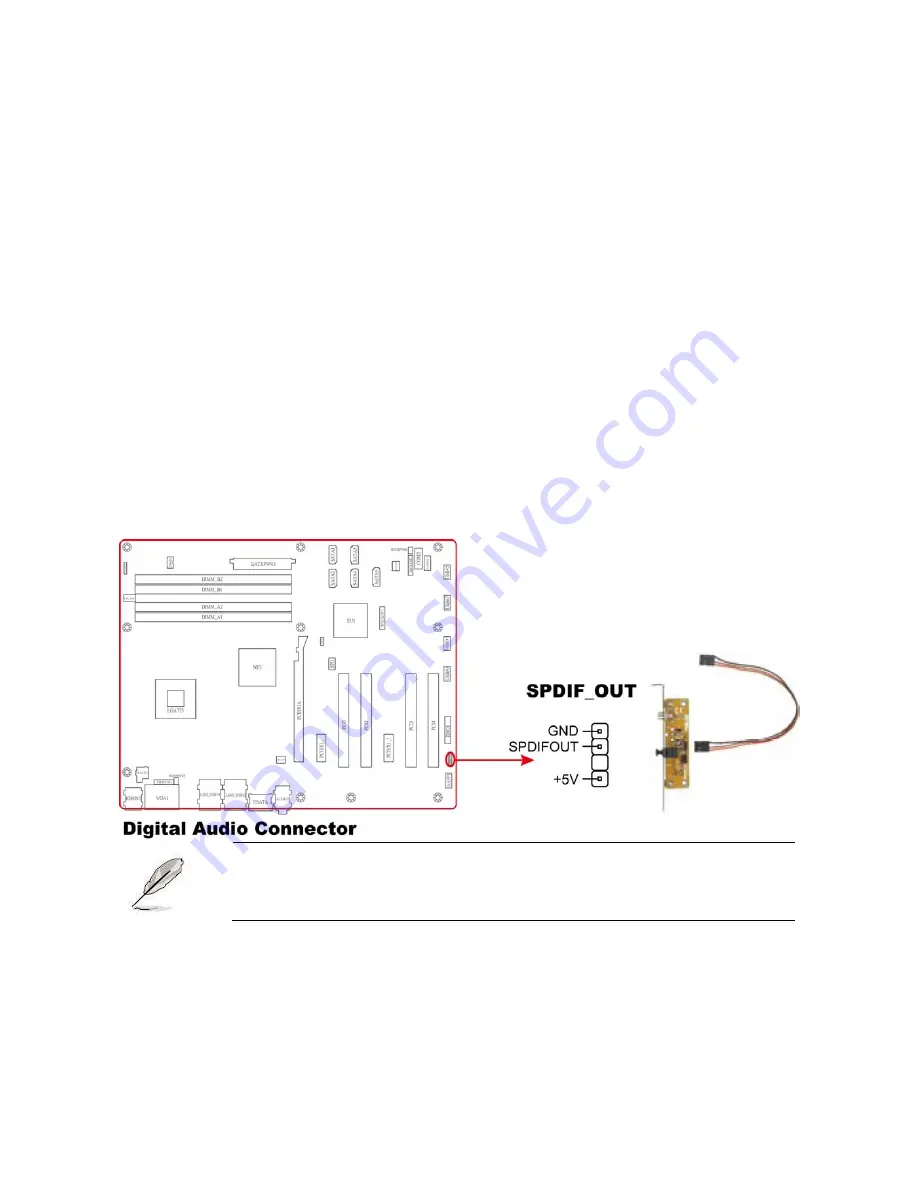
8. Digital Audio connector (4-pin SPDIF_OUT) 

This connector is for the S/PDIF audio module to allow digital sound output. 

Connect one end of the S/PDIF audio cable to this connector and the other end to the 

S/PDIF module. 


The S/PDIF out module is purchased separately. 


Содержание EAX-Q45

Страница 1: ...EAX Q45 Intel Q45 LGA775 socket for Intel Core 2 Quad ATX Motherboard User s Manual Ver 1 00...

Страница 2: ...alling the CPU Heatsink and Fan 20 1 6 3 Uninstalling the CPU Heatsink and Fan 22 1 7 System memory 24 1 7 1 Overview 24 1 7 2 Memory Configurations 25 1 7 3 Installing a DIMM 26 1 7 4 Removing a DIMM...

Страница 3: ...ating a bootable floppy disk 43 2 2 BIOS setup program 44 2 2 1 Legend Box 44 2 2 2 List Box 45 2 2 3 Sub menu 45 2 3 Main Setup 46 2 4 Advanced BIOS Setup 47 2 5 Advanced PCI PnP Settings 63 2 6 Boot...

Страница 4: ...contact your local power company y If the power supply is broken do not try to fix it by yourself Contact a qualified service technician or your retailer Operation safety y Before installing the mothe...

Страница 5: ...e information Refer to the following sources for additional information and for product and software updates 1 Advansus websites The Advansus website provides updated information on Advansus hardware...

Страница 6: ...ess the enclosed key Example Enter means that you must press the Enter or Return key Key1 Key2 Key3 If you must press two or more keys simultaneously the key names are linked with a plus sign Example...

Страница 7: ...es TPM Integrated iTPM 1 2 Wake up on LAN or Ring LAN PXE RPL Smart Fan Control Yes Display Chipset Intel Graphics Media Accelerator 4500 integrated Display Memory Intel DVMT 4 0 supports up to 384 MB...

Страница 8: ...r connector Mechanical Environment Power Type ATX mode Operating Temperature 0 60 C 32 140 F Operating Humidity 0 90 relative humidity non condensing Size L x W 12 x 9 6 304 8 mm x 243 84 mm Specifica...

Страница 9: ...User s Manual EAX Q45 User s Manual 9 1 This chapter describes the motherboard features and the new technologies it supports Product Introduction...

Страница 10: ...s on it check the items in your package with the list below 1 2 Package contents Check your motherboard package for the following items Before you begin installing your single board please make sure t...

Страница 11: ...power optimized enabled dual core technology and exceptional energy efficiency the Intel Core 2 Duo processor excels running the most intense applications Intel Q45 Chipset The Intel Q45 Express Chip...

Страница 12: ...th in dual channel interleaved mode Intel I O Controller Hub 10 Intel ICH10DO The Intel ICH10 I O controller hub as part of the Intel Q45 Express Chipset integrates several capabilities to provide fle...

Страница 13: ...ur computer to home theater decoders to produce crystal clear digital audio Serial ATA technology The motherboard supports the Serial ATA technology through the Serial ATA interfaces and the ICH10DO c...

Страница 14: ...ect such as the power supply case before handling components to avoid damaging them due to static electricity y Hold components by the edges to avoid touching the ICs on them y Whenever you uninstall...

Страница 15: ...ure to do so can cause you physical injury and damage motherboard components 1 5 1 Placement Direction When installing the motherboard make sure that you place it into the chassis in the correct orien...

Страница 16: ...DV7560 Q45 16 DV7560 Q45 User s Manual 1 5 3 Motherboard Layout...

Страница 17: ...ot bent Contact your retailer immediately if the PnP cap is missing or if you see any damage to the PnP cap socket pins motherboard components ADVANSUS will shoulder the cost of repair only if the dam...

Страница 18: ...PnP cap unless you are installing a CPU 3 Lift the load lever in the direction of the arrow to a 135 angle 4 Lift the load plate with your thumb and forefinger to a 100 angle A then push the PnP cap...

Страница 19: ...ab The CPU fits in only one correct orientation DO NOT force the CPU into the socket to prevent bending the connectors on the socket and damaging the CPU The motherboard supports Intel LGA775 processo...

Страница 20: ...certified multi directional heatsink and fan z Your Intel Core 2 Quad Intel Core 2 Duo LGA775 heatsink and fan assembly comes in a push pin design and requires no tool to install If you purchased a s...

Страница 21: ...e in a diagonal sequence to secure the heatsink and fan assembly in place 3 Connect the CPU fan cable to the connector on the motherboard labeled CPU_FAN Do not forget to connect the CPU fan connector...

Страница 22: ...nk and fan 1 Disconnect the CPU fan cable from the connector on the motherboard 2 Rotate each fastener counterclockwise 3 Pull up two fasteners at a time in a diagonal sequence to disengage the heatsi...

Страница 23: ...X Q45 User s Manual 23 5 Rotate each fastener clockwise to ensure correct orientation when reinstalling The narrow end of the groove should point outward after resetting The photo shows the groove sha...

Страница 24: ...ckets A DDR2 module has the same physical dimensions as a DDR DIMM but has a 240 pin footprint compared to the 184 pin DDR DIMM DDR2 DIMMs are notched differently to prevent installation on a DDR DIMM...

Страница 25: ...32 bit version operating system we recommend that you install less than 3GB of total memory y For dual channel configuration the total size of memory module s installed per channel must be the same fo...

Страница 26: ...ng the retaining clips outward 2 Align a DIMM on the socket such that the notch on the DIMM matches the break on the socket 3 Firmly insert the DIMM into the socket until the retaining clips snap back...

Страница 27: ...g a DIMM 1 Simultaneously press the retaining clips outward to unlock the DIMM Support the DIMM lightly with your fingers when pressing the retaining clips The DIMM might get damaged when it flips out...

Страница 28: ...move the system unit cover if your motherboard is already installed in a chassis 3 Remove the bracket opposite the slot that you intend to use Keep the screw for later use 4 Align the card connector w...

Страница 29: ...e installed on a PCI slot This motherboard supports PCI Express x16 graphic cards that comply with the PCI Express specifications The figure shows a graphics card installed on the PCI Express x16 slot...

Страница 30: ...jumper cap from pins 1 2 default to pins 2 3 Keep the cap on pins 2 3 for about 5 10 seconds then move the cap back to pins 1 2 4 Re install the battery 5 Plug the power cord and turn ON the computer...

Страница 31: ...X Q45 User s Manual 31 1 9 2 COM1 2 Voltage Select JCOMPWR5 JCOMPWR6 This jumper allows you to select COM 1 2 Voltage power 1 9 3 RS232 422 485 Select JSETCOM1 JSETCOM2 This jumper allows you to selec...

Страница 32: ...DV7560 Q45 32 DV7560 Q45 User s Manual 1 9 4 Intruder Select CHASSIS1 This jumper allows you to select Intruder...

Страница 33: ...nnects a headphone or a speaker In 4 channel 6 channel and 8 channel configuration the function of this port becomes Front Speaker Out 7 Microphone port pink This port connects a microphone 8 eSATA po...

Страница 34: ...Front panel audio connector 10 pin AAFP1 This connector is for a chassis mounted front panel audio I O module that supports either HD Audio or legacy AC 97 audio standard It is recommended that you co...

Страница 35: ...45 User s Manual 35 2 Serial Port connector COM2 This connector is for a serial COM port Connect the serial port module cable to this connector then install the module to a slot opening at the back of...

Страница 36: ...22A 26 64W max at 12V Connect the fan cables to the fan connectors on the motherboard making sure that the black wire of each cable matches the ground pin of the connector Do not forget to connect th...

Страница 37: ...SB1011 This connector is for USB 2 0 ports Connect the optional USB module cable to any of these connectors then install the module to a slot opening at the back of the system chassis This USB connect...

Страница 38: ...rmly until the connectors completely fit y Do not forget to connect the 4 pin ATX 12 V power plug otherwise the system will not boot y Use of a PSU with a higher power output is recommended when confi...

Страница 39: ...ack 4 or the Windows XP Service Pack1 or later before using Serial ATA 7 System panel connector 10 1 pin F_PANEL1 This connector supports several chassis mounted functions The system panel connector i...

Страница 40: ...tton Blue 2 pin RESET This 2 pin connector is for the chassis mounted reset button for system reboot without turning off the system power y Hard disk drive activity Red 2 pin IDELED This 2 pin connect...

Страница 41: ...andard allows network equipment designers to develop an array of next generation multi service switches and routers to support multi service traffic with aggregate bandwidths up to OC 192 10 Gb s and...

Страница 42: ...DV7560 Q45 42 DV7560 Q45 User s Manual 2 This chapter tells how to change the system settings through the BIOS Setup menus Detailed descriptions of the BIOS parameters are also provided BIOS Setup...

Страница 43: ...3 1 2 Floppy Drive icon d Click File from the menu then select Format A Format 3 1 2 Floppy Disk window appears e Select Create an MS DOS startup disk from the format options field then click Start Wi...

Страница 44: ...ty Select the Load Default Settings item under the Exit Menu See section 2 9 Exit Menu z The BIOS setup screens shown in this section are for reference purposes only and may not exactly match what you...

Страница 45: ...plays an initial list of configurable items in the menu you selected 2 2 3 Sub menu Note that a right pointer symbol X appears to the left of certain fields This pointer indicates that you can display...

Страница 46: ...ection The Main BIOS Setup screen is shown below y System Time System Date Use this option to change the system time and date Highlight System Time or System Date using the Arrow keys Enter new values...

Страница 47: ...t any of the items in the left frame of the screen such as SuperIO Configuration to go to the sub menu for that item You can display an Advanced BIOS Setup option by highlighting it using the Arrow ke...

Страница 48: ...the value of the selected option A description of the selected item appears on the right side of the screen The settings are described on the following pages y Max CPUID Value Limit The choices of Ma...

Страница 49: ...ual EAX Q45 User s Manual 49 y Core Multi Processing The item is to enable or disable the Core Multi processing function y Intel SpeedStep tech The choices of Execute Disable Bit Capability are Enable...

Страница 50: ...hange the value of the selected option A description of the selected item appears on the right side of the screen The settings are described on the following pages y Mirrored IDER Configuration The ch...

Страница 51: ...E disk drive in the AMIBIOS 5 Set this value to stop the AMIBIOS from searching the IDE bus for IDE disk drives in five seconds A large majority of ultra ATA hard disk drives can be detected well with...

Страница 52: ...560 Q45 User s Manual y AHCI Configuration AHCI BIOS Support Enables for supporting AHCI BIOS The choices are Enabled or Disabled AHCI CD DVD Boot Time Out Select the time out value for detecting AHCI...

Страница 53: ...shown below y Serial Port1 Address This option specifies the base I O port address and Interrupt Request address of serial port 1 The Optimal setting is 3F8 IRQ4 Option Description Disabled Set this v...

Страница 54: ...ess and IRQ 3 for the interrupt address This is the default setting The majority of serial port 2 or COM2 ports on computer systems use IRQ3 and I O Port 2F8 as the standard setting The most common se...

Страница 55: ...temperature of system y CPU Temperature This shows you the current CPU temperature y CPU_FAN Speed This shows the current CPU FAN operating speed y SYS_FAN Speed This shows the current System FAN oper...

Страница 56: ...n You can use this screen to select options for the ACPI settings Use the up and down Arrow keys to select an item Use the Plus and Minus keys to change the value of the selected option The settings a...

Страница 57: ...X Q45 User s Manual 57 y Chipset ACPI Configuration This item allows you to set South Bridge ACPI Configuration High Performance Event Timer This item allows you to enable or disable the High Performa...

Страница 58: ...ion The settings are described on the following pages The screen is shown below y Power Management APM This item allows you to set APM to Enabled or Disabled y Restore on AC Power Loss This item allow...

Страница 59: ...RTC to generate a wake event 2 4 7 Intel Danbury DT Configuration You can use this screen to select options for the Intel Danbury DT settings Use the up and down Arrow keys to select an item Use the P...

Страница 60: ...r the Intel TXT LT settings Use the up and down Arrow keys to select an item Use the Plus and Minus keys to change the value of the selected option The settings are described on the following pages Th...

Страница 61: ...ect options for the Intel VT d settings Use the up and down Arrow keys to select an item Use the Plus and Minus keys to change the value of the selected option The settings are described on the follow...

Страница 62: ...tings Use the up and down Arrow keys to select an item Use the Plus and Minus keys to change the value of the selected option The settings are described on the following pages The screen is shown belo...

Страница 63: ...l Plug and Play BIOS Setup options are described in this section The Plug and Play BIOS Setup screen is shown below 2 5 1 Clear NVRAM This item is to clear NVRAM during system boot The choices are No...

Страница 64: ...the PCI latency to 224 PCI clock cycles 248 This option sets the PCI latency to 248 PCI clock cycles 2 5 4 Allocate IRQ to PCI VGA Set this value to allow or restrict the system from giving the VGA a...

Страница 65: ...will select PCI Slot 3 as the location of the OffBoard PCI IDE adapter card Use this setting only if there is an IDE adapter card installed in PCI Slot 3 This option is available even if the motherbo...

Страница 66: ...9 IRQ10 IRQ11 IRQ14 IRQ15 Reserved This setting allows the specified IRQ to be used by a legacy ISA device 2 5 9 DMA Set this value to allow the DMA setting to be modified The default setting is Avail...

Страница 67: ...figuration Select the Boot tab from the setup screen to enter the Boot Setup screen You can display a Boot Setup option by highlighting it using the Arrow keys All Boot BIOS Setup options are describe...

Страница 68: ...ted option The settings are described on the following pages The screen is shown below y Quick Boot The default setting is Enabled Option Description Disabled Set this value to allow the BIOS to perfo...

Страница 69: ...be lit This is the default setting y Wait For F1 If Error Set this value to allow the Wait for F1 Error setting to be modified The default setting is Enabled Option Description Disabled This prevents...

Страница 70: ...lt setting 2 6 2 Boot Device Priority Use this screen to specify the order in which the system checks for the device to boot from To access this screen select Boot Device Priority on the Boot Setup sc...

Страница 71: ...screen to view the hard disk drives in the system To access this screen select Hard disk drives on the Boot Setup screen and press Enter The following screen displays examples of hard disk drives y 1s...

Страница 72: ...ibed in this section To access the sub menu for the following items select the item and press Enter y Change Supervisor Password The Security Setup screen is shown below The sub menus are documented o...

Страница 73: ...Setup screen You can select any of the items in the left frame of the screen such as CPU Configuration to go to the sub menu for that item You can display a Chipset BIOS Setup option by highlighting i...

Страница 74: ...nus keys to change the value of the selected option Note The North Bridge Configuration setup screen varies depending on the supported North Bridge chipset y Memory Remap Feature Set this value to all...

Страница 75: ...PCI The default setting is PEG PCI y IGD Graphics Mode Select This item selects the amount of system memory used by the internal graphics device The choices are Disabled Enabled 32MB Enabled 64MB and...

Страница 76: ...is a chipset on the motherboard that controls the basic I O functions USB ports audio functions modem functions IDE channels and PCI slots Use the up and down Arrow keys to select an item Use the Plu...

Страница 77: ...abled and Disabled Select Disabled if you don t want to use HDA controller y SLP_S4 Min Assertion Width The choices are 4 to 5 seconds 3 to 4 seconds 2 to 3 seconds and 1 to 2 seconds y PCIE Ports Con...

Страница 78: ...ect the Exit tab from the setup screen to enter the Exit BIOS Setup screen You can display an Exit BIOS Setup option by highlighting it using the Arrow keys All Exit BIOS Setup options are described i...

Страница 79: ...figuration changes select this option to leave Setup and reboot the computer so the new system configuration parameters can take effect Select Exit Saving Changes from the Exit menu and press Enter Sa...

Страница 80: ...Select this option to quit Setup without making any permanent changes to the system configuration Select Exit Discarding Changes from the Exit menu and press Enter Discard Changes and Exit Setup Now...

Страница 81: ...User s Manual EAX Q45 User s Manual 81 2 9 3 Discard Changes Select Discard Changes from the Exit menu and press Enter Discard Changes Ok Cancel appears in the window Select Ok to discard changes...

Страница 82: ...Select this option The Optimal settings are designed for maximum system performance but may not work best for all computer applications In particular do not use the Optimal Setup options if your comp...

Отзывы: