background image

Operation

2 5

© Travis Industries

4070806

1 0 0 - 0 1 1 9 1 _ 0 0 0

Start-Up Sequence

This stove utilizes a start-up sequence whenever the mode switch is changed or the heater is started
when cold.  This is to ensure proper operation through all possible settings and operational states (hot
or cold, pellets burning or not burning, etc.).  This sequence over-rides all user settings (except the
"OFF" position) to set the auger feed rate to medium, the exhaust blower to high, and the igniter on.
During this period the lowest “HEAT OUTPUT” light will flash.

"AUGER ON" Light

This light comes on when the auger is turning.  This allows the operator to determine when the auger
is turning.

"Maintenance Required" Light

N O T E

   : If the “MAINTENACE REQUIRED” light

comes on, check the items below    

before calling

for service

   .

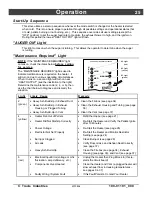
The “MAINTENACE REQUIRED” light is used to
indicate maintenance is required on the heater.  It
will turn on due to various operating circumstances.
When it turns on, a second light will turn on near
“HEAT OUTPUT” (see the illustration to the right).
Determine the maintenance code (2, 4, or 6), then
use the chart below to diagnose and remedy the
situation.

HIGH

DISCONNECT POWER BEFORE SERVICE

AUTO

MANUAL

H
E
A
T

O
U
T
P
U
T

MED

LOW

AUGER

# 6 Light

(red)

# 2 Light

(green)

# 4 Light

(yellow)

MAINT.

(REQUIRED)

Light

Likely Cause

R e m e d y

2
(green)


Heavy Ash Build-Up in Exhaust Duct


Heavy Ash Build-Up in Exhaust

Housing or Plugged Tubing


Heavy Ash Build-Up in Vent


Clean the Firebox (see page 34)


Clean the Exhaust Housing and Tubing (see page

36)


Clean the Vent (see page 37)

4
(yellow)


Heater Ran Out of Pellets


Heater Did Not Start-Up Correctly


Power Outage


Restrictor Not Set Properly


Burnpot Clogged


Air Leak


Heavy Ash Build-Up


Refill the Hopper (see page 21)


Re-Start the Heater and Verify the Pellets Ignite
after 10 Minutes


Re-Start the Heater (see page 26)


Re-Start the Heater and Monitor Restrictor
Setting (see page 24)


Clean Burnpot (see page 28)


Verify Door, Glass, and Ashpan Seal Correctly
(see page 37)


Clean the Firebox (see page 34), Exhaust
Housing (see page 36), and Vent (see page 37)

6
(red)


Electrical Input Error (voltage or mhz
fluctuation, amp deficiency, etc.)


Components Over-Heated


Faulty Wiring / System Fault


Unplug the Heater then Plug it Back In (this re-
starts the circuit board)


Clean the Heater and Vent (a plugged heater will
slow exhaust flow, increasing temperatures –
see pages 34- 37)


If this Fault Persists, Contact Your Dealer

Содержание Arbor

Страница 1: ...re manual before installation and use of this pellet fuel burning room heater Failure to follow these instructions could result in property damage bodily injury or even death Contact local building or fire officials about restrictions and installation inspection requirements in your area Save these instructions Installer After installation give this manual to the home owner and explain operation o...

Страница 2: ...stallation and operation of your new heater an easier and more enjoyable experience We offer our continual support and guidance to help you achieve the maximum benefit and enjoyment from your heater Important Information No other Arbor heater has the same serial number as yours The serial number is on the safety label on the back of the appliance This serial number will be needed in case you requi...

Страница 3: ...HearthStove 18 InstallationExample FreestandingMasonryChimney 19 Operation Safety Notice 20 Location of Controls 20 Starting the Heater for the First Time 20 Loading Pellets 21 The Two Modes of Operation 21 Operation continued Manual Mode 22 Auto Mode 23 Restrictor Adjustment 24 Restrictor Adjustment 24 Adjusting the Fan Speed 24 Start Up Sequence 25 AUGER ON Light 25 Maintenance Required Light 25...

Страница 4: ...ctly adhered to Do not use makeshift methods or compromise in the installation Never try to repair or replace any part of the heater unless instructions are given in this manual All other work should be done by a trained technician Your heater requires periodic maintenance and cleaning see Maintaining Your Heater Failure to maintain your heater may lead to smoke spillage in your home The viewing d...

Страница 5: ...NOTE Turning the Mode Switch to OFF does not disconnect all power to the heater The exhaust system should be checked twice a year minimum for any build up of soot or creosote This Manual Do not throw this manual away This manual has important operating and maintenance instructions that you will need at a later time Always follow the instructions in this manual Do not touch the hot surfaces of the ...

Страница 6: ...mes Differences of plus or minus 20 depending on fuel quality may occur Dimensions Center Line 7 3 4 NOTE Measure front and side clearances from the stove top Rear and corner clearances are measured from the stove body Weight 390 Lbs 27 27 1 4 25 27 3 4 17 1 4 4 Diameter Exhaust Electrical Specifications Electrical Rating 115 Volts 3 6 Amps 60 Hz Watts During Start Up Sequence 400 approximately Wa...

Страница 7: ...INT When determining the location of the stove locate the wall studs for horizontal penetrations and ceiling trusses for vertical penetrations You may wish to adjust the stove position slightly to ensure the vent does not intersect with a framing member HINT Place the heater outside and load 10 pounds of pellets inside the hopper Plug the heater in and let it run on HIGH until the pellets run out ...

Страница 8: ...AAAA AAAAAAAAAAA AAAAAAAAAAA AAAAAAAAAAA AAAAAAAAAAA 6 Minimum AAA AAA 3 Minimum 45 Elbow 45 3 Minimum Interior Vertical Vents AAAAAAAAAAAAA AAAAAAAAAAAAA AAAAAAAAAAAAA AAAAAAAAAAAAA AAAAAAAAAAAAA AAAAAAAAAAAAA AAAAAAAAAAAAA AAAAAAAAAAAAA AAAAAAAAAAAAA AAAAAAAAAAAAA AAAAAAAAAAAAA AAAAAAAAAAAAA AAAAAAAAAAAAA 3 Minimum 6 Minimum 2 Minimum 3 Minimum Tee Vent Clearance Install vent at clearance specif...

Страница 9: ...TO MAINTAIN CLEARANCE TO ANY COMBUSTIBLES No more than one tee and 180 of elbows one tee with two 90 elbows one tee with one 90 and two 45 elbows etc Maximum Venting Distance Vent must have a support bracket every 5 of pellet vent when exterior of structure 0 Feet 5 Feet 10 Feet max 0 Feet 5 Feet 10 Feet 15 Feet 20 Feet 25 Feet 30 Feet 33 Feet max The vent height and run must not exceed the distan...

Страница 10: ...revent water from entering or a 45 downturn with rodent screen If the termination is located on a windy side of the house an approved house shield is recommended to prevent soot from building up on the side of the house Must not be located where it will become plugged by snow or other material H G A D F NOTE Measure clearances to the nearest edge of the exhaust hood A E B C F X H A Minimum 4 clear...

Страница 11: ...pace garage unventilated crawl space HINT Travis Industries strongly suggests outside air for all residential installations especially for those that are energy efficient air tight homes Must not be over 15 long Must be made with 3 diameter or larger metal or aluminum duct with a metal screen attached to the end to keep out rodents P V C or other combustible materials may not be used We recommend ...

Страница 12: ...aster than it is fed For medium heat output settings the restrictor will need to be opened to a medium position For high heat output settings the restrictor will need to be opened to a high position This prevents the firepot from over filling with pellets and becoming clogged with ash clumps Keeping your firepot clean is the most important step to maintaining a safe and efficient stove Check and c...

Страница 13: ...h the quick connects to the two posts near the molex connector on the circuit board orientation does not mater 2 Determine a location for the thermostat that is within range of the 20 length of thermostat wire It should be centralized in the room and away from the heater The wire may be routed externally on the wall or behind the wall preferred 3 Follow the directions to the right to attach the th...

Страница 14: ...ior wall from soot discoloration is HIGHLY RECOMMENDED 12 Minimum Horizontal Rain Cap Wall Thimble note clearance between vent and combustibles Type L Vent 12 Minimum A A A A A A A A A A A A AA AAAAAAAAAAAAAAAA AAAAAAAAAAAA AAAAAAAAAAAA A A A A A A A A A A A A 3 Minimum 17 1 4 Floor Protection Seal each vent section including adapters elbows etc by injecting a liberal amount of 500 F RTV silicone ...

Страница 15: ...ion must maintain clearance Outside air may be drawn from a ventilated crawl space 2 Min Ceiling Support Fire Stop Spacer Roof Flashing Storm Collar Vertical Cap Vent must maintain clearance to combustibles L Vent Seal each vent section including adapters elbows etc by injecting a liberal amount of 500 F RTV silicone into the gap between sections 500 F RTV Silicone Floor Protection AAAAAAAA AAAAAA...

Страница 16: ...ass A Chimney Ceiling Support Roof Flashing L Vent to Class A Chimney Adapter Class A Chimney L Vent AAAA AAAA AAAA AAAA AAAA AAAA AAAA AAAA AAAA AAAA AAAAA AAAAA Storm Collar Class A Chimney must maintain clearances outlined in the chimney s installation instructions usually 2 Seal each vent section including adapters elbows etc by injecting a liberal amount of 500 F RTV silicone into the gap bet...

Страница 17: ... AA AA AA AA AA AA AA AA AA AA AA AA AA AA AA AA AA AA AA AA AA AA AA AAA AAA AA AA AA AA AA AA AA AA AA AAA AAA AA AA AA AA AA AA AA AA AA AA AA AA AA AA AA AA AA AA AA AA AA AA AA AA AA AA AA AA AA AA AA AA AA AA AA AA AA AA AA AA AA AA AAA AAA AAA AAA AAA AAA AAA AAA AAA AAA AA AA AA AA AA AAAAA AAAAA AAA AAA AAAA AAAA AAA AA Storm Collar Vertical Cap Cover Plate non combustible Silicone Seal t...

Страница 18: ...AAA AAA L Vent Flex Section 6 Min L Vent AAAA AAAA AAAA AAAA AAAA AAAA AAAA AAAA Storm Collar Vertical Cap Cover Plate non combustible Silicone Seal the cover plate with silicone NOTE you may need a short horizontal section here to clear the lintel and allow the hopper lid to open Allow room for the hopper lid to open 44 AAAA AAAA AAAA AAAA AAAA AAAA AAAA AAAA Seal each vent section including adap...

Страница 19: ...A AA AA AA AA AA AA AA AA AA AA AA AA AA AA AA AA AA AA AA AA AA AA AA AA AA AA AA AA AA AA AA AA AA AA AA AA AA AA AA AA AA AA AA AA AA AA AA AA AA AA AA AA AA AA AA AA AA AA AA AA AA AA AA AA AA AA AA AA AA AA AA AA AA AA AA AA AA AA AA AA AA AA AA AA AA AA AA AA AA AA AA AA AA AA AA AA AA AA AA AA AA AA AA AA AA AA AA AA AA AA AA AA AA AAAAAAAAAAAAAAAAAAA AAAAAAAAAAAAAAAAAAA AAA AAA AAA AAA AAA...

Страница 20: ... t o Restrictor The restrictor adjusts the amount of air flowing to the firepot AAA AAA AAA AAA AAA AAA Three tabs are provided on the back of the stove to hang the cleaning tools bend the tabs out Starting the Heater for the First Time Start the Heater Let it Burn for 1 Hour THEN OPEN THE DOOR The stove paint is cured through heat To prevent it from bonding to the door gasket you must burn the he...

Страница 21: ...rtently shutting down due to the auger disabling switch we recommend pressing the START button after reloading the stove The Two Modes of Operation Manual Manual mode requires the user to turn the heater on and off manually Auto requires a thermostat Auto mode allows you to use a thermostat to control room temperature The stove automatically turns on when the temperature drops below the thermostat...

Страница 22: ...ANUAL START AUGER TRAVIS INDUSTRIES HOUSE OF FIRE TM To Shut Down Move the mode switch to OFF The exhaust blower will still run until the heater cools down AUTO OFF MANUAL H E A T F A N UP DOWN UP DOWN MANUAL MANUAL START AUGER TRAVIS INDUSTRIES HOUSE OF FIRE TM To Adjust the Heat Press the Heat buttons to adjust the heat output NOTE During start up you may adjust the heat setting This heat settin...

Страница 23: ...adjust the heat output HINT If you find that the stove turns on and off repeatedly you may wish to turn the heat output to a lesser setting The lower setting will provide a more consistent heat output over time eliminating the need for the thermostat to repeatedly turn the stove off NOTE If the thermostat calls for heat while the stove is still cooling down the stove will go through the start up s...

Страница 24: ...val Not Enough Air If clinkers ashes that solidify into a clump develop or the flame appears lazy and slow to blow the ash out of the firepot pull the restrictor outward until the flame becomes active and the firepot holes remain clean NOTE If the restrictor is fully out yet the firepot does not remain clean the stove needs to be cleaned and checked for air leaks see Maintenance section of this ma...

Страница 25: ...diagnose and remedy the situation HIGH DISCONNECT POWER BEFORE SERVICE AUTO MANUAL H E A T O U T P U T MED LOW AUGER 6 Light red 2 Light green 4 Light yellow MAINT REQUIRED Light Likely Cause Remedy 2 green Heavy Ash Build Up in Exhaust Duct Heavy Ash Build Up in Exhaust Housing or Plugged Tubing Heavy Ash Build Up in Vent Clean the Firebox see page 34 Clean the Exhaust Housing and Tubing see page...

Страница 26: ...DO NOT BURN A MIX WITH MORE THAN 50 CORN TO WOOD PELLETS THOROUGHLY MIX THE TWO FUELS TOGETHER TO BE SURE OF AN EVEN BURN RATE If combustion is slow if the fire is slow to start or if clinkers ashes that solidify into a clump build up rapidly in the fire pot decrease the proportion of corn and increase the proportion of wood pellets until you find a proportion that works well in your appliance If ...

Страница 27: ...eds adjustment see Restrictor Adjustment in the installation section of this manual The door glass or ashpan is open or has an air leak The firepot requires cleaning The exhaust system requires cleaning AA AA A A A A A AA AA AA A AA A A A A A A AA A A A A A A A AA A A A AA AA AA A A A A A A A A A A A A A A A AA A A A AA AA A A A A A AA AA AA AA AA AA A A AA A AA AA A AA AA A A A A A A AA AA AA A A...

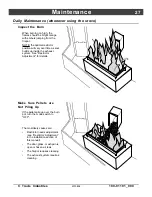
Страница 28: ...AA A A A A A AA A A A A A A A A A A A A A A AA AA AA AA A A A A A A A A AA A A AA A A A A A A A A A AA AA A A A A A A A A A A A A A A AA AA AA AA A A AA AA AA AA A A A A A A A A A A A A A A A A A A A A A A A A A A A A A Cleaning the Firepot WARNING Make sure the heater has fully cooled approximately 25 minutes before opening the door and conducting service To clean the firepot open the door see pa...

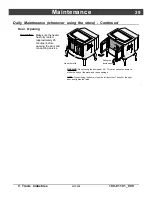
Страница 29: ...heater has fully cooled approximately 25 minutes before opening the door and conducting service Open the latch WARNING Do not swing the doors past 90 This may cause the doors to strike the body of the stove and cause damage NOTE When closing the doors close the left door first Then shut the right door and tighten the latch Swing the doors open ...

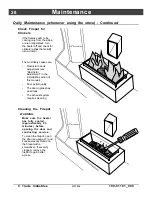
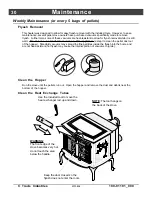
Страница 30: ... appliance except to clean the pellet dust out of the hopper Standard vacuums may spread the fine particles inside the flyash into the home and are not heat resistant hot flyash may cause the internal portion of vacuums to ignite Clean the Hopper Run the stove until the pellets run out Open the hopper and remove the dust and debris near the bottom of the hopper Clean the Heat Exchange Tubes WARNIN...

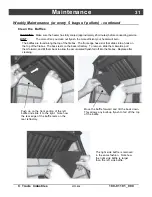
Страница 31: ...s into a hook on the top of the firebox The back rests on the back refractory To remove slide them inwards pull them forward and tilt them back to allow the accumulated flyash fall off into the firebox Replace after cleaning Push up on the front portion of the left baffle and slide it to the right Note how the rear edge of the baffle rests on the rear refractory Move the baffle forward and tilt th...

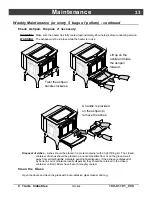
Страница 32: ...ashdump covers on the floor of the firebox using the included hook tool Remove the firepot and place it aside Sweep accumulated flyash through the holes in the firebox floor into the ashpan Replace the covers and firepot after cleaning Use the included hook tool to remove the ashdump covers both side Lift the firepot out of the firebox Use the included brush to sweep all flyash into the ashpan Mak...

Страница 33: ...to remove the ashes A A Lift up on the ashlip and slide the ashpan forward AA AA AAAAA AAAAA AAAAA Disposal of Ashes Ashes should be placed in a metal container with a tight fitting lid The closed container of ashes should be placed on a noncombustible floor or on the ground well away from all combustible materials pending final disposal If the ashes are disposed of by burial in soil or otherwise ...

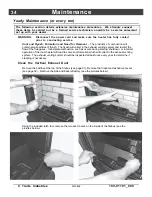
Страница 34: ...ash The flyash will collect in the exhaust venting system and restrict the flow of the flue gases Incomplete combustion such as occurs during startup shutdown or incorrect operation of the room heater will lead to some soot formation which will collect in the exhaust venting system The exhaust venting system should be inspected at least once every year to determine if cleaning is necessary Clean t...

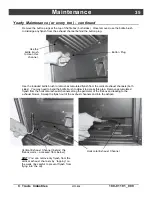
Страница 35: ...des You may need to bend the bottle brush to allow it to access this area Remove accumulated flyash from the horizontal exhaust channels along the perimeter of the firebox and leading to the exhaust blower Sweep the flyash out of the exahust channels and into the ashpan Button Plug Vertical Exhaust Channel behind the firebox walls accessed from below HINT You can remove dry flyash from the vertica...

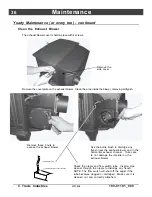
Страница 36: ...attached to exhaust channel Remove the side cover Remove these 3 nuts to expose the exhaust blower Use the bottle brush to disoldge any flyash near the exahust blower and in the horizontal exhaust channel Take care to not damage the impeller on the exhaust blower Check the nipple and flow switch tube Insert a pipe cleaner through the nipple to dislodge any flyash NOTE The flow switch will shut off...

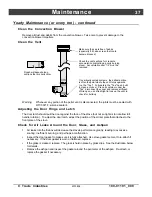
Страница 37: ...at are horizontal AA AA AA AA AA AA Warning Whenever any portion of the pellet vent is disconnected the joints must be sealed with RTV 500 F silicone sealant Adjusting the Door Hinge and Latch The door latch should pull the door against the face of the stove but not so tight as to not allow full handle rotation To adjust the door latch adjust the position of the striker plate that attaches to the ...

Страница 38: ... 15 G1 2 93 95BV 91 96PS PI 00 LRG PS 98900755 IGNITER LG PS PI 2000 UP 250 WATT ELEMENT 250 00243 BRUSH BROOM STYLE REPLACES 93005530 93005531 100 04301 OIL PAN COMB BLOWER LG PEL 20 GA ALZ 5 414 x 1 881 210 03216 BURN POT LG PS PI CORN PEL LRG PS PI ONLY SERVICE PART 250 00128 POWER CORD PS PI 1997 UP 16 ga AWG w RING FML CNCTRS 93005015 CNTRL BRD ALL PEL 1997 UP LARGE OR SMALL PS PI 250 00011 S...

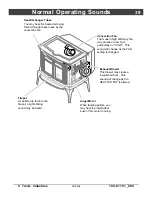
Страница 39: ...heated air being forced through these tubes by the convection fan Firepot As pellets are fed into the firepot a light clicking sound may be heard Convection Fan The modern high efficiency fan may produce a low hum particularly on HIGH This sound will change as the FAN setting is changed Exhaust Blower This blower may create a low pitched hum This sound will change as the HEAT OUTPUT is altered ...

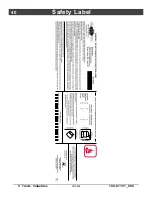
Страница 40: ...40 Safety Label Travis Industries 4070806 100 01191_000 ...

Страница 41: ...ess or condensation c Any damage to the unit combustion chamber heat exchanger or other components due to water or weather damage which is the result of but not limited to improper chimney venting installation 7 Exclusions to this 7 Year Warranty include injury loss of use damage failure to function due to accident negligence misuse improper installation alteration or adjustment of the manufacture...

Страница 42: ...27 Installation Example Class A Chimney Retrofit 16 InstallationExample Direct Through the wall Installation 14 InstallationExample FreestandingMasonryChimney 19 Installation Example Interior Vertical Installation 15 InstallationExample MasonryFireplaceHearthStove 17 InstallationExample Zero Clearance Metal FireplaceHearthStove 18 Installation Options 7 Installing the Pellet Vent 10 Introduction 2...

Отзывы: