background image

Email: [email protected]

10

3.  Illustrations of the Device

19

20

21

Содержание TU2224-A

Страница 1: ...stitute for the user manual Please read the user manual careful ly before use to understand the contraindica tions and warnings Please consult your doctor before use if you re not sure whether you can use this device Operation Note Do not use it while charging 1 Clean and dry the application areas 2 Connect the lead wire to a pair of pads and the device Quick Guide ...

Страница 2: ...3 Attach a pair of pads 4 Long press the button to turn on the device 5 Choose the con nected channel 6 Choose a mode ...

Страница 3: ...7 Adjust intensity 8 Set time 9 Long press to turn off the device 10 Remove the pads Do not pull the wire ...

Страница 4: ...Pad Placement Suggestion Calf Thigh Ankle Abdomen Sciatica Knee Shoulder Elbow Upper Back Lower Back Waist Buttock Neck Square Electrodes ...

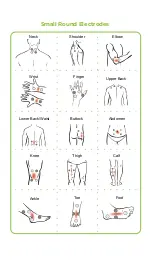
Страница 5: ...Small Round Electrodes Calf Ankle Toe Foot Thigh Abdomen Upper Back Knee Shoulder Elbow Wrist Finger Buttock Neck Lower Back Waist ...

Страница 6: ...Calf Thigh Ankle Abdomen Sciatica Knee Shoulder Elbow Upper Back Lower Back Waist Buttock Neck Rectangular Electrodes ...

Страница 7: ...USER MANUAL Model TU2224 A TENS and Powered Muscle Stimulator Relaxation Anywhere Anytime Device Name TENS and Powered Muscle Stimulator ...

Страница 8: ...cription 19 5 2 Pad Placement Suggestion 21 6 TENS Electrode Pads Pads Holder 24 6 1 Features 24 6 2 Instruction 25 6 3 Electrode Pads Care and Storage 26 6 4 Electrode Pads Precautions 27 7 Safety Precautions Warnings 28 7 1 Prohibited Conditions 28 7 2 Prohibited Individuals 29 7 3 Prohibited Areas 29 7 4 Prohibited Activities 29 8 Trouble Shooting 30 9 Symbols 34 10 Certification 35 11 Customer...

Страница 9: ...NS does not work for everyone but for most patients it is effective in reducing or eliminating pain allowing them to re turn to normal activities Electrical Muscle Stimulation EMS stimulates the muscles rather than the nerve cells EMS stimulates your motor nerves which induces muscle contrac tions and mimics the way they contract during a workout It will force the muscles to rapidly contract and r...

Страница 10: ...Email support iauvon com 10 3 Illustrations of the Device 19 20 21 ...

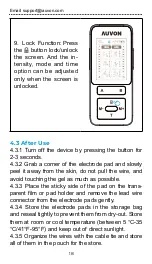
Страница 11: ... Channel A Intensity indicator Channel A EMS modes P17 P24 Channel A choose button Lock button Mode button Time button Mode number Battery indicator Intensity Increase button Channel B Intensity decrease button Channel B Intensity indicator Channel B Channel B choose button Mode button On Off switch button USB port Two output connectors ...

Страница 12: ...3 hours The backlight of the screen will automatically come off after 20 seconds of no operation when the device has no output it will automatically shut down if there is no further operation within 5 minutes 4 2 How to Use 1 Clean and dry your skin before use and choose the unbroken no hair and flat areas with no sweat and no oil ...

Страница 13: ... pads to the massage area and press the edge of the pads firmly on your skin to make sure full contact Make sure the unit is off when you attach the pads Note Make sure both pads on the skin are not overlapping The electrode pads should be at least one inch apart from each other Each lead wire needs to be connected to a pair of pads 2 pads or it won t work ...

Страница 14: ... on the unit NOTE Do not move the electrode pads or remove the lead wires during the use or you may be shocked 5 C h a n n e l O p t i o n Choose channel A B by pressing the A B but ton or the corresponding intensity buttons on the side and the selected channel will flash ...

Страница 15: ...s the M M button to choose the mode If A is flashing it means the mode of channel A is selected If B is flashing it means the mode of channel B is selected NOTE The intensity of the channel will revert to the lowest setting with each mode selection ...

Страница 16: ...nsi ty for the channel on which the icon is flashing NOTE 1 The intensity of the channel will revert to the lowest setting with each mode selection NOTE 2 For initial use the intensity should be set between 1 3 If you feel the intensity is weak in 1 2 minutes gradually increase it and select the most comfortable setting ...

Страница 17: ...off when time is reached NOTE 1 When the device is set in C mode and the channel has output the massage will go on until the battery is exhausted unless it is manually turned off If the channel has no output and no operation the machine will automatically shut down within 5 minutes NOTE 2 It is recommended that each area should not use this device for more than 30 min utes at a time Stop using it ...

Страница 18: ...y from the skin do not pull the wire and avoid touching the gel as much as possible 4 3 3 Place the sticky side of the pad on the trans parent film or pad holder and remove the lead wire connector from the electrode pads gently 4 3 4 Store the electrode pads in the storage bag and reseal tightly to prevent them from dry out Store them at room or cool temperature between 5 C 35 C 41 F 95 F and keep...

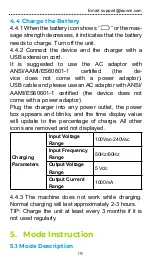
Страница 19: ...th ANSI AAMI ES60601 1 certified the device does not come with a power adaptor Plug the charger into any power outlet the power box appears and blinks and the time display value will update to the percentage of charge All other icons are removed and not displayed Charging Parameters Input Voltage Range 100Vac 240Vac Input Frequency Range 50Hz 60Hz Output Voltage Range 5 Vdc Output Current Range 10...

Страница 20: ... are TENS and modes 17 to 24 are EMS Main Mode Number of Mode Mode Type 1 TENS 2 TENS 3 TENS 4 TENS 5 TENS 6 TENS 7 TENS 8 TENS 9 TENS 10 TENS 11 TENS 12 TENS 13 TENS 14 TENS 15 TENS 16 TENS 17 EMS 18 EMS 19 EMS 20 EMS 21 EMS 22 EMS 23 EMS 24 EMS ...

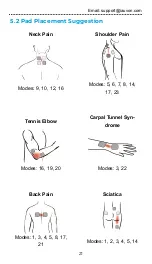
Страница 21: ...com 21 5 2 Pad Placement Suggestion Neck Pain Shoulder Pain Modes 9 10 12 16 Modes 5 6 7 8 14 17 23 Tennis Elbow Carpal Tunnel Syn drome Modes 16 19 20 Modes 3 22 Back Pain Sciatica Modes 1 3 4 5 8 17 21 Modes 1 2 3 4 5 14 ...

Страница 22: ... iauvon com 22 Hip Thigh Pain Period Pain Modes 15 17 18 19 20 21 22 23 24 Modes 1 4 11 Knee Pain Claf Pain Modes 4 9 10 12 13 16 19 Modes 3 6 13 15 17 18 Ankle Pain Plantar Fasciitis Modes 6 17 18 20 Modes 9 10 12 ...

Страница 23: ...Email support iauvon com 23 Biceps Abs Modes 19 20 Modes 23 24 Glutes Hamstrings Modes 21 22 23 24 Modes 18 20 21 Quadriceps Calves Modes 17 19 20 Modes 17 18 ...

Страница 24: ...m 24 Widely compatible for pads in different sizes The salient points are designed specially to lessen damage to the pads High quality ABS material to make sure you use it safely 6 TENS Electrode Pads Pads Holder 6 1 Features ...

Страница 25: ...Email support iauvon com 25 6 2 Instruction Stick the electrode pads on the holder to avoid getting dust Wind the thread around the holder for easy use as the picture shown Step 1 Step 2 ...

Страница 26: ...lectrode pads lifespan drop a few drops of water on the sticky side and dry it naturally on the pad holder with the gel side facing up then it will become sticky again Excessive water will de crease the stickiness Cover the sticky side of the electrode pads with the transparent film and store them in the sealed bag Dust on the gel will decrease the stickiness of the electrode pads Step 3 Store the...

Страница 27: ...ry or throat broken excessively swollen and red infected and inflamed or rash skin e g phlebitis thrombophlebitis varicose veins Do not apply ointment or solvent to the electrode pads or the area where to be used The electrode pads should not touch metal objects like belt buckles necklaces or other metal worn un der clothes Please refer to the following principles when using During use please ensu...

Страница 28: ...based on personal feeling Attaching the pads to one area for a long time will make the skin un breathable and lead to redness or itching If your skin is irritated during the use stop using the electrode pads and consult your doctor Please turn off the unit first and remove the pads from your skin or you will be shocked When removing the electrode pads grab the cor ner of the electrode pad with you...

Страница 29: ...and its vicinity can cause severe muscle spasms and lead to choking The heart and its vicinity or genital area Open wounds or rash areas Swollen red infected or inflamed areas Areas of skin erosion caused by varicose veins phlebitis thrombophlebitis and thrombosis Sites on or near cancerous lesions Skin that lacks normal sensation Do not use the pads in the following two areas at the same time bec...

Страница 30: ...vice sup port iauvon com Problem Possible Cause Solution The unit is on while no pulse is felt in the pads Only attach 1 electrode pad to the mas sage area Attach a pair of electrode pads of the same channel to the massage area Poor connec tion between the electrode pads and the device Connect both ends of the lead wires to the electrode pads and the device tightly or change a new lead wire Poor c...

Страница 31: ... pads Poor wire connection Plug the wire into the output port completely If it does not work replace the wire and try again The pads are close to each other Make sure the distance be tween the pads is more than one inch apart The de vice can t turn on Low battery Charge the battery and a full charge may need 2 3 hours The device is charging Unplug the charging cable and then turn it on again ...

Страница 32: ...he same The screen is locked If there s a lock icon on the top right side of the screen please touch the lock icon on the screen or press the lock button to unlock it The intensity felt is very weak Pads are not attached to the body firmly Attach both electrode pads firmly to the flat skin The intensity is too low Increase the intensity level and wait for 1 minute to feel the pulse Low battery Cha...

Страница 33: ...minutes and the continu ous mode infinite time Can t charge Charging port is not properly inserted Charging port is narrow at the top and wide at the bot tom shape please align the USB cable and charging port before fully inserting Incorrect pow er connection no charging started After the charging cable is correctly connected please confirm that the power supply is working properly and the battery...

Страница 34: ...ted Applied Part Class II equipment Disposal in accordance with Directive 2002 96 EC MANUFACTURER Date when the medical device was manufac tured AUTHORISED REPRESENTATIVE IN THE EUROPEAN COMMUNITY Pls read the user manual before use CE Mark meets compliance of applicable directives and regulation in EU ...

Страница 35: ...er The second number Protected against vertically falling water drops when enclosure is tilted up to 15º Vertically falling drops shall have no harmful effects when the enclosure is tilted at any angle up to 15 on either side of the vertical 10 Certification The device complies with following normative docu ments ANSI ES 60601 1 IEC60601 1 2 IEC60601 1 11 IEC 60601 2 10 ISO 10993 5 ISO 10993 10 FD...

Страница 36: ...Auvon US TU2224 sms v1 2 221012 ...

Отзывы: