background image

Email

 [email protected]

13

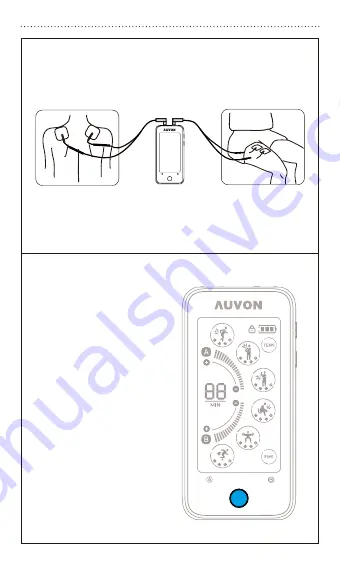
3. Attach at least one pair of pad to the massager 

area, such as shoulder or leg. (Make sure the unit is 

off when you attach the pads.)


Note: Adding a few drops of water on the pads and 

drying the pads naturally will increase their longevity. 

Make sure both pads on the skin are not overlapping.

4. On: Press HOME key 

for 2-3 seconds to turn 

on the unit.

Содержание AS8019

Страница 1: ...k guide are not a substitute for the user manual Please read the user manual carefully before use to un derstand the contraindications and warnings Please consult your doctor before use if you re not sure whether you can use this device Operation 1 Clean the applica tion areas 2 Connect the lead wire to a pair of pads and the device Quick Guide ...

Страница 2: ...3 Attach the pads 4 Turn on the device 5 Choose the con nected channel 6 Choose mode ...

Страница 3: ...7 Adjust intensity 8 Set time 9 Turn off the device after massage 10 Remove the pads Do not pull the wire ...

Страница 4: ...t place the pads on the artery Only place the pads on the same side of the arm leg If you want to know more details about the mode please read the user manual and if you encounter any problem during the use please check the user manual for Trouble Shooting ...

Страница 5: ...USER MANUAL Model AS8019 TENS and Powered Muscle Stimulator Relaxation Anywhere Anytime Device Name TENS and Powered Muscle Stimulator ...

Страница 6: ...commendation 21 8 2 Time Recommendation 21 8 3 Expected Feelings 22 8 4 Mode Specification 26 9 TENS Pads Holder 27 9 1 Features 27 9 2 Instruction 28 10 Safety Precautions and Warnings 29 10 1 Pain Management Warnings 29 10 2 Prohibited Conditions 29 10 3 Prohibited Individuals 29 10 4 Prohibited Areas 29 10 5 Prohibited Activities 30 10 6 Pads Precautions 30 11 Trouble Shooting 31 12 Symbols 37 ...

Страница 7: ...ls from the injured area along the small nerves leading to the spinal cord Here the message is switched to differ ent nerves that travel up the spinal cord to the brain The pain message is then interpreted referred back and the pain is felt 2 Explanation of TENS Transcutaneous Electrical Nerve Stimulation TENS is a non invasive drug free method of controlling pain TENS uses tiny electrical impulse...

Страница 8: ...l with same mode and different intensity Pulse Amplitude 0 200 mA at 500 ohm load each channel Wave Form Symmetrical Bi Phasic Square Pulse Voltage 0 98V Load 500 ohm Power Source 300mA lithium battery Size 12 8cm L x6 37cm W x1 25cm H Weight 97 5 grams Pulse Rate From 0 130 Hz Pulse Width From 100 240μs microseconds ...

Страница 9: ...mode for uninter rupted usage and increases decreases in 10 minute intervals Set the timer by tapping the time icon and the unit will turn off when the time is up Low Battery Indicator A low battery indicator will show up on the LCD when the battery is low Operating Condition Atmosphere Pressure 700Hpa 1060Hpa Remark There may be a 5 tolerance of all parameters and 20 tolerance of amplitude voltag...

Страница 10: ...Email support iauvon com 10 5 Product Illustrations ...

Страница 11: ...e button Intensity decrease touch button Channel A EMS mode indicator Channel B selection button Power button Lock button HOME USB port Intensity increase touch button Channel A Intensity indicator Channel A Time touch button Intensity decrease touch button Channel B Intensity indicator Channel B Intensity increase touch button Channel B Channel A selection button ...

Страница 12: ... down if there is no further action within 5 minutes 6 2 How to Use 1 Clean your skin before use Use the pads on clean and flat areas with no sweat and no oil 2 Connect a pair of electrode pads to one lead wire connect the other end of the wire to the left output of the device Similarly the other pair of electrode pads should be connected to the remaining wire end and the right output of the devic...

Страница 13: ...uch as shoulder or leg Make sure the unit is off when you attach the pads Note Adding a few drops of water on the pads and drying the pads naturally will increase their longevity Make sure both pads on the skin are not overlapping 4 On Press HOME key for 2 3 seconds to turn on the unit ...

Страница 14: ...reen and the selected channel will flash on and off 6 Intensity Options Press the but ton on the right side of the machine or tap the icon on the screen to adjust the in tensity for the channel on which the icon is flashing Note The intensity of the channel will revert to the lowest setting with each mode selec tion ...

Страница 15: ...Email support iauvon com 15 7 Mode Option Switch mode by tapping the mode icons on the screen one by one and channel A shares the same modes with channel B ...

Страница 16: ...n and the time will increase by 10 minutes for each tap The device will automatically turn off when time is reached NOTE When the device is set in continuous mode and the channel has output the massage will go on until the battery is exhausted unless it is manually turned off If the channel has no output and no oper ation the machine will automatically shut down with in 5 minutes ...

Страница 17: ...ally in 20 seconds to avoid unnecessary touch 6 3 After Use 1 Turn off the device by pressing HOME key for 2 3 seconds 2 Unplug the lead wire pin connector from the pads gently 3 Lift a corner of the electrode and slowly peel it away Avoid touching the gel as much as possible NOTE DO NOT peel the electrode off by the wire 4 Store the electrodes into the storage bag and reseal tightly to prevent dr...

Страница 18: ...ht side of the neck Shoulder Modes 1 4 6 18 20 22 Attach the pad as shown on the left do not place the pad on the spine Back Modes 1 4 17 Attach the two pads on the sides of the back do not at tach it on the spine or back bone Waist Modes 1 11 19 13 16 Attach the two pads on the sides of the lower back do not attach it on the spine or backbone ...

Страница 19: ...t and one behind the muscle Arm Modes 1 24 Attach the pads on both sides of the same arm Elbow Modes 8 12 23 Attach the pads on the upper and lower side of the same elbow Wrist Modes 10 Attach the pads on the upper and lower side of the same wrist Do not place the pads on the pulse ...

Страница 20: ...6 9 13 15 19 22 Attach the pads above and below the pain area of your hip NOT on the back Leg Modes 15 Attach the pads on both sides of the same leg Knee Modes 1 3 7 8 9 13 19 22 Attach both pads above the knee or above and below the pain area ...

Страница 21: ...ion on the outside inside of your ankle foot 8 Mode Instruction 8 1 Intensity Recommendation It is recommended to set the intensity within 1 3 for initial use feel the intensity for 1 2 minutes after each intensity increase if the intensity makes you feel pain or uncom fortable please decrease the intensity 8 2 Time Recommendation It is recommended to use the device for no more than 30 minutes and...

Страница 22: ... Master Mode Sub Mode Feeling TENS For TENS it is used for temporary relief of pain associated with sore and aching mus cles in the shoulder waist back neck upper extremi ties arm and lower extremities leg due to strain from exercise or normal household work activi ties P1 Sustained tingling at a higher frequency P2 Constant tingling at a medium frequency P3 Comfortable rhythmic tingling P4 Sustai...

Страница 23: ... leg due to strain from exercise or normal household work activi ties P5 Weak pulsing at a low frequency followed by a constant comfort able tingling and finally a constant weak pulsing at a low frequency P6 Comfortable rhythmic tingling P7 Weak pulsing at a low frequency followed by a constant tingling at a high frequency P8 Weak pulsing at a low frequency followed by constant comfortable tinglin...

Страница 24: ...ld to severe and then from severe to mild P10 Comfortable tingling from mild to severe and then from severe to mild P11 Comfortable rhythmic pulsing followed by a constant comfortable tingling P12 Slowly comfortable tingling followed by a tingling at a higher frequency P13 Slowly comfortable tingling followed by a tingling at a higher frequency P14 Comfortable rhythmic tingling P15 Constant tingli...

Страница 25: ... rhythmic pulsing P19 Pulsing from weak to strong and then strong to weak P20 Constant comfortable pulsing P21 Weak pulsing at a high frequency followed by a comfortable tingling at a high frequency P22 Comfortable tingling at a high frequency P23 Constant pulsing at a high frequency P24 A medium frequency tapping for about 7 8 seconds followed by a constant tingling at a high frequency for about ...

Страница 26: ... 150 4 TENS 76 81 150 5 TENS 10 100 10 240 6 TENS 2 240 7 TENS 2 100 200 150 8 TENS 2 50 200 150 9 TENS 40 45 240 10 TENS 43 240 11 TENS 2 131 240 12 TENS 38 42 240 13 TENS 42 240 14 TENS 8 240 15 TENS 41 46 240 16 TENS 2 45 240 17 EMS 5 200 18 EMS 7 240 19 EMS 4 20 200 20 EMS 13 16 240 21 EMS 40 100 240 22 EMS 100 200 23 EMS 50 240 24 EMS 5 60 200 ...

Страница 27: ... com 27 Wide compatibility for patches in different sizes The shape of salient point designed specially to lessen damage to the patches High quality ABS material to make sure your use safely 9 TENS Pads Holder 9 1 Features ...

Страница 28: ...Email support iauvon com 28 9 2 Instruction Stick the electrode patches on the holder to avoid getting dust Wind the thread around the holder for easy use as the picture shown Step 1 Step 2 ...

Страница 29: ...es not improve after using this machine becomes severe chronic pain or severe pain stop using this device and consult your doctor 10 2 Prohibited Conditions The wire is broken The gel is damaged The lead wire connection port is broken The device is broken Battery leakage 10 3 Prohibited Individuals Pregnant women infants and children People who do not have the ability to express their thoughts or ...

Страница 30: ...k or through chest Calves of both legs Bottom of both legs 10 5 Prohibited Activities Shower or bath Sleeping Driving or operating machines Any activities that cannot be interfered 10 6 Pads Precautions Do not bend or fold the pads because it may damage gel Only place the pads on the skin or the pad holder Do not apply ointment or any solvent to the pads or the area where the pads are to be used D...

Страница 31: ... be low for common problems and suggested solutions If the recommended action does not solve the problem please contact the seller Problem Possible Cause Solution Pads don t work Only apply 1 pad on the skin Attach a pair of pad of the same channel on the skin Did not set the intensity Increase the intensity of the connected channel Poor connec tion between the pads and the device Connect the both...

Страница 32: ...ry the pad The gel was damaged Replace the pad Pads get deteriorative Contact the vendor for replacements The pads are stored under extreme con ditions Replace the pad One pad feels stronger than the other Different body areas react differently Just make sure the pads are moist and make a good contact Poor wire contact Plugged the wire into the output port completely If it does not work replace th...

Страница 33: ...se the intensity The electrode pad surface is worn out Replace electrode pad Can t plug the lead wires into the device port or the pad connec tor The lead wires are conntected backwards The side with 1 connector is for connecting the device port the side with 2 con nectors are for connecting the electrode pads please make sure you ve operated it correctly Incompatible connector or damaged con nect...

Страница 34: ...n use it Something is wrong inside the device Contact us if the device still can t be turned on after trying all of the above solo tions Can t adjust the mode intensi ty time Adjust the intensity for the wrong channel If you want to adjust the in tensity for channel A make sure the A icon is select ed and flashing on and off The screen is locked If there s a lock icon on the top right side of the ...

Страница 35: ... pads firmly to the skin The transpar ent films are still on the pads Peel the film off the pads The pads stack together or overlap Do not stack pads together or overlap pads The cord is not properly connected to the unit Connect cord correctly into the port The intensity is too low Increase the intensity level Low battery Charging the battery ...

Страница 36: ...rectly The charging port is narrow at the top and wide at the bottom so please check the direction before insert ing No power source Ensure the power supply is working properly and the battery icon on the screen will flash on and off while charging Power cuts off during use The cord is broken Replace the cord The battery is weak Charging the battery No power source or no display on LCD The battery...

Страница 37: ...ted Applied Part Class II equipment Disposal in accordance with Directive 2002 96 EC MANUFACTURER Date when the medical device was manu factured AUTHORISED REPRESENTATIVE IN THE EUROPEAN COMMUNITY Please read the user manual before use CE Mark meets compliance of applicable directives and regulation in EU ...

Страница 38: ...ter The second number Protected against vertically falling water drops when enclosure is tilted up to 15º Vertically falling drops shall have no harmful effects when the enclosure is tilted at any angle up to 15 on either side of the vertical 13 Certification The device complies with following normative documents ANSI ES 60601 1 IEC60601 1 2 IEC60601 1 11 IEC 60601 2 10 ISO 10993 5 ISO 10993 10 FD...

Страница 39: ...AS8019 sms v1 5 220321 80 135mm ...

Страница 40: ......

Отзывы: