background image

AS-1785 

Installation Guide  

P. 3


Operation is subject to the following two conditions: (1) this device may not cause 
interference, and (2) this device must accept any interference, including interference that 
may cause undesired operation of the device. 
To reduce potential radio interference to other users, the antenna type and its gain 
should be so chosen that the equivalent isotropically radiated power (EIRP) is not more 
than that required for successful communication. 

FCC USER NOTICE: 

The manufacturer is not responsible for any radio or TV interference caused by 
unauthorised modifications to this equipment. Such modifications could void the user’s 
authority to operate the equipment. 

Installation Points to Remember 


When installing a manual-transmission 
product on a vehicle with a manual 
Transmission, always make sure that all 
Doors will get the Unit out of Ready Mode. 
Switch the wire used so that it is triggered by 
all Doors. 


When installing a manual-transmission 
product on a vehicle with a manual 
Transmission, make sure that the Parking 
Brake and Door Switch contacts work 
properly. 

 When working on a vehicle, always leave a 

window open. 

 Never 

leave the keys in the car. Leave them 

on a workbench with a window rolled down. 

 If possible, remove courtesy light fuse to 

prevent battery drain. 

 The 

PROGRAMMING ASSISTANCE BUTTON


(PAB)


   The PAB is mounted on the side of the 

Remote Car Starter unit and fulfils the same 
function as the Hood-Pin Switch. The PAB 
will spare installers the effort of getting out of 
the vehicle to access the Hood-Pin Switch. 

The PAB works only when the Hood is up. 

 Inspect vehicle for any body damage or 

electrical problems 

  Always solder and tape all connections.  

 Keep the Antenna away from other types of 

antennas (GPS/OnStar). 

 Never install the control unit where it could 

interfere with normal operation or obstruct 
service technicians. 

 Always use a grommet when running wires 

into the Engine compartment. Never run 
wires through bare or sharp metal. 

 Do not disconnect the battery on vehicles 

equipped with air bags and anti-theft radios. 

 Never ground the control unit to the vehicle’s 

steering column. 

 Make sure that all the switches and controls 

operate properly. 

 Verify that the vehicle starts and idles 

properly. 

 Make sure that all safety equipment is 

installed: the Valet Button (if provided), the 
Hood Switch and the Warning Label

.


 When wiring in parallel, make sure you 

isolate each connection with a diode in order 
to avoid feedback and possible damage. 

 Examples: 


Wiring a Clutch Bypass and a 
Transponder Module to the 

GROUND OUT 

WHEN RUNNING

 wire: 

At the junction point, 

where the 

GROUND OUT WHEN RUNNING

 wire 

“splits” and connects to each device, a diode 
is inserted on each of these lines. 

  Multiple or separate Door pin Connec-

tions: 

  When joining all Door Pins together to the 

Door Pin input wire of the Remote Car 
Starter unit, each wire must be isolated with 
a diode to prevent feedback. 


Note: 

The above examples reflect common 

situations where diodes are use to isolate 
connections. Please note that there are 
numerous other cases where diode isolation 
is required. 

 Always make sure that all external relays or 

modules added to the Remote Car Starter 
unit are properly fused and diode isolated. 

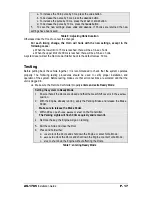
Содержание AS-1785

Страница 1: ...supplied Please note that this guide has been written for properly trained Autostart technicians a certain level of skills and knowledge is therefore assumed Please review the Installation Guide carefully before beginning any work Warning This Remote Car Starter is designed for vehicles with a manual Transmission only Before installing the Unit test that the OEM Door Switch contacts of the vehicle...

Страница 2: ... Starter Most of the features of this product are explained in the User Guide Therefore if you need detailed information about a feature of the product we recommend that you refer to the User Guide Included in the Kit Please carefully read the Installation Guide before beginning the installation especially the Harness Description section and the Programming Options It is very important that you fa...

Страница 3: ...the vehicle to access the Hood Pin Switch The PAB works only when the Hood is up Inspect vehicle for any body damage or electrical problems Always solder and tape all connections Keep the Antenna away from other types of antennas GPS OnStar Never install the control unit where it could interfere with normal operation or obstruct service technicians Always use a grommet when running wires into the ...

Страница 4: ...o put them back during the very last steps 6 Pin Main Ignition Harness Wire Colour Function Description Connect to the largest 12 V supply wire at the Ignition Harness Ensure that the OEM power wire is fused for more than 30 A A RED 12 V Battery Please note some of the most recent vehicles have no suitable 12 V source at the Ignition Switch the 12 V wire is too small to supply the necessary curren...

Страница 5: ...cal system This high current output can be used to power a second Ignition Accessories or Crank wire See Jumper Setting later in this Guide for correct output F GREEN Fifth Relay output 30 A Please note additional Ignition Accessories or Starter wires must use external relays Do not jump wires at the Ignition Switch this would compromise the OEM electrical system 5 Pin Secondary Harness Wire Colou...

Страница 6: ...ease or increase when the dimmer control switch is turned If the voltage goes up or down find another Parking Light wire 12 Pin Accessories Harness Wire Colour Function Description 1 BLUE Trunk AUX 3 output 500 mA negative output This output can be used to control the Trunk release 1 sec pulse or it can be set to operate as a constant output as long as the TRUNK button is held pressed for Sunroof ...

Страница 7: ... by itself a sufficient connection 7 WHITE ORANGE Starter Kill output armed output This wire will provide a constant 500 mA output when the system is armed locked by remote control It can be connected to an external Starter Interrupt Relay This wire should be connected to a Single Pole Double Throw Relay this wire will connect to Pin 85 on the Relay and Pin 86 will be connected to the Ignition wir...

Страница 8: ... enabled UNLOCK pulse s will be sent with DISARM a LOCK pulse and a REARM pulse will be sent when the Trunk is closed or if the Trunk was left closed Option 2 Default Engine Start Stop The first Ground pulse on this input will start the Engine the second Ground pulse on this input will stop the Engine Option 3 Key Sense Input Connects to OEM Key Sense Wire When the Key is detected in the Ignition ...

Страница 9: ... essential that the Remote Car Starter be connected in such a way as will allow each one of the Doors to turn off Ready Mode the driver side Door Pin does not constitute by itself a sufficient connection 12 YELLOW Glow Plug input In Diesel Mode this positive input will monitor the Glow Plug Light it will wait for up to 18 seconds until the Glow plug Light goes out before allowing the Remote Car St...

Страница 10: ...on The Remote Car Starter will only accept positive Glow plug input signals therefore negative Glow Plugs should only be connected using relays to invert the polarity A diode must be added between the negative Glow plug trigger on the relay and the negative Glow plug wire of the car This is to prevent feedback effects on the Glow plug indicator light on the instrument cluster the light on the dash...

Страница 11: ... very last steps in the installation process 2 Pin Harness Wire Colour Function Description 1 BLUE WHITE AUX 2 output This 500 mA negative output can be programmed for one of the following Options Constant while the LOCK and UNLOCK buttons are pressed simultaneously 1 sec after the buttons are released Pressing LOCK and UNLOCK simultaneously toggles the output ON and OFF with automatic toggle OFF ...

Страница 12: ...ave up to 20 seconds to select a sub menu If you do not select a sub menu within 20 seconds the Remote Car Starter will exit Programming Mode and you will have to flash the Hood Pin switch once again The Programming Assistance Button A k a the PAB Mounted on the Remote Car Starter this button can be used from within the vehicle instead of the Hood Pin switch in the Engine compartment This will spa...

Страница 13: ...gramming Options are designed to facilitate interfacing with all vehicle types See section Table of Programming Options later in this Guide 1 Flash the Hood Pin switch see Table 1 The Parking Lights will stay ON for up to 20 seconds Before the lights go out 2 Press and hold the Brake Pedal And press one of the following buttons on the Transmitter LOCK to access Mode 1 UNLOCK to access Mode 2 TRUNK...

Страница 14: ...NABLED in Standard Mode FUNCTION 3 Passive or Active Arming OPTION 1 PASSIVE Arming 60 sec OPTION 2 ACTIVE Arming OPTION 3 PASSIVE Arming 3 min FUNCTION 4 Door lock pulse timing OPTION 1 7 10 sec Lock Unlock pulses OPTION 2 4 sec Lock Unlock pulses OPTION 3 7 10 sec Lock pulse and two 1 4 sec Unlock pulses OPTION 4 1 10 sec Lock Unlock pulses FUNCTION 5 LED flashing OPTION 1 ENABLED without starte...

Страница 15: ...Start Mode activate AUX 2 by pressing the START button OPTION 2 Toggle ON OFF with 30 second timeout OPTION 2 Horn confirmation when lock OPTION 4 Priority Door Access FUNCTION 5 External Trigger OPTION 1 Zone 3 disarm rearm Trunk Pin a disarm pulse is sent before the Trunk opens the vehicle rearms 4 seconds after the Trunk is closed OPTION 2 Engine Start Stop OPTION 3 Key Sense Tach Programming A...

Страница 16: ...the Tach programming procedure Automatic Tach Programming This simple procedure can replace the Multi speed Tach Programming procedure 1 Make sure that all the connections are properly made and that the Remote Car Starter is powered up 2 With the Hood up ground on the Hood Pin switch line start the vehicle using the Key 3 Allow the vehicle to reach regular Engine idle speed The Parking Light outpu...

Страница 17: ...ended to check that the system operates properly The following testing procedures should be used to verify proper installation and operation of the system Before testing make sure that all connections are soldered and that the unit is plugged in Make sure the Remote Car Starter properly enters and exits Ready Mode Setting the system to Ready Mode 1 Ensure that all the Doors are closed and that the...

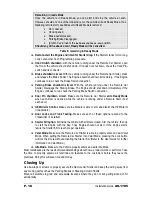
Страница 18: ...ction Door Pin shutdown circuit Make sure the Remote Car Starter exits Ready Mode when each Door is opened while the vehicle is running under a Remote Start Test each door OEM Alarm Control Make sure the Module is able to arm and disarm the OEM Alarm if applicable Door Locks and Trunk Testing Make sure each of these options respond to the Transmitter if installed Starter Kill option Sit inside the...

Страница 19: ... A causing the 30 A Fuse to blow Always verify your circuit with an appropriate measuring device Clutch bypass In order to remote start a manual Transmission vehicle the Clutch switch must be bypassed Clutch safety switch circuits can take many forms The most common types are listed below When testing to determine the type of Clutch circuit it is recommended that you use a computer safe logic prob...

Страница 20: ...stem when the clutch is pressed a negative signal is sent to the relay the relay energizes when the Key is turned to the START position the 12 V from the start wire is allowed to pass through the relay and to starter motor One of the wires at the clutch will test as negative this is the supply wire The relay s negative trigger wire will only show negative when the pedal is pressed some vehicle s a...

Страница 21: ...e a relay to interrupt this wire during remote starts Ignition controlled Door Locks This feature will LOCK all the Doors of the vehicle when the Brake Pedal is pressed while the Ignition Key is in the IGNITION ON RUN position The unit will UNLOCK all Doors when the Ignition Key is turned back to the OFF position If Ignition Lock Only is selected the system will only LOCK all Doors when the Brake ...

Страница 22: ...ked by remote control and can be connected to an external Starter or Ignition interrupt relay see diagram below The Starter Kill circuit can be set to arm in either Passive Mode or Active Mode Caution When installing the Starter Kill it is extremely important that pin 86 be wired to Ignition do not jump it to pin 30 damage to the vehicle could result Note Installation of the Starter Kill system re...

Страница 23: ... this feature the Remote Car Starter will play back the last 4 Start Failure Events Codes and the last Intrusion Code via the Parking Lights or L E D Events playback Ensure that the Hood is up that the vehicle is not in Valet Mode and that the Ignition is OFF Hold down the Hood Pin switch for 4 seconds Release the Pin switch The Parking Lights will come on While the Parking Lights are on immediate...

Страница 24: ... 2 pause 2 There was an attempt to start the vehicle while the Remote Car Starter was in Home Valet Mode 4 pause 3 The vehicle went out of Ready Mode 12 V detected on the Brake Line 10 pause 3 The vehicle went out of Ready Mode the Hood Pin switch went to ground ON 2 sec The Hood is up and the Hood Switch line went to ground This is step one of the Programming Centre procedure ON 3 sec First press...

Отзывы: