Relay Terminal Blocks
A-51
ABS Series
ABL Series
ASL Series
Power Relay
SSR
I/O Terminal Blocks
Interface
Terminal Blocks
Common
Terminal Blocks
Sensor Connector
Terminal Blocks
Relay
Terminal Blocks
I/O Cables
Connector Type
Cables
Open Type
Cables
Others
-|Transparent setting guide|-
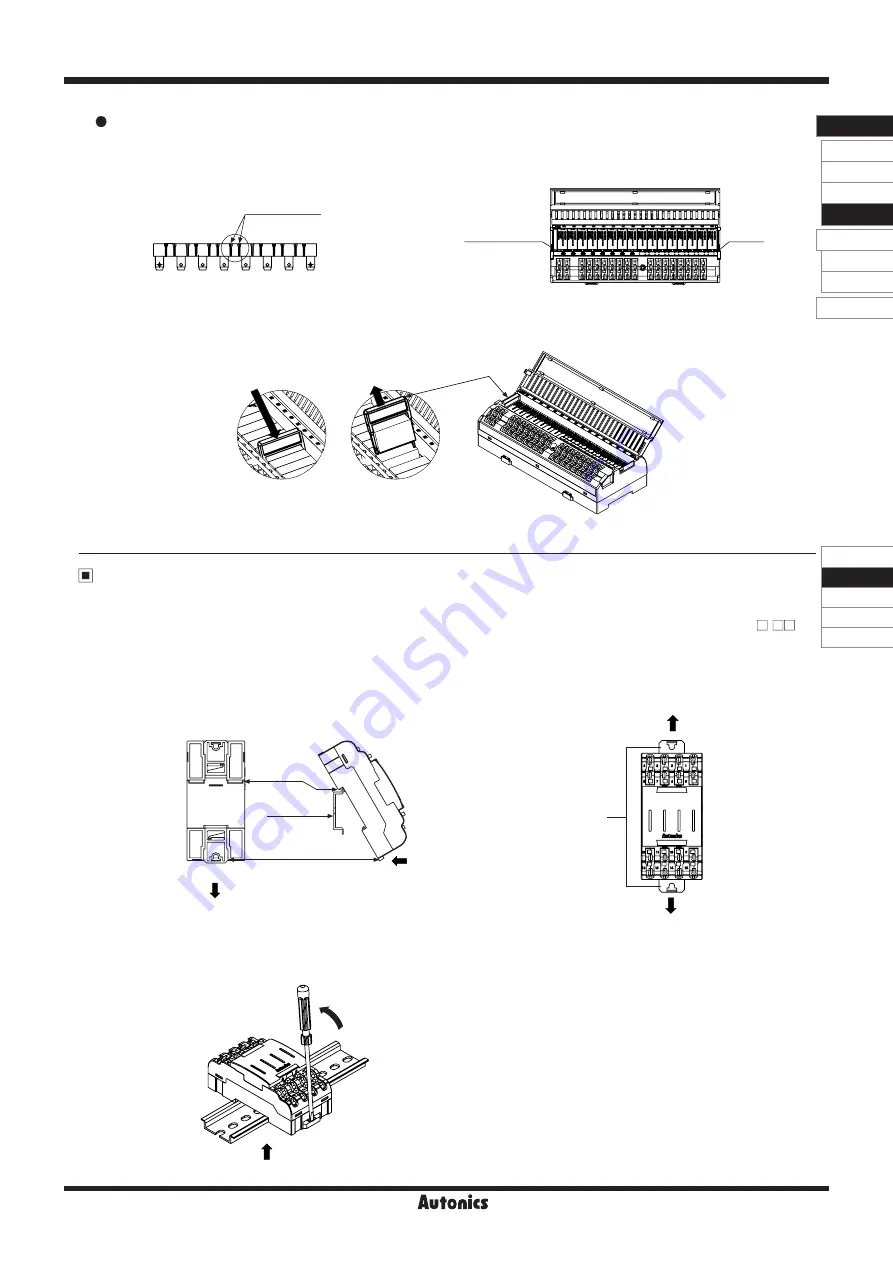
1) Cut the jumper bar to the user's desired length by cutting
at the V dent (two) using a nipper.
2) Insert the cut jumper bar to the desired jumper bar socket
position.
2. Replacing relays
1) Insert the relay ejector at both ends of the installed relay to direction
①
.
2) Pull the relay ejector to direction
②
for removing the relay.
1. Using jumper bars
ABL-H16R6-NN/PN
Jumper bar
cutting V groove
Jumper
bar
Jumper socket
part
①
②
Installation
1. Mounting and removal at DIN rail
●
Mounting
1) Pull the rail lock towards direction
①
.
2) Attach the DIN rail connection part onto the DIN rail.
3) Push the unit towards direction
②
, then push the rail lock in to lock
toward the unit.
DIN rail
connection
part
Rail lock
DIN rail
①
②
②
①
Rail lock
②
①
2. Mounting with screws (only for ABL-L04
-
)
1) The unit can be mounted on panels using the rear rail locks.
2) Pull the rail locks towards directions
①
and
②
.
3) M4×10mm spring washer screws are recommended for
installation. When using flat washers, use Ø9mm diameter
washers. The tightening torque should be between 1.0 and
1.5N.m.
●
Removal
1) Insert a screwdriver into the rail lock hole and push it towards
direction
①
.
2) Remove the unit by pulling the unit towards direction
②
.
※
Each model appearance is different by no. of relay points.


