background image

Page 6

SR35-KPD-REM

 – 1st Ed. – 7/9/2020 

IP66 Remote Keypad User Guide

Selecting Units to Monitor/Configure

When the Remote Keypad is attached to multiple SR35 starters on the Modbus network, the user can 

switch between each unit by using the following method.

NOTE: To simplify this selection process, it is recommended that the host SR35 units are 

configured with consecutive Modbus addresses.

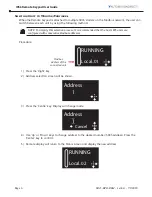
Procedure:

Modbus 

address of the 

connected unit

Local..01

RUNNING

1)  Press the ‘Right’ key
2)  Address selection screen will be shown

Address

1

3)  Press the ‘Centre’ key. Display will change mode

Address

1

Cancel

4)  Use ‘Up’ or ‘Down’ keys to change address to the desired number (SR35 address). Press the 

‘Center’ key to confirm

5)  Remote display will return to the Status screen and display the new address

Local..02

RUNNING

Содержание SR35-KPD-REM

Страница 1: ...Page 1 SR35 KPD REM 1st Ed 7 9 2020 IP66 Remote Keypad User Guide SR35 KPD REM...

Страница 2: ...tion Modbus RTU NOTE As the remote keypad acts as the Modbus master no additional masters may be placed on the network Failure to observe this restriction may lead to erratic behavior network failure...

Страница 3: ...2020 IP66 Remote Keypad User Guide For multiple SR35 starters connected to the keypad the use of SR55 SPLT is highly recommended See diagram below CLOSE JUMPER 56 ADDRESS 1 ENABLE KEYPAD POWER ON THIS...

Страница 4: ...ypad to one or more SR35 starters Initial Power Up If the host SR35 starters and the remote keypad have the default Modbus transmission parameters set and the host SR35 is powered and has Keypad power...

Страница 5: ...d The keypad will display the following screen Local Remote Modbus Local 01 NO SLAVE Only RIGHT key is Active By pressing the Right key the user will be taken directly to the Modbus address selection...

Страница 6: ...t is recommended that the host SR35 units are configured with consecutive Modbus addresses Procedure Modbus address of the connected unit Local 01 RUNNING 1 Press the Right key 2 Address selection scr...

Страница 7: ...he self adhesive gasket supplied with the keypad enclosure The orientation of the unit has the TOP uppermost The location allows adequate front access The screen can be viewed Do not install other equ...

Страница 8: ...omationdirect com and copy the files to a USB flash drive 2 Power down the Remote Keypad and insert the USB flash drive 3 Power up the remote Keypad the update will start automatically 4 When the upda...

Отзывы: