background image

A

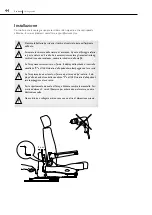
Programmazione del finecorsa inferiore 

Il finecorsa inferiore è impostato su massimo giù. Se necessario, può essere regolato. 

Ruotare Turny completamente 
verso l'esterno. Il display sulla 
scheda di controllo visualizza "b", 
che indica che il finecorsa per la 
rotazione massima verso l'esterno 
è azionato.

1

Staccare l'alimentazione. Premere 
entrambi i tasti sulla pulsantiera 
e ricollegare l'alimentazione. At-
tendere 2 secondi e rilasciare poi 
i tasti. Ora entrambi i LED della 
pulsantiera lampeggiano.

Premere nuovamente e poi rilas-
ciare entrambi i tasti. Ora il LED 
verde lampeggia velocemente ed 
il LED rosso lampeggia lentam-
ente.

2

Portare Turny alla posizione 
desiderata come finecorsa inferio-
re. Attendere 20 secondi fino a 
quando il LED rosso si accende 
con luce fissa.

Sollevare completamente Turny 
fino a quando il microinterruttore 
per il finecorsa superiore si attiva. 
Solo in questo momento viene 
salvato il finecorsa inferiore.

3

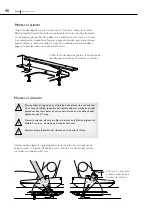
Adattamento dell'angolo di rotazione esterno

Allentare la vite interna (A).

Ruotare Turny verso l'esterno e 
allentare la vite esterna (B).

1

L'angolo di rotazione inferiore è impostato su  90°. Se necessario, può essere 
regolato. Eseguire la regolazione dal lato o dall'alto dopo avere rimosso il coper-
chio centrale.

Turny Orbit
68° - 97°

Turny HD
78° - 105°

Turny HD


Ruotare Turny verso l'esterno 
fino alla posizione desiderata e 
serrare entrambe le viti.

Turny Orbit

Regolare dal lato anteriore con un 
cacciavite fino alla posizione desid-
erata e serrare entrambe le viti.

2

B

49

Getting seated    

Product

IT

In

st

al

la

zi

on

e

Содержание Turny

Страница 1: ...t Brings the car seat out of the vehicle SV 5 Installationsmanual EN 13 Installation manual DE 21 Installationanleitung FR 29 Manuel d installation ES 37 Manual de instalación IT 45 Manuale di installazione Turny Getting seated ...

Страница 2: ......

Страница 3: ...adapt är designad för att underlätta din kunds bilåkning och vi har lagt stort fokus på säkerhet kvalitet och funktion Följande manual är en integrerad och viktig del av produkten som ger information om hur du utför en korrekt och säker installation Läs därför noga igenom manualen innan du påbörjar ditt arbete Har du några frågor kring din kunds anpassning är du varmt välkommen att kontakta Autoad...

Страница 4: ...s se aktuell konsolinstruktion Om Turny överbelastas kommer den att stanna Displayen på styrkortet kommer att visa C och handkontrollens vänstra diod att blinka rött Om Turny stöter på ett hinder kommer den att stanna och sedan rever sera något Displayen på styrkortet kommer att visa F och handkon trollens vänstra diod att blinka rött Använd alltid veven vid manuell körning av Turny Stanna minst 2...

Страница 5: ...meter J1 IN OUT Montera hållaren till kontrollen på lämplig plats så som instrumentpanel eller B stolpe 30A Något av alternativ 1 eller 2 måste in stalleras Koppla ihop de båda ledarna om säkerhetsbrytare inte används Alt 1 medföljer 15 12V när tändningen är aktiverad Alt 2 medföljer ej Door safety switch artikelnr 420049 Styrkortets meddelanden 5 Getting seated Turny SV Installation ...

Страница 6: ...idigt Förmodligen fel på en av microbrytarna Gränsläge max utvriden är påverkat Sätet kan manövreras både in och ut Meddelandet visas ej i strömsparläge Övre gränsläget förblir aktiverat då lyftmotorn rör sig i nedåtgående riktning Överströmsskyddet har lösts ut och stoppat enheten Meddelandet förblir synligt tills dess en ny rörelse startas eller tills strömsparläge inträder Övre brytare är inte ...

Страница 7: ...profiler Montera konsol För att förtydliga monteringen av säkerhetsprofilerna visas inte Turny i illustra tionerna nedan Ställ Turny på konsolplattan Placera säkerhetsprofilerna runt glidskenorna Flytta Turny bakåt för att komma åt infästningen framtill Flytta Turny framåt för att komma åt infästningen baktill Notera Plan sida ner Montera länkarm Dra åt låsmutterns så hårt att länkarmen kan glida ...

Страница 8: ...att montera sätena BEV Compact eller Recaro Montera enligt illustrationen nedan Ersätt konsolerna med rullprofiler om Turny skall kombineras med Carony Vid behov finns olika förhöjningssatser att beställa som tillbehör För att se utbudet av rullprofiler och förhöjningsatser se dealerweb autoadapt com Montera säte Använd den hålbild och skruvdimension som matchar aktuellt säte Sträva alltid efter a...

Страница 9: ...Kör ner Turny till önskat nedre ändläge Vänta i 20 sekunder tills röd lysdiod lyser med ett fast sken Kör upp Turny hela vägen tills mikrobrytare för övre läge akti veras Först då sparas det nedre ändläget 3 Anpassa yttre vridvinkel Lossa den inre skruven A Vrid ut Turny och lossa den yttre skruven B 1 Den yttre vridvinkeln är standardinställd på 90 Vid behov kan vinkeln justeras Gör justeringen f...

Страница 10: ...30A Strömförbrukning vid maximal belastning 18A Strömförbrukning i viloläge ca 15 mA A Vridvinkel HD 78 105 Orbit 68 97 B Vertikal rörelse HD Orbit 300 300 mm HD Orbit 395 395 mm HD Orbit 4801 480 mm Notera Längd och breddmått visar Turny utan kåpor och tillbehör A 475 mm B Bakifrån utvriden åt höger Ovanifrån utvriden åt höger 590 mm 165 mm 10 Turny Getting seated ...

Страница 11: ... part of the product providing you with information on how to perform accurate and safe installation of the product Please read through the manual carefully before starting your work If you have any questions about your customer s adaptation please feel free to contact Autoadapt Your feedback is important to us It helps us in our work of continuously improving our product and its installation You ...

Страница 12: ... see the console instructions in question If Turny is overloaded it will stop The display on the control card will indi cate C and the LED on the left of the manual control will flash red If Turny encounters an obstruction it will stop and then reverse slightly The display on the control card will indicate F and the LED on the left of the manual control will flash red Always use the crank for manu...

Страница 13: ...meter J1 IN OUT Mount the holder for the control in a suitable location such as the dashboard or the B pillar 30 A One of option 1 or 2 must be installed Connect the two wires together if the safety switch is not used Option 1 provided 15 12 V when the ignition is activated Option 2 not provided Door safety switch article no 420049 The control card s messages 13 Getting seated Turny EN Installatio...

Страница 14: ...ly a fault on one of the microswitches Limit position max turned out is actuated The seat can be manoeuvred both in and out The message is not displayed in power saving mode The upper limit position remains actuated when the lifting motor moves in a downwards direction The overcurrent protection has been triggered and stopped the unit The message remains visible until a new movement is started or ...

Страница 15: ...rofiles Fit console For the sake of clarity in showing how the safety profiles are fitted Turny is not shown in the illustrations below Put Turny on the console plate Place the safety profiles around the slide bars Move Turny backwards to access the fastening at the front Move Turny forwards to access the fastening at the back Note Flat side down Fit link rod Tighten the lock nut until the link ro...

Страница 16: ...e BEV Compact or Recaro seats Fit as indicated in the illustration below If Turny is to be combined with Carony replace the consoles with roller profiles Different elevation kits can be ordered as accessories if needed To see the range of roller profiles and exten sion kits please visit dealerweb autoadapt com Fit seat Use the hole pattern and dimension of screw that match the seat in question Alw...

Страница 17: ... and the red LED slowly 2 Lower Turny down to the desired lower end position Wait for 20 seconds until the red LED lights up continuously Raise Turny all the way until the upper position microswitch is actuated The lower end position is not saved until now 3 Adjust outward rotation angle Loosen the inner screw A Rotate Turny and loosen the outer screw B 1 The outward rotation angle is set by defau...

Страница 18: ...imum load 18 A Power consumption in standby mode approx 15 mA A Rotation angle HD 78 105 Orbit 68 97 B Vertical movement HD Orbit 300 300 mm HD Orbit 395 395 mm HD Orbit 4801 480 mm Note The length and width dimensions show Turny without covers or accessories A 475 mm B From the back rotated out towards the right From above rotated out towards the right 590 mm 165 mm 18 Turny Getting seated ...

Страница 19: ...ukts und informiert Sie darüber wie Sie das Produkt optimal und sicher montieren Lesen Sie sich deshalb das Handbuch sorgfältig durch bevor Sie mit der Montage beginnen Sollten Sie Fragen zur Fahrzeugumrüstung für Ihren Kunden haben dann setzen Sie sich bitte mit Autoadapt in Verbindung Ihre Meinung ist für uns sehr wichtig Sie hilft uns dabei das Produkt und seinen Einbau ständig zu verbessern We...

Страница 20: ... siehe entsprechende Konsolenanleitung Bei einer Überlastung hält Turny an Auf dem Display der Steuerplatte erscheint C und die linke LED an der Handbedienung blinkt rot Wenn Turny auf ein Hindernis stößt halt es an und fährt ein Stück zu rück Auf dem Display der Steuerplatte erscheint F und die linke LED an der Handbedienung blinkt rot Verwenden Sie beim manuellen Betrieb von Turny stets die Kurb...

Страница 21: ...Halter für die Handbedienung an geeigneter Stelle z B am Armaturen brett oder an der B Säule anbringen 30 A Entweder Alternative 1 oder 2 muss installiert werden Die beiden Leiter zusammenschließen wenn der Sicherhe itsschalter nicht benutzt wird Alt 1 Im Lieferumfang 15 12 V bei aktivierter Zündung Alt 2 Nicht im Lieferumfang Türsicherheitsschalter Artikelnr 420049 Meldungen der Steuerplatte 21 G...

Страница 22: ...kroschalter defekt Endposition max nach außen gedreht ist betätigt Der Sitz lässt sich nach innen und nach außen dre hen Die Mitteilung erscheint nicht im Stromsparmo dus Die obere Endposition bleibt aktiviert während sich der Hubmotor nach unten bewegt Der Überstromschutz wurde ausgelöst und hat die Einheit zum Stillstand gebracht Die Mitteilung ist so lange zu sehen bis eine neue Bewegung eingel...

Страница 23: ...le Um die Montage der Sicherheitsprofile zu verdeutlichen wird Turny auf den folgenden Abbildungen nicht dargestellt Stellen Sie Turny auf die Konsolenplatte Positionieren Sie die Sicherheitsprofile um die Gleitschienen Schieben Sie den Turny nach hinten damit Sie vorn an die Befestigung kommen Schieben Sie den Turny nach vorn damit Sie hinten an die Befestigung kommen Hinweis Glatte Seite nach un...

Страница 24: ...ro zu montieren Richten Sie sich bei der Montage nach der Abbildung unten Ersetzen Sie die Konsolen durch Rollprofile wenn Turny mit Carony kombiniert werden soll Bei Bedarf sind unterschiedliche Erhöhungssätze verfügbar die als Sonderzubehör bestellt werden können Das Angebot an Roll profilen und Erhöhungssätzen ist unter dealerweb autoadapt com Sitz montieren Verwenden Sie das Bohrlochmuster und...

Страница 25: ...f die gewünschte untere Endposition herunter fahren 20 Sekunden warten bis die rote LED durchgehend leuchtet Den Turny ganz hochfahren bis der Mikroschalter für die obere Endposition aktiviert wird Erst jetzt wird die untere Endposition gespeichert 3 Anpassen des äußeren Drehwinkels Die innere Schraube A lösen Turny herausschwenken und die äußere Schraube B lösen 1 Der äußere Drehwinkel ist standa...

Страница 26: ... Zuladung 18 A Stromverbrauch in Ruhestellung ca 15 mA A Drehwinkel HD 78 105 Orbit 68 97 B Vertikale Bewegung HD Orbit 300 300 mm HD Orbit 395 395 mm HD Orbit 480 480 mm Hinweis Längen und Breitenmaß gelten für Turny ohne Abdeckungen und Zubehör A 475 mm B Rückwärtige Ansicht nach rechts herausgedreht Draufsicht nach rechts herausgedreht 590 mm 165 mm 26 Turny Getting seated ...

Страница 27: ...partie intégrante du produit Il contient des informations sur la manière d effectuer une installation correcte et sûre Lisez donc attentivement ce manuel avant de commencer votre travail Si vous avez des questions concernant l adaptation de votre client n hésitez pas à contacter Autoadapt Vos opinions sont très importantes pour nous Elles nous aident dans notre travail pour continuer à améliorer l...

Страница 28: ...instructions concernées En cas de surcharge Turny s arrêtera L écran de la carte de commande affichera C et la diode gauche de la commande manuelle clignotera en rouge Si Turny se heurte à un obstacle il s arrêtera et reculera légèrement L écran de la carte de commande affichera F et la diode gauche de la commande manuelle clignotera en rouge Utilisez toujours la manivelle pour une utilisation man...

Страница 29: ...entiomètre de levage J1 IN OUT Montez le support de la commande à un endroit approprié par exemple le tableau de bord ou le pilier B 30 A L une des solutions 1 ou 2 doit être installée Connectez les deux conducteurs si l interrupteur de sécurité n est pas utilisé Solution 1 inclus 15 12 V lorsque l allumage est activé Solution 2 non inclus Door safety switch n de réf 420049 Messages émis par la ca...

Страница 30: ...ément Erreur probable au niveau d un des microrupteurs La position limite du pivotement vers l extérieur max est affectée Le siège peut être manœuvré vers l intérieur et vers l extérieur Le message indique que l unité n est pas en mode économie d énergie La position limite supérieure demeure activée lorsque le moteur de levage descend La protection contre les surintensités se déclenche et arrête l...

Страница 31: ... Pour simplifier l installation des profilés de sécurité Turny n est pas représenté sur l illustration ci dessous Placez Turny sur la plaque de console Placez les profilés de sécurité autour des glissières Poussez Turny vers l arrière pour atteindre la fixation à l avant Poussez Turny vers l avant pour atteindre la fixation à l arrière Remarque Côté plat en bas Montez le bras de liaison Serrez les...

Страница 32: ...Compact ou Recaro Installez conformément à l illustration ci dessous Si Turny doit être combiné à Carony remplacez les consoles par des profilés roulants Au besoin il existe différents kits rehausseurs que vous pouvez commander comme accessoires Pour découvrir la gamme de profilés roulants et de kits rehausseurs visitez dealerweb autoadapt com Montez le siège Utilisez le gabarit et la dimension de...

Страница 33: ...lle 2 Descendez Turny à la position d extrémité inférieure souhaitée Attendez 20 secondes que la diode électroluminescente rouge reste allumée Montez complètement Turny jusqu à ce que le microrupteur de la position supérieure soit activé À ce moment la position d ex trémité inférieure est enregistrée 3 Adaptez l angle de pivotement externe Desserrez la vis interne A Pivotez Turny vers l extérieur ...

Страница 34: ... charge maximale 18 A Consommation de courant au repos env 15 mA A Angle de pivotement HD 78 105 Orbit 68 97 B Mouvement vertical HD Orbit 300 300 mm HD Orbit 395 395 mm HD Orbit 4801 480 mm Remarque La longueur et la largeur indiquées corre spondent à Turny sans cache ni accessoire A 475 mm B Depuis l arrière mouvement de sortie vers la droite Depuis le haut mouvement de sortie vers la droite 590...

Страница 35: ...ente manual es un componente importante del producto que le indica cómo realizar una instalación correcta y segura Por eso lea minuciosamente le manual antes de iniciar el trabajo Si tiene alguna pregunta sobre su adaptación le pedimos que se ponga en contacto con Autoadapt Sus comentarios nos interesan Saber lo que usted opina nos ayuda a seguir perfeccionando el producto y su instalación Encontr...

Страница 36: ... instrucciones del soporte en cuestión Si se sobrecarga el Turny el mismo se detendrá El visualizador del cuadro de mando indicará C y el diodo izquierdo del mando de control em pezará a parpadear con luz roja Si el Turny choca con un obstáculo se detendrá y después retrocederá un poco El visualizador del cuadro de mando indicará F y el diodo izquier do del mando de control empezará a parpadear co...

Страница 37: ...ciómetro de elevación J1 IN OUT Montar el soporte del mando en un lugar adecuado como el panel de instrumentos o el pilar B 30A Se debe instalar una de las alternativas 1 ó 2 Conectar las dos partes si no se utiliza un disyuntor de seguridad Alt 1 se incluye 15 12V cuando está activado el encendido Alt 2 no se incluye Interruptor de seguri dad de la puerta núm art 420049 Mensajes del cuadro de man...

Страница 38: ...crointerruptores está averiado Está activada la posición límite girado hacia fuera al máx El asiento se puede maniobrar hacia dentro y hacia fuera Este mensaje no aparece en el modo de ahorro de energía La posición límite superior permanece activada cuando el motor de giro se mueve en dirección descendente La protección contra sobrecargas se ha disparado y ha detenido la unidad El mensaje permanec...

Страница 39: ...ar el montaje de los perfiles de seguridad el Turny no se muestra en las ilustraciones de abajo Colocar el Turny en la base de soporte Colocar los perfiles de seguridad alred edor de los raíles Mover el Turny hacia atrás para acceder a la sujeción desde la parte delantera Mover el Turny hacia delante para acceder a la sujeción desde la parte trasera Nota El lado plano hacia abajo Montar el brazo a...

Страница 40: ...s como indica la ilustración de abajo Reempla zar los soportes por perfiles de rodillos si va a combinarse el Turny con el Carony Si es necesario hay disponibles diferentes juegos de elevación para el asiento que pueden solicitarse como accesorios Para ver el surtido de perfiles de rodillos y juegos de elevación véase dealerweb autoadapt com Montar el asiento Utilizar la distribución de agujeros y...

Страница 41: ... a parpadear uno rápidamente con luz verde y el otro lentamente con luz roja 2 Descender el Turny a la posición límite inferior deseada Esperar 20 segundos hasta que se active el diodo luminiscente rojo Elevar el Turny hasta que se active el microinterruptor para la posición superior Recién entonc es se guarda la posición límite inferior 3 Adaptar el ángulo de giro exterior Aflojar el tornillo int...

Страница 42: ...rga máxima 18A Consumo de corriente en el modo de reposo aprox 15 mA A Ángulo de giro HD 78 105 Orbit 68 97 B Movimiento vertical HD Orbit 300 300 mm HD Orbit 395 395 mm HD Orbit 4801 480 mm Nota La medida de longitud y anchura muestra el Turny sin cubiertas y accesorios A 475 mm B Desde atrás girado hacia fuera y hacia la derecha Desde arriba girado hacia fuera y hacia la derecha 590 mm 165 mm 42...

Страница 43: ...ntegrante del pro dotto e fornisce informazioni importanti per un installazione corretta e sicura È quindi importante leggere l intero manuale prima di cominciare l installazione Per qualsiasi domanda sulla soluzione personalizzata per il vostro cliente rivolgetevi ad Autoadapt Saremo lieti di ricevere le vostre osservazioni che ci aiutano a migliorare continuamente il prodotto e la sua installazi...

Страница 44: ... vedere le istruzioni della staffa Se Turny viene sovraccaricato si ferma Il display della scheda di controllo visualizza C ed il LED sinistro della pulsantiera lampeggia con luce rossa Se Turny incontra un ostacolo si ferma e poi torna un po indietro Il dis play della scheda di controllo visualizza F ed il LED sinistro della pulsant iera lampeggia con luce rossa Per lo spostamento manuale di Turn...

Страница 45: ...mento J1 IN OUT Montare il supporto per la pulsantiera in un luogo adatto come sul cruscotto o sul montante centrale 30A È necessario installare una delle due alternative Collegare i due cavi multipo lari se non viene utilizzato un interruttore di sicurezza Alt 1 in dotazione 15 12V quando l accensione è attiva Alt 2 non in dotazione Interruttore di sicurezza della porta articolo numero 420049 Mes...

Страница 46: ...ione massima esterna è azionato Il sedile può essere manovrato sia verso l interno che verso l esterno Il messaggio non è visualizzato in modalità risparmio di energia Il finecorsa superiore rimane attivato quando il moto re di sollevamento si muove verso il basso Il fusibile si è attivato ed ha fermato l unità Il messag gio rimane visualizzato fino a quando si avvia un nuo vo movimento o quando i...

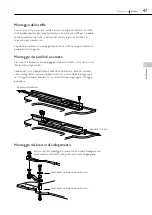
Страница 47: ...di montaggio dei profili di sicurezza Turny non è visua lizzato nell immagine sotto Posizionare Turny sulla piattaforma della staffa Posizionare i profili di sicurezza attorno alle guide di scorrimento Spostare Turny verso indietro per raggiunge re il fissaggio anteriore Spostare Turny verso avanti per raggiungere il fissaggio posteriore Nota bene Lato piano verso il basso Montaggio del braccio di...

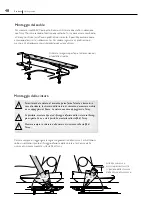
Страница 48: ...ne con Turny Montare secondo l illustrazione sotto Se Turny deve essere combinato a Carony sostituire le staffe con profili di scorrimento È possibile ordinare come accessorio diversi kit di sollevamento Per vedere la gamma di profili di scorri mento e kit di sollevamento visitaredealerweb autoadapt com Montaggio del sedile Utilizzare la sagoma per fori e la dimensione di vite adatta al sedile Cer...

Страница 49: ...a come finecorsa inferio re Attendere 20 secondi fino a quando il LED rosso si accende con luce fissa Sollevare completamente Turny fino a quando il microinterruttore per il finecorsa superiore si attiva Solo in questo momento viene salvato il finecorsa inferiore 3 Adattamento dell angolo di rotazione esterno Allentare la vite interna A Ruotare Turny verso l esterno e allentare la vite esterna B 1...

Страница 50: ...cità a carico massimo 8 A Consumo di elettricità a riposo ca 15 mA A Angolo di rotazione HD 78 105 Orbit 68 97 B Movimento verticale HD Orbit 300 300 mm HD Orbit 395 395 mm HD Orbit 4801 480 mm Nota bene Le misure di larghezza e lunghezza visualiz zano Turny senza coperchio e accessori A 475 mm B Da dietro ruotato verso l esterno a destra Da sopra ruotato verso l esterno a destra 590 mm 165 mm 50 ...

Страница 51: ...2005 Quality system certified in accordance with ISO 9001 2008 Illustrations descriptions and specifications in the user manual are based on current product information Autoadapt reserves the right to make alterations without previous notice 2013 Autoadapt AB 1976 ISO IEC 17025 ...

Страница 52: ...com Autoadapt AB Autoadapt UK Ltd Åkerivägen 7 Unit 1 Windsor Industrial Estate S 443 61 Stenkullen Rupert Street Sweden Aston Birmingham B7 4PR UK Phone 46 302 254 00 Phone 44 121 33 35 170 E mail info autoadapt se E mail info autoadapt co uk 428299 2 2013 11 ...

Отзывы: