background image

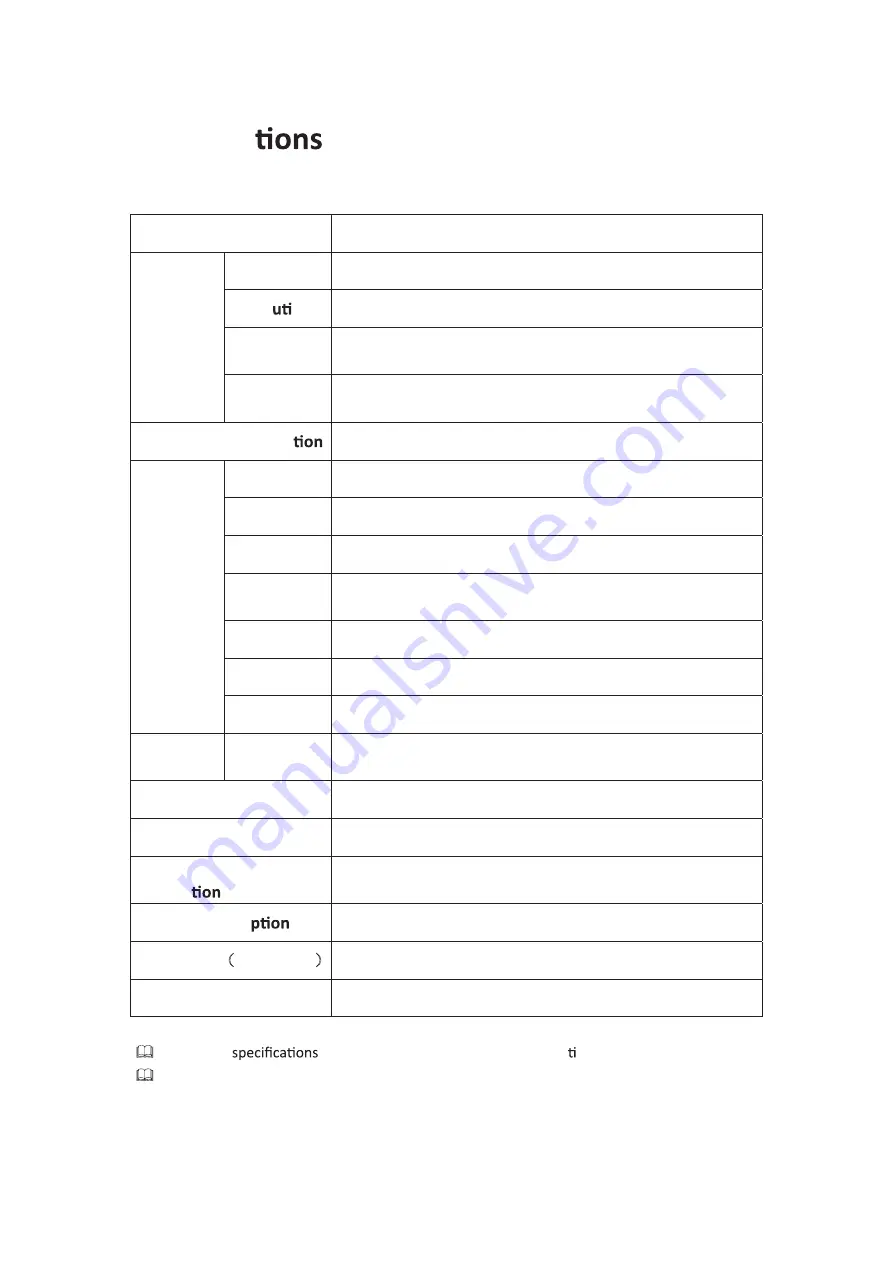
Speci

Į

ca

Model

EQ3266P

Panel Size

32" Widescreen TFT LCD

Resol

on

1366×768 Pixel

Number of

Colors

450 cd/m

2

LCD Panel

Viewing

Angle

176°/176°

Dynamic Contrast Ra

3500:1

AV

1

YPbPr

2

AUDIO (L/R)

3

PC/AUDIO

(L/R)

1

S-VIDEO

1

HDMI

2

Input

Connector

TV

1

Output

Connector

SPDIF

1

USB

1

Power Source

AC 100-240V, 50/60Hz

Standby Power

Dissipa

<1W

Power Consum

<135W

Dimension

˄

With Base

˅

W875mm*H620mm*D250mm

Weight (N.W.)

10.0kg

Design and

are subject to change without prior no ce.

Weight and dimensions are approximate.

28

Содержание EQ3266P

Страница 1: ...EQ3266P In order to avoid accident and risk Please read the Important safety notice to know how to use the TV before using USER GUIDE ȑ OJK 9IXKKT OMOZGR 2 ...

Страница 2: ......

Страница 3: ...na 7 Satellite Cable TV Set Top Box 8 Watching Cable TV 8 DVD ons 9 Playing the DVD 9 PC 10 How to Use as PC monitor 10 Digital AmpliĮer 10 Basic Use 11 Powering the LCD TV 11 Input Source 11 12 the Menu 12 Customizing the PICTURE Se 14 Customizing the SOUND 17 Customizing the CHANNEL Se gs 17 Customizing the PARENTAL CONTROL ngs 20 Customizing the SETUP Se gs 21 Customizing the OTHERS 23 Customiz...

Страница 4: ...ound to comply with the limits for a Class B digital device pursuant to Part 15 of the FCC Rules These limits are designed to provide reasonable protection against harmful interference when the equipment is operated in a residential installation This equipment generates uses and can radiate radio frequency energy and if not installed and used in accordance with the instruction manual may cause har...

Страница 5: ...tripod bracket or table specified by the manufacturer or sold with the apparatus When a cart is used caution when moving the cart apparatus combination to avoid injury tipͲover 13 Unplug this apparatus during lightning storms or when unused for long periods of time 14 Refer all servicing to qualified service personnel Servicing is required when the apparatus has been damaged in any way such as pow...

Страница 6: ... Ba eries Installa of Remote Control Unit 1 Li the cover at the back of the remote control upward as shown in the Įgure 2 Install two AAA size eries Make sure to match the and ends of the ba with the diagram inside the compartment 3 Replace the cover Remove the ba and store them in cool dry place if you won t be using the remote control for a long Assuming typical TV usage the should last for abou...

Страница 7: ... input sources In the on screen menu use this bu on as you use the ENTER bu on on the remote control 3 MENU Press to see an on screen menu of your TV s features 4 CH Press to change channels In the on screen menu use the CH bu ons as you would use the Ÿ ź bu ons on the remote control 5 VOL Press to increase or decrease the volume In the on screen menu use the VOL bu ons as you would use the Ż Ź s ...

Страница 8: ...Remote Control 5 ...

Страница 9: ...Names of each part 6 2 3 4 5 6 7 8 9 10 11 1 SWITCH Turn on off the power supply HDMI1 2 VGA YPbPr 1 2 R L 1 2 S Video COAX AV R L In AC Power IN USB USB jack Switch PC Audio Digital Audio output ...

Страница 10: ...ONNECTIONS Installing an Antenna For co ng to ATSC or NTSC broadcasts Press SOURCE bu on on the remote control to select TV then press Ź bu on to conĮrm Then you can receive the ATSC NTSC signal 7 Switch ...

Страница 11: ...able broadcas receiver Composite Out terming using the Composite cable Make sure the color of terminals and the color of cable are the same to the HDMI terminal Watching Cable TV 1 Turn on the LCD TV and press SOURCE bu on on the remote control 2 Use Ÿ ź bu ons to move to AV If HDMI has been connected select HDMI 3 Turn on the cable broadcas receiver and select the channel you wish to view 8 RCA V...

Страница 12: ...tch the component co cable Y Pb Pr between the LCD TV and DVD Player to the HDMI terminal from HDMI terminal to HDMI terminal to the S VIDEO terminal from HDMI terminal to S VIDEO terminal Playing the DVD 1 Turn on the LCD TV and press SOURCE bu on on the remote control 2 Use Ÿ ź bu ons to move to YPbPr If HDMI has been connected select HDMI 3 Turn on the DVD insert the DVD disc and press Play bu ...

Страница 13: ...e Connect LCD TV s PC Audio terminal to PC s Audio terminal using the Audio cable Only for PC s with Audio terminal How to Use as PC monitor 1 Turn on the LCD TV and press SOURCE bu on on the remote control 2 Use Ÿ ź to move to VGA Digital AmpliĮer to the Digital ŵƉůŝĮĞƌ 10 Switch Switch terminals of other equipments diīer by manufacturer and model ...

Страница 14: ... between the TV signal and the input signal of other equipments connected to the TV Use this to switch to the input source you wish to view Press SOURCE bu on on the remote control Use Ÿ ź bu ons to move to the desired input source Press Ź bu on to select 11 To turn on the LCD TV Be sure to turn off the power and unplug both units from the wall outlet before making any connections Power on Power o...

Страница 15: ...ill appear on the screen 3 Use the Ż Ź to select your main menu PICTURE MENU Allows you to make adjustments your picture se ngs Select TV sources for example SOUND MENU Allows you customize the sound s and eīects Select TV source for example 12 CHANNEL MENU Allows you to search channels and set up a variety of channel ŽƉƟŽŶƐ Select TV source ...

Страница 16: ...ce OTHERS MENU Allows you to search OTHERS and set up a variety of channel Select TV source 4 Use the Ÿ ź bu ons to select an n of the sub menu and press the Ź button While in adjustment mode use the Ż Ź to change the value of the item 5 Press the MENU bu on to exit the menu Note Only when you input the suitable signal the relevant items can be ac vated 13 ...

Страница 17: ... tŚĞŶ LJŽƵ ŚĂǀĞ ĐŚĂŶŐĞĚ ƚŚĞ ƐĞƫŶŐƐ LJŽƵ ĐĂŶ Ğdžŝƚ ĨƌŽŵ ƚŚĞ ŵĞŶƵ ďLJ ƉƌĞƐƐŝŶŐ D Eh Picture Mode WƌĞƐƐ ďƵƩŽŶ ƚŽ ƐĞůĞĐƚ WŝĐƚƵƌĞ DŽĚĞ ƚŚĞŶ ƉƌĞƐƐ ďƵƩŽŶ ƚŽ ĂĚũƵƐƚ ǀĂŝůĂďůĞ ƉŝĐƚƵƌĞ ŵŽĚĞ DŽǀŝĞ hƐĞƌ LJŶĂŵŝĐ ƚĂŶĚĂƌĚ Ϳ ƌŝŐŚƚŶĞƐƐ WƌĞƐƐ ďƵƩŽŶ ƚŽ ƐĞůĞĐƚ ƌŝŐŚƚŶĞƐƐ ƚŚĞŶ ƉƌĞƐƐ ďƵƩŽŶ ƚŽ ĂĚũƵƐƚ ŽŶƚƌĂƐƚ WƌĞƐƐ ďƵƩŽŶ ƚŽ ƐĞůĞĐƚ ŽŶƚƌĂƐƚ ƚŚĞŶ ƉƌĞƐƐ ďƵƩŽŶ ƚŽ ĂĚũƵƐƚ Color WƌĞƐƐ ďƵƩŽŶ ƚŽ ƐĞůĞĐƚ ŽůŽƌ ƚŚĞŶ ƉƌĞƐƐ ďƵƩŽŶ ƚŽ ĂĚũƵƐƚ Tin...

Страница 18: ...cessary Press to adjust the item to the desired level Screen Size Press Available Screen Size WaterGlass Cinema Full Normal AutoWide Auto Adjust Press Press Clock Press Press Reset Press to the factory mode Ż Ź Ż Ź Ÿ ź Ÿ ź Ÿ ź Ż Ź Ż Ź Ż Ź Ż Ź Ÿ ź Ÿ ź Ÿ ź Ÿ ź Ÿ ź Ÿ ź 15 ...

Страница 19: ...Color Temperature SABC Press Available SABC Low Medium Kī igh Film Mode Press Available Film Mode KŶ KīͿ Press 16 Ż Ź Ż Ź Ż Ź Ż Ź Ż Ź Ÿ ź Ÿ ź Ÿ ź Ÿ ź ...

Страница 20: ...t the desired menu item Press ENTER to proceed if necessary Press to adjust the item to the desired level Press Analog Sound Available Analog Sound SAP Stereo Mono Sound Mode Press Bass Press Treble Press Balance Press 17 Ż Ź Ż Ź Ż Ź Ż Ź Ż Ź Ż Ź Ż Ź Ż Ź Ż Ź Ż Ź Ż Ź Ż Ź Ż Ź ...

Страница 21: ...Digital Sound Available Digital Sound English French Spanish 18 Ż Ź Ż Ź AVL Press Note if you select OFF you could not hear the sound of the TV set Ż Ź Ż Ź OTHER SETTINGS AVL OFF ...

Страница 22: ...EL MENU is only shown in TV source Press Signal Type Press the sub menu Press you want to set Channel Number Press Number you want to set In Channel List Press Channel Label Press Favorite Channel 19 Ż Ź Ż Ź Ż Ź Ż Ź Ż Ź Ż Ź Ż Ź Ż Ź Ż Ź ...

Страница 23: ... A Channel Search Menu will appear as below Input password to enter default password is 0000 V CHIP Press A SubMenu Will appear as below CHANGE PASSWORD to adjust the value A Sub Menu Will appear as right 20 Ż Ź Ż Ź Ż Ź ...

Страница 24: ...able type TEXT1 TEXT2 TEXT3 TEXT4 CC1 CC2 CC3 CC4 Available type Service1 6 Digital CC Preset Press Digital CC Style This menu is only shown when the Digital CC Preset is selected Custom 21 Ż Ź Ż Ź Ż Ź Ż Ź Ż Ź Ż Ź Ż Ź Ż Ź Ż Ź Ż Ź ...

Страница 25: ...k White Green Magenta Cyan Default CC Background Opacity Press Available Opacity Flashing Default Solid Translucent Transparent CC Background Color Press Available Color Blue Yellow Red Black White Green Magenta Cyan Default Available Language English French Spanish 22 Ż Ź Ż Ź Ż Ź Ż Ź Ż Ź Ż Ź Ż Ź Ż Ź Ż Ź Ż Ź Ż Ź Ż Ź Ż Ź Ż Ź DIGITAL CC STYLE CC Size Small CC Font Style0 CC Opacity Solid CC Color Cy...

Страница 26: ...Clock Press Blue BLack Press All Reset Press EŽ ŝŐŶĂů WŽǁĞƌ Kī Press Press 23 Ż Ź Ż Ź Ż Ź Ż Ź Ż Ź ...

Страница 27: ...ƚ ƌŝŐŚƚŶĞƐƐ ƚŚĞŶ ƉƌĞƐƐ ďƵƩŽŶ ƚŽ ďƌŽǁƐĞ WŝĐƚƵƌĞƐ Press ďƵƩŽŶ ƚŽ ƐĞůĞĐƚ ƌŝŐŚƚŶĞƐƐ ƚŚĞŶ ƉƌĞƐƐ ďƵƩŽŶ ƚŽ ŚŽǁ Ăůů ĚŽĐƵŵĞŶƚƐ h WƌĞƐƐ Ed Z ďƵƩŽŶ ĚŝƐƉůĂLJ ƚŚŝƐ ƐĐƌĞĞŶ Ż Ź Ż Ź Ż Ź Ż Ź 24 MEDIA Slideshow Media Browser Settings Mp3 Control Thumbnal display Media Setting Music Settings Return Photo Settings Photo Settings Slideshow Effect Blind Down Slideshow Repeat Off Return Slideshow interval 1s ...

Страница 28: ...ŽŽƐĞ ǁŚĞƚŚĞƌ ƚŽ ƉůĂLJ Ă ƐŽŶŐ ĐLJĐůĞ MUSIC INFOMATION WƌĞƐƐ ďƵƩŽŶ ƚŽ ĂĚũƵƐƚ ƚŚĞ ƐŽŶŐ ŝŶĨŽƌŵĂƟŽŶ ĚŝƐƉůĂLJŝŶŐ ƟŵĞ MUSIC AUTO PLAY WƌĞƐƐ ďƵƩŽŶ ƚŽ ƐĞůĞĐƚ ǁŚĞƚŚĞƌ ƚŽ ĂƵƚŽŵĂƟĐĂůůLJ ƉůĂLJ ƚŚĞ ƐŽŶŐƐ WƌĞƐƐ ďƵƩŽŶ ƚŽ ƐĞůĞĐƚ ƚŚĞ DWϯ KEdZK ĂŶĚ ƉƌĞƐƐ Ed Z ďƵƩŽŶ ƚŽ WůĂLJ DWϯ WƌĞƐƐ Ed Z ŝƐ WůĂLJ WƌĞƐƐ y d ŝƐ dKW WƌĞƐƐ ďƵƩŽŶ ƚŽ ƐĞůĞĐƚ ƚŚĞ ŵƵƐŝĐ ǁŚĂƚ LJŽƵ ǁĂŶƚ ƚŽ ůŝƐƚĞŶ Ϳ Ż Ź Ż Ź Ż Ź Ż Ź Ż Ź Ż Ź Ż Ź Ż Ź Ÿ ź 25 Music Setting...

Страница 29: ...rma on will apply in almost all cases 1 First click on Control Panel on the Windows start menu 2 When the control panel window appears click on Appearance and Themes and a display dialog box will appear 3 When the control panel window appears click on Display and a display dialog box will appear 4 Navigate to the tab on the display dialog box The correct size se ng res Op 1360 768 If a ver cal fre...

Страница 30: ...ppear on the screen and it shakes Stop using wireless telephones hair driers and electric drills The screen does not move Press the PAUSE Check if the Pause is pressed on external equipment Screen appears Voice is not heard 1 Press the MUTE 2 Increase the sound level by pressing volume adjustment 3 Check if sound terminal of external input is connected properly 4 Check if audio cables are connecte...

Страница 31: ...rast Ra 3500 1 AV 1 YPbPr 2 AUDIO L R 3 PC AUDIO L R 1 S VIDEO 1 HDMI 2 Input Connector TV 1 Output Connector SPDIF 1 USB 1 Power Source AC 100 240V 50 60Hz Standby Power Dissipa 1W Power Consum 135W Dimension With Base W875mm H620mm D250mm Weight N W 10 0kg Design and are subject to change without prior no ce Weight and dimensions are approximate 28 ...

Страница 32: ......

Отзывы: