background image

­ 40 ­ 

DVD System Setup(Continued) 

Preference Setup


Press the

 SETUP

 button to enter the General setup menu. Then use the 

34

 direction buttons to 

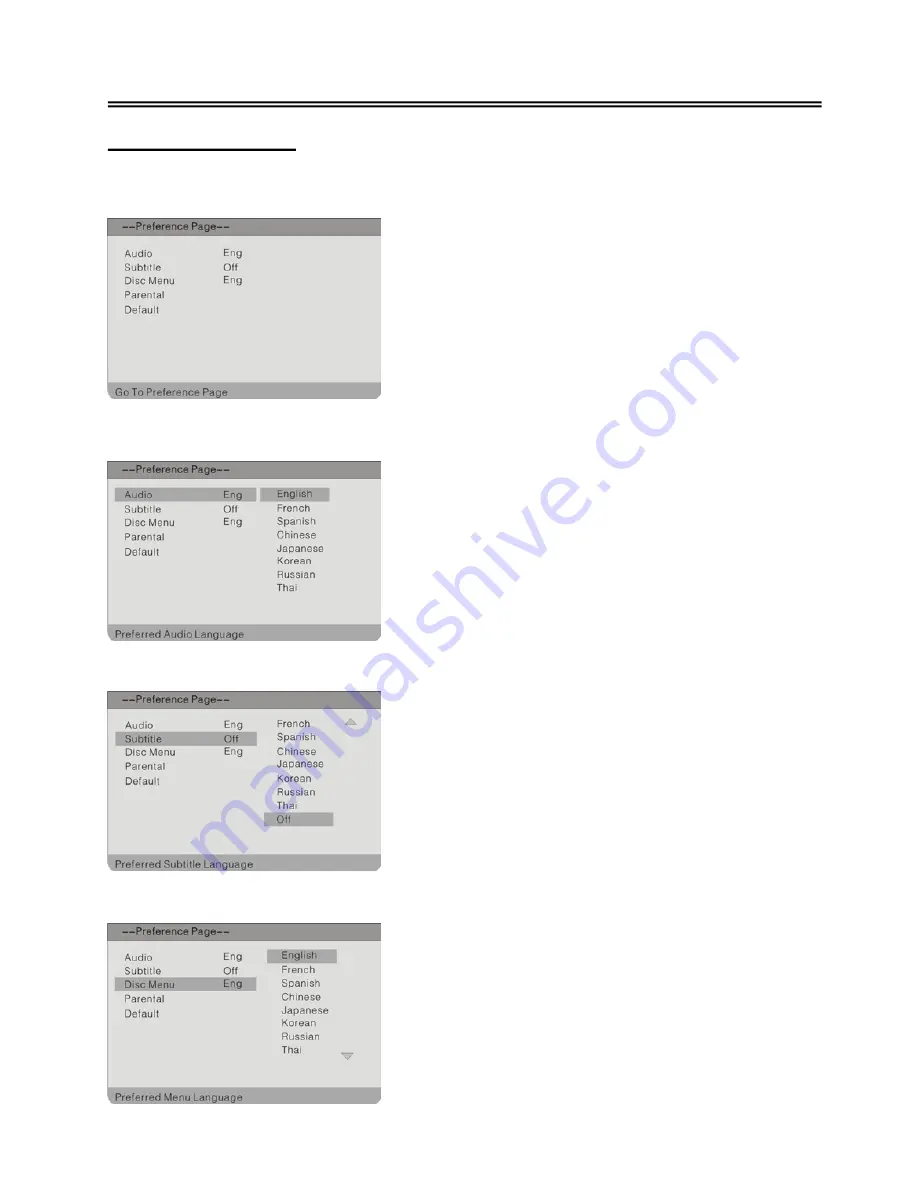
select Preference Page, the screen will display as the following:


Audio 

Subtitle 

Disc Menu


In  the  menu,  Use  the 

56

  direction  buttons  to 

select the desired item. Press the

 ENTER

 button to 

enter the item. Press the 

3

 button to return. 

1.  Press  the 

56

  direction  buttons  to  select


Audio

2.  Press  the

  ENTER

  button  to  enter  the  setup, 

see the left figure: 

3.  Press the 

56

 direction buttons to select audio 

language. 

4.  Press  the

  ENTER

  button  again  to  confirm 

setting and return. 

1.  Press  the 

56

  direction  buttons  to  select


Subtitle

2.  Press  the

  ENTER

  button  to  enter  the  setup, 

see the left figure: 

3.  Press  the 

56

  direction  buttons  to  select 

subtitle language. 

4.  Press  the

  ENTER

  button  again  to  confirm 

setting and return. 

1.  Press the 

56

 direction buttons to select

 Disc 

Menu

2.  Press  the

  ENTER

  button  to  enter  the  setup, 

see the left figure: 

3.  Press the 

56

 direction buttons to select menu 

language. 

4.  Press  the

  ENTER

  button  again  to  confirm 

setting and return.

Содержание FPE3206DV - 32" LCD TV

Страница 1: ...ions Model No FPE3206DV For assistance please call 1 800 645 4994 Or visit us at WWW AUDIOVOX COM Before connecting operating or adjusting this product please read these instructions completely Please keep this manual for future reference 128 7728 ...

Страница 2: ...l AV Signal Source AV3 AV4 15 Connecting to HDMI Output Device 16 Connecting to External AV Device AV Out 17 Connecting to Digital Amplifier 18 Connecting to PC 19 Connecting to TV Signal Input 20 Connecting to Power Supply 20 Connecting to Earphone 21 Input Source Selecting 22 System Setup and Operation 23 Preparations 23 Setup Setting 23 Video Setting 24 Audio Setting 26 Feature Setting 27 DVD P...

Страница 3: ...ervicing instructions are for use by qualified service personnel only To reduce the risk of electric shock do not perform any servicing other than that contained in the operating instructions unless you are qualified to do so Refer to service manual for servicing instructions The lightning flash with arrowhead symbol within an equilateral triangle is intended to alert the user to the presence of u...

Страница 4: ... moving the cart apparatus combination to avoid injury from tip over 13 Unplug this apparatus during lightning storms or when unused for long periods of time 14 Refer all servicing to qualified service personnel Servicing is required when the apparatus has been damaged in any way such as power supply cord or plug is damaged liquid has been spilled or objects have fallen into the apparatus the appa...

Страница 5: ...annel Edit Function Supports channel edit function you can edit the channel for your preference Special Function Supports V CHIP CCD and sleep timer setting functions USB and CARD PORTS Designed with USB and SD MS MMC card port can be connected to USB device or SD MS MMC Card High Resolution Adopt an MPEG2 decoding format to achieve horizontal resolution more than 500 lines Superior sound Supports...

Страница 6: ... playback of CD R or CD RW discs created on a computer requires proper formatting and finalization of the disc for audio playback Some computers and or software programs may not be capable of creating compatible discs About Disc Terms Title Generally pictures or music compressed on a DVD are divided into several sections title Chapter The smaller section unit of picture or music in a DVD under the...

Страница 7: ...mode TV AV1 Composite1 AV2 Composite 2 AV3 Component1 AV4 Component2 VGA HDMI or DVD then press the Enter button to enter the selected mode 3 MENU button Press to enter or exit system setup menu 4 CH button In TV mode press to select channels In setup menu the same function as direction buttons 5 VOL button Press to decrease or increase the volume the same function as direction buttons in setup me...

Страница 8: ... tray 9 POWER button Press to enter or exit the standby mode 10 Disc Tray Slot Insert disc into this slot 11 SD MS MMC card port Insert SD MS MMC card into this slot 12 USB Port Connecting to the USB device 13 Remote Sensor Remote sensor window for the remote control 14 Power Indicator In standby mode it turns red when operation it is blue 15 Speakers Provides high quality sound ...

Страница 9: ... AV1 Composite mode 4 Video S VIDEO and L R audio Input Jacks Connecting for the audio and video S Video signal input in AV2 Composite mode The Video and S Video is with the same L R audio jacks and the S Video is the priority 5 Earphone Jack Used for connecting to the earphone 6 TV Signal Input Jack Connected to TV antenna in TV mode 7 VGA Input Jack Connected to the VGA output jack of the PC in ...

Страница 10: ... setup menu 9 SLEEP button Press to set the sleep time 10 TV button Press to shift to TV mode 11 SIGNAL button Press to display the ATSC signal status 12 button Press number buttons to select channel and then press the button to confirm and go the selected channel 13 10 button In TV mode press the number buttons to select channel first then press this button and add number button 0 or one number f...

Страница 11: ...DVD DISPLAY button Press to display reference information 13 ZOOM button Press to realize various zoom effects 14 EJECT button Press to eject the disc out 15 STOP button Press to stop playback then press the 4PLAY button to resume normal playback Press this button twice repeatedly to stop completely 16 NEXT button Press to skip to the next chapter track for some discs 17 9 PREV button Press once t...

Страница 12: ... when the remote is not in use for a long time Using Remote control Point the remote control unit from no more than about 7m from the remote control sensor and within about 60 degrees of the front of the unit The operating distance may vary depending to the brightness around NOTE Do not point bright lights directly at the remote control sensor Do not place objects between the remote control unit a...

Страница 13: ... the left rear panel of the unit Step 2 remove the DVD module 1 Loose the screw on the DVD module 2 Unplug the MGI connecting cord from the LCD TV 3 Remove the DVD module outward Step 3 close the back cover Installing the DVD module There are three different positions for installing the functional module and two MGI jacks for connecting the MGI connecting cord Select one proper position for instal...

Страница 14: ...ght side of the unit s rear panel Connecting To External AV Signal Source AV1 Use the audio and video cable to connect the input jacks on the right side of the unit s rear panel to the external AV signal source After connection turn on the power of the unit and the external AV signal source press the SOURCE button to enter the Input menu then select AV1 Composite and press the ENTER button to ente...

Страница 15: ...input jacks on the right side of the unit s rear panel to the external AV signal source NOTE S VIDEO cable will produce good image quality After connection turn on the power of the unit and the external AV signal source press the SOURCE button to enter the Input menu then select AV2 Composite and press the ENTER button to enter the selected mode If connected to the two group AV and S Video signal ...

Страница 16: ...right side of the unit s rear panel to the external AV signal source After connection turn on the power of the unit and the external AV signal source press the SOURCE button to enter the Input menu then select AV3 Component or AV4 Component and press the ENTER button to enter the selected mode NOTE The Component cable will produce better image quality ...

Страница 17: ...connected to the AV device with HDMI output See the below figure for details After connection turn on the power of the unit and the external HDMI output device press the SOURCE button to enter the Input menu then select HDMI and press the ENTER button to enter the HDMI mode ...

Страница 18: ...t side of the rear panel to the external AV device NOTE The features of this A V equipment allows you to connect to other A V equipment Care should be taken when connecting the A V outputs of this device to the A V inputs of the other device For example composite output of this device needs to be connected to composite inputs of the other device ...

Страница 19: ...Connecting to Digital Amplifier The unit is designed with an optical digital audio jack can be connected to the digital amplifier see the below figure NOTE The optical digital audio can only output ATSC NTSC and HDMI signals ...

Страница 20: ... jack on the right side of the unit s rear panel 2 Connect the other end to the PC 3 Connect one end of the audio cables to the PC audio input jack on the right side of the unit s rear panel 4 Connect the other end to the PC audio output jack 5 You had better set the PC s resolution at 1024 768 and the refresh frequency must at 60Hz After connection press the SOURCE button and select VGA mode ...

Страница 21: ...he TV signal input source via the 75Ω antenna jack on the rear panel After connection turn on the power of the unit and press the SOURCE button and select TV mode Connecting to Power Supply One end is connected to the jack on the rear panel of the unit the other end to the AC110 220V wall outlet ...

Страница 22: ...e for listening music privately See the below figure for details When the headphone is connected the speakers will turn off automatically NOTE Excessively loud volume could damage your hearing So turn down the volume before you connect the headphones and then raise the volume to comfortable level ...

Страница 23: ...enu press the 56 direction button to select the video mode press the ENTER button to enter the selected mode NOTE If connected to external AV and S Video signal input source at the same time the AV1 Composite is for video1 input the AV2 Composite is for S Video input the video2 input can not be selected If installed with extended functional module DVD or PVR DVD or RECORDER will be displayed on th...

Страница 24: ...atus press the ENTER button again to return to the previous menu Press the MENU button to enter the main setup menu as shown on the right In the menu press the button to select the SETUP and then press the or button to enter the setup menu press the button to select items Press the or button again to return to the previous menu Press the EXIT button to exit the setup menu Auto Ch Search Press the ...

Страница 25: ... the menu press the 3456direction buttons to select items press the ENTER button to confirm or set press the EXIT button to exit Channel Labels Press the button to select the Channel Labels press the ENTER button to enter the Channel Labels Menu see the right figure In the menu press the 34direction buttons to select the item you want to set press the 56 button to set the item press the EXIT butto...

Страница 26: ...just the value Press the ENTER button again to confirm and return Tint Press the button to select the Tint press the ENTER button to enter the adjusting mode press the button to adjust the value Press the ENTER button again to confirm and return Backlight Press the button to select the Backlight press the ENTER button to enter the adjusting mode press the button to adjust the value Press the ENTER...

Страница 27: ...l audio signal select RAW to output an original audio signal TV Speaker Press the button to select the TV Speaker press the ENTER button to select On or Off Mode Press the button to select the Mode press the ENTER button to select audio mode Restore Default Settings Press the button to select the Restore Default Settings press the ENTER button all the settings on this setup page will return to the...

Страница 28: ...s the or button to select the time NOTE the Year Date and time only can be set when the time set mode is set to Manual Sleep Timer Press the button to select the Sleep Timer press the ENTER button to select the sleep time or Off Press the MENU button to enter the main setup menu as shown on the right In the menu press the button to select the Feature and then press the or button to enter the setup...

Страница 29: ...ER button the screen is shown as right figure In the menu press the 56direction buttons to select items press the ENTER button to set press the EXIT button to exit Parental Control Press the button to select the Parental Control press the ENTER button an indication will be displayed on the screen you should input password The Parental Control setting is a parental control rating function Depending...

Страница 30: ... the rating Press the EXIT button to exit the setup menu In the AV1 AV2 AV3 AV4 VGA HDMI mode you can refer to the setups in the TV mode to set the items Closed Caption Options Press the button to select the Closed Caption Options press the ENTER button the screen is shown as right figure In the menu press the 56direction buttons to select items press the ENTER button to set press the EXIT button ...

Страница 31: ...appear on the liquid crystal display and playback will begin Warning Do not play poor quality discs that may damage the player DVD Playback Region Code DVD players and discs are coded by region These regional codes must match the played discs If the codes don t match the disc cannot be played This player s default code is region 1 Play Press the 4PLAY button to start playback Press the STOP button...

Страница 32: ...itle Chapter Normally there are several titles in a DVD disc and several chapters sections in a title You can select any title or chapter quickly by entering the relevant number Language Audio There can be up to 8 audio languages on a DVD disc When you play a multi language DVD disc you can press the AUDIO button to select different audio languages Subtitle The DVD player can support multiple kind...

Страница 33: ...LAY button to resume normal playback Previous and Next Press the 9 button once to go the beginning of this track Press twice repeatedly to go the previous track Press the button to play from the beginning of the next track Fast Playback Press the 8 or 7 button on the remote control to activate fast forward or backward playback Repeat Use the REPEAT button repeatedly to repeat Single All or to canc...

Страница 34: ...tomatically During playback press the 9 or button to select picture Many discs have other content besides pictures Stop Press the STOP button once to stop playback and return to the preview menu Press the 4 PLAY button to resume normal playback Pause Press the PAUSE button to pause playback press the 4PLAY button to resume playback Repeat During playback press the REPEAT button repeatedly and the ...

Страница 35: ...tion 6 Press the CARD button to shift among disc playback USB playback and the SD MS MMC playback The default state is disk playback Please see the below figure 7 Press the 56 button to select the folder and press the ENTER button to enter 8 Press the 56 button to select the desired track Then press PLAY4 button to start playback 9 Press the STOP button to stop playback if the STOP button is press...

Страница 36: ... the General setup menu The screen will display as the following TV Display Angle Mark In the menu Use the 56 direction buttons to select the desired item Press the ENTER button to enter the item Press the 3 button to return 1 Press the 56 direction buttons to select TV Display 2 Press the ENTER button to enter the setup 3 Use the 56 direction buttons to select items 4 Press the ENTER button again...

Страница 37: ...s the ENTER button to enter the setup 3 Use the 56 direction buttons to select On or Off 4 Press the ENTER button again to confirm selection and to return 1 Press the 56 direction buttons to select Last Memory 2 Press the ENTER button to enter the setup 3 Use the 56 direction buttons to select On or Off 4 Press the ENTER button again to confirm selection and return 1 Press the 56 direction buttons...

Страница 38: ...the setup the screen will display as left 3 In the menu use the 56 direction buttons to select items 4 Press the ENTER button to enter the setup Press the 3 button to return 1 Press the 56 direction buttons to select Dual Mono 2 Press the ENTER button to enter the setup 3 Use the 56 direction buttons to select items 4 Press the ENTER button again to confirm selection and return 1 Press the 56 dire...

Страница 39: ...o select HD Mode press the ENTER button to enter the menu as the following 1 In the menu press the ENTER button to enter the setup 2 Use the 56 direction buttons to select items 3 Press the ENTER button again to confirm selection and return 4 Press the 3 button to return In the menu Use the 56 direction buttons to select the desired item Press the ENTER button to enter the item Press the 3 button ...

Страница 40: ...e the 56 direction buttons to select High Medium or Low 4 Press the ENTER button again to confirm selection and return 1 Press the 56 direction buttons to select Brightness 2 Press the ENTER button to enter the setup the screen will display as left 3 Use the 34 direction buttons to adjust the level 4 Press the ENTER button again to confirm setting and return 1 Press the 56 direction buttons to sel...

Страница 41: ...utton to enter the setup see the left figure 3 Press the 56 direction buttons to select audio language 4 Press the ENTER button again to confirm setting and return 1 Press the 56 direction buttons to select Subtitle 2 Press the ENTER button to enter the setup see the left figure 3 Press the 56 direction buttons to select subtitle language 4 Press the ENTER button again to confirm setting and retur...

Страница 42: ...ted according to their contents and settings vary from disc to disc Depending on the disc you can lock out playback of the disc altogether 1 Press the 56 direction buttons to select Parental 2 Press the ENTER button to enter the setup see the left figure 3 Press the 56 direction buttons to select item 4 Press the ENTER button to confirm And use the number buttons to enter the password The default ...

Страница 43: ...button to enter the setup see the left figure 3 Press the 56 direction buttons to select On or Off 4 Press the ENTER button to confirm setting and return You can change the password by yourself 1 Press the 56 direction buttons to select Password 2 Press the ENTER button to enter the setup see the left figure 3 Press the ENTER button enter the password change menu 4 According to the indication in t...

Страница 44: ...D does not continue to play or plays the same section repeatedly Make sure disc is not dirty or damaged There is no picture or picture moves up and down Check if the connections with the external AV signal source are correct Correctly set the items in the picture menu Check if the video type input signal is not corresponding to the unit Make sure the unit is turned on and in correct video type The...

Страница 45: ...ut Out Level 1VP P 0 1 Load 75Ω Unbalanced Negative Power AC110 220V 50 60Hz Power Consumption 210W Dimension 803mm 630mm 280mm LXWXD Ambient Temperature 10 45 C Weight About 25 Kg DESIGN AND SPECIFICATIONS ARE SUBJECT TO CHANGE WITHOUT NOTICE Manufactured under license from Dolby Laboratories Dolby and the double D symbol are trademarks of Dolby Laboratories Confidential unpublished works 1992 19...

Отзывы: