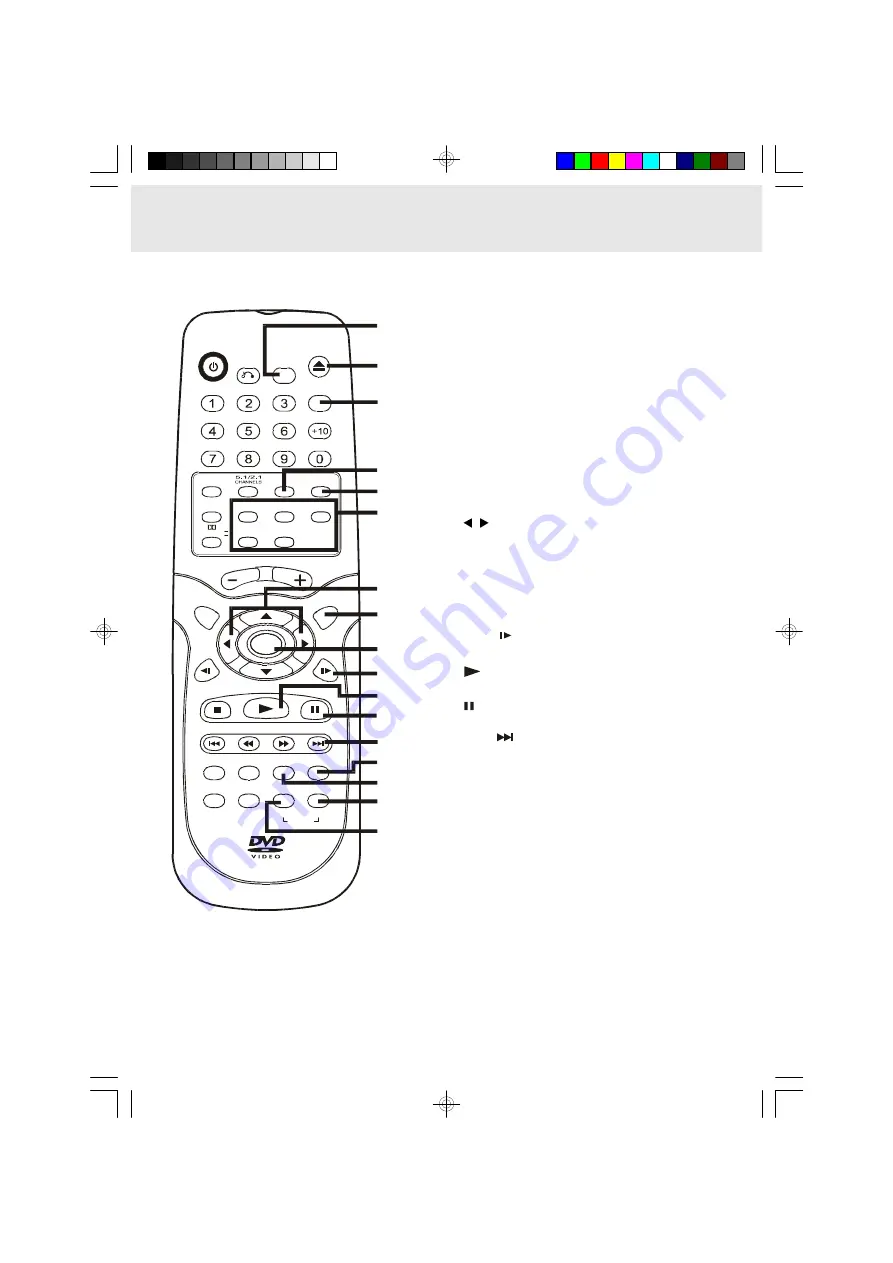
Audiovox DV1532 Скачать руководство пользователя страница 10

E - 9

19) FUNCTION button

Display the FUNCTION screen where you can check
or change various setting.

20) OPEN / CLOSE button

Use to open or close the disc tray.

21) GOTO button

Skip directly to a specific location on a DVD disc.

22) P. SCAN / CVBS button

Changing YUV output to Progressive Scan Video
mode.

23) SOUND button

Selects sound balance and tone controls for
adjustment with the cursor buttons.

24) DISC 1 - 5 select buttons
25)  /   CURSOR buttons

Use to highlight selections on a menu screen and
make adjust certain settings.

26) MENU button

Open and close DVD's menu.

27) ENTER button

Confirm selections on a menu screen.

28) SLOW 

button

Perform slow forward playback of DVDs.

29)

 PLAY button

Start playback.

30)

 PAUSE button

Pause playback, frame advance.

31) NEXT 

 button

Move forward through titles, chapters or tracks on a
disc.
Tune to the presetted stations.

32) ZOOM button

Zoom into an image.
NTSC/PAL button
Select whether to output the video signal.

33) AUDIO button

Select one of the audio soundtracks programmed
on a DVD or selects the audio output mode on a
AUDIO CD.

34) BAND/REPEAT-DISC button

Switch between AM or FM.

Repeat chapter or title of a DVD.

Repeat single track or whole CD.

35) FM MODE / REPEAT A - B button

Set FM MODE to FM STEREO for FM stereo sound
or to FM MONO for mono sound.

Perform point-to-point repeat playback on a DVD or
CD.

Parts and Functions

Remote Control

VOLUME

SETUP

MENU

ENTER

SLOW

SLOW

STOP

PLAY

PAUSE

FM MODE

BAND

REPEAT

PREV

CLEAR

ANGLE

SUBTITLE

A-B

DISC

DISPLAY

AUDIO

ZOOM/

NTSC/PAL

TUNING

NEXT

STANDBY/ON

OPEN/

CLOSE

FUNCTION

GOTO

MEMORY

DIMMER

SOUND

RETURN

19

20

21

22
23
24

25
26

27
28
29

30
31

32

33

34
35

DISC 1

DISC 4

DISC 5

DISC 2

DISC 3

P. SCAN/

CVBS

PRO LOGIC II

151AUD5-10_E.pmd

4/24/2004, 11:53 AM

9

Содержание DV1532

Страница 1: ...DVD HOME THEATER SYSTEM OWNER S MANUAL CD PLAYBACK 1 R CD R CD RW VCR AV INPUT VIEWER...

Страница 2: ...erwise authorized by Macrovision Corporation Reverse engineering or disassembly is prohibited On Placement The apparatus shall not be exposed to dripping or splashing Do not use the Unit in places whi...

Страница 3: ...grounding or polarization means of an appliance are not defeated 12 Power Cord Protection Power supply cords should be routed so that they are not likely to be walked on or pinched by items placed up...

Страница 4: ...Formats 4 Before You Start 5 Usingtheremotecontrol 5 Parts and Functions 6 9 FrontPanel 6 RearPanel 7 RemoteControl 8 9 Display 10 FrontPanelDisplay 10 DisplayInformation 10 Setup 11 16 Forbetterrece...

Страница 5: ...hased from outside your geographic area or made for business purposes Title Chapter and Tracks DVDs are divided into titles and chapters If the disc has more than one movie on it each movie would be a...

Страница 6: ...by battery leakage corrosion Do not mix old and new batteries Do not mix ALKALINE standard CARBON ZINC or rechargeable NICKEL CADMIUM batteries 2 Insert two AA or UM 3 size batteries Using the Remote...

Страница 7: ...SKIP TUNING button to begin fast scan Four speeds are available Scan all available radio stations Front Panel 8 VOLUME buttons Changetheloudnessofthesoundfromthespeakers connected to the Unit 9 Remote...

Страница 8: ...terminals 17 Right REAR speaker terminals 18 SUBWOOFER terminals 19 Center speaker terminals 20 Left REAR speaker terminals 21 Left FRONT speaker terminals 22 DIGITAL AUDIO OUT jack 23 AUDIO OUT L R...

Страница 9: ...RSOR buttons Use to highlight selections on a menu screen and adjust certain settings 11 SLOW button Perform slow reverse playback of DVDs 12 TUNING buttons Fast reverse playback Fast forward playback...

Страница 10: ...ard through titles chapters or tracks on a disc Tune to the presetted stations 32 ZOOM button Zoom into an image NTSC PAL button Select whether to output the video signal 33 AUDIO button Select one of...

Страница 11: ...o CDs Repeat a specific section The operation is not permitted by the DVD Unit or the disc TV Screen Unit Display No Disc Main display section Indicates the operation status of the disc and Unit REPEA...

Страница 12: ...S Video Jack Use an S Video cable not supplied and the Audio cable not supplied 1 Use an S Video cable to connect the S VIDEO DVD jack on your Unit to the S VIDEO IN jack on your TV 2 Use the Audio c...

Страница 13: ...ht AUDIO OUT jacks on your Unit to the left right AUDIO IN jacks on your TV and the Component video cable not supplied connect the Green plug Y VIDEO OUT jack on your Unit to Y VIDEO IN jack on your T...

Страница 14: ...get an RCA to scart input adapter 2 Press the FUNCTION button on the DVD Amplifier Unit to get AV_IN mode shown on the front panel display 3 On the television select the AV or scart input channel for...

Страница 15: ...ie onto a videotape the resulting copy will be unclear with poor sound quality This is NOT caused by a defective DVD system Refer to the instruction manual of the connected equipment as well C Connect...

Страница 16: ...and NEGATIVE ends of each speaker wire into the corresponding jacks on the rear of the Unit matching the color tube on the end of the speaker wire to the color coded connector 2 Thefrontleft rightandr...

Страница 17: ...are off before making connections When you are not going to use the Unit for a long period of time disconnect the power cord Need More Help DO NOT RETURN THIS TO THE STORE Please call Customer Service...

Страница 18: ...ASS the low range of sounds TREBLE the high range of sounds Bass and treble control the sound from the front left and right speakers Dolby Digital DolbyDigitalisasoundsystemdevelopedbyDolbyLaboratorie...

Страница 19: ...woofer output by setup menu Notes The wording 2 1 CH will be corresponded to the audio sound output from Front Left and Front Right speakers plus the Subwoofer 5 1 2 1 CH button is no response to JPG...

Страница 20: ...cs If you use the OPEN CLOSE button on the front panel to open the disc tray the unit will stop playing The disc holder will rotate half circle so that the disc can be taken out If you use the OPEN CL...

Страница 21: ...D Zooming into an image While a disc is playing press the ZOOM NTSC PAL button While an image is zoomed you can use and button to shift the view and display the part you want To return to the normal v...

Страница 22: ...ues without changing the current angle Sequence of angle shots Example Notes This function can only be used for discs on which scenes shot from multiple angles have been recorded If only one angle is...

Страница 23: ...n is pressed within a few seconds playback continues without changing the current subtitle This function can only be used for discs on which subtitles have been recorded in multiple languages On some...

Страница 24: ...on to confirm Time skip Elapsed time from the beginning of the currently playing chapter and the remaining time from the beginning of the currently playing title Press the GOTO button to set your desi...

Страница 25: ...ing a specific title chapter track If you know the title chapter track number you want to play you can locate a specifc title chapter track by directly selecting a title chapter track number 1 Press t...

Страница 26: ...tton resets the time Angle setting 1 Press the DISPLAY button twice The FUNCTION menu is displayed on the screen and you can see how many angles are recorded on the disc 2 Press the ANGLE button repea...

Страница 27: ...f you press the CLEAR button while you are entering a title or chapter the currently entered numbers will be erased and you can reset the numbers again 3 Use or button to other field 4 Repeat steps 2...

Страница 28: ...While the disc is playing press the REPEAT DISC button until the Off indicator displays on the screen DVD Repeat Playback continued on next page Advanced playback You can play a single track and whole...

Страница 29: ...ection Rep A B is displayed 3 The Unit will immediately begin replaying your selection To resume normal playback 4 While the disc is playing press the REPEAT A B button until the Off indicator display...

Страница 30: ...hen press the ENTER button Note You can not play in Fast reverse or Fast forward during MP3 playback On screen display Turn on your TV to view the on screen display of MP3 files Press the or CURSOR bu...

Страница 31: ...ENTER button Note The SETUP button does not work during MP3 or Picture Disc playback or stop PREV NEXT Notes If you press the MENU button on the remote control in full screen review the Unit will dis...

Страница 32: ...BAND button to select the desired band 3 Use the TUNING button to find your desired station 4 Press the MEMORY button on the remote 5 Press the NEXT or PREV button to select the preset number and pres...

Страница 33: ...e or button to select the Language then press the ENTER button 5 Use or button to English then press the ENTER button The screen will change to English Wordings immediately 6 To exit the FUNCTION SETU...

Страница 34: ...m of the screen 16 9 Wide screen This is the correct mode for playing wide screen videos on a wide screen TV You must also set the screen mode on your wide screen TV to FULL The actual appearance of t...

Страница 35: ...he CVBS display continued on next page Customizing the Function Settings Brightness 1 Press the SETUP button 2 Use or button to select Video then press the ENTER button 3 Use or button to select Brigh...

Страница 36: ...es 1 Press the SETUP button 2 Use or button to select Video then press the ENTER button 3 Use or button to select Edges and then press the ENTER button 4 Use or button to shift and select the Sharpen...

Страница 37: ...tton to select the Audio press the ENTER button 3 Use the cursor or button to L R Speaker and then press the ENTER button 4 Use the cursor or button to select the desired setting and then press the EN...

Страница 38: ...s selected no sound will be emitted by subwoofer Surround Delay 1 Press the SETUP button 2 Use the cursor or button to select the Audio press the ENTER button 3 Use the cursor or button to Surround De...

Страница 39: ...ar surround right speaker for testing Subwoofer Pink noise comes out from subwoofer for testing Note When using the pink noise generator to test your speakers you can press the SOUND button on the rem...

Страница 40: ...select Password enter your 4 digit security code and then press the ENTER button If you make a mistake before pressing the ENTER button press the CLEAR button and enter your 4 digit security code aga...

Страница 41: ...se or button to shift and select the Factory Set then press the ENTER button 4 Use or button to shift and select Yes then press the ENTER button 5 To exit the FUNCTION SETUP MENU and return to the nor...

Страница 42: ...Rhaeto Romance Kirundi Romanian Russian Kinyarwanda Sanskrit Sindhi Sangho Serbo Croatian Singhalese Slovak Language Name Slovenian Samoan Shona Somali Albanian Serbian Siswat Sesotho Sundanese Swedis...

Страница 43: ...c from the center outward with a cleaning cloth NEVER use solvents such as benzine or alcohol to clean the disc Do NOT use irregular shape discs example heart shaped octagonal etc They may cause malfu...

Страница 44: ...ghtly moistened with alcohol Clean the disc Vibrations from the speakers are affecting the Unit Remove any obstacles between the remote and the Unit Use the remote near the Unit Point the remote at th...

Отзывы: