background image

- 17 -

DVD PROGRAMMABLE MEMORY

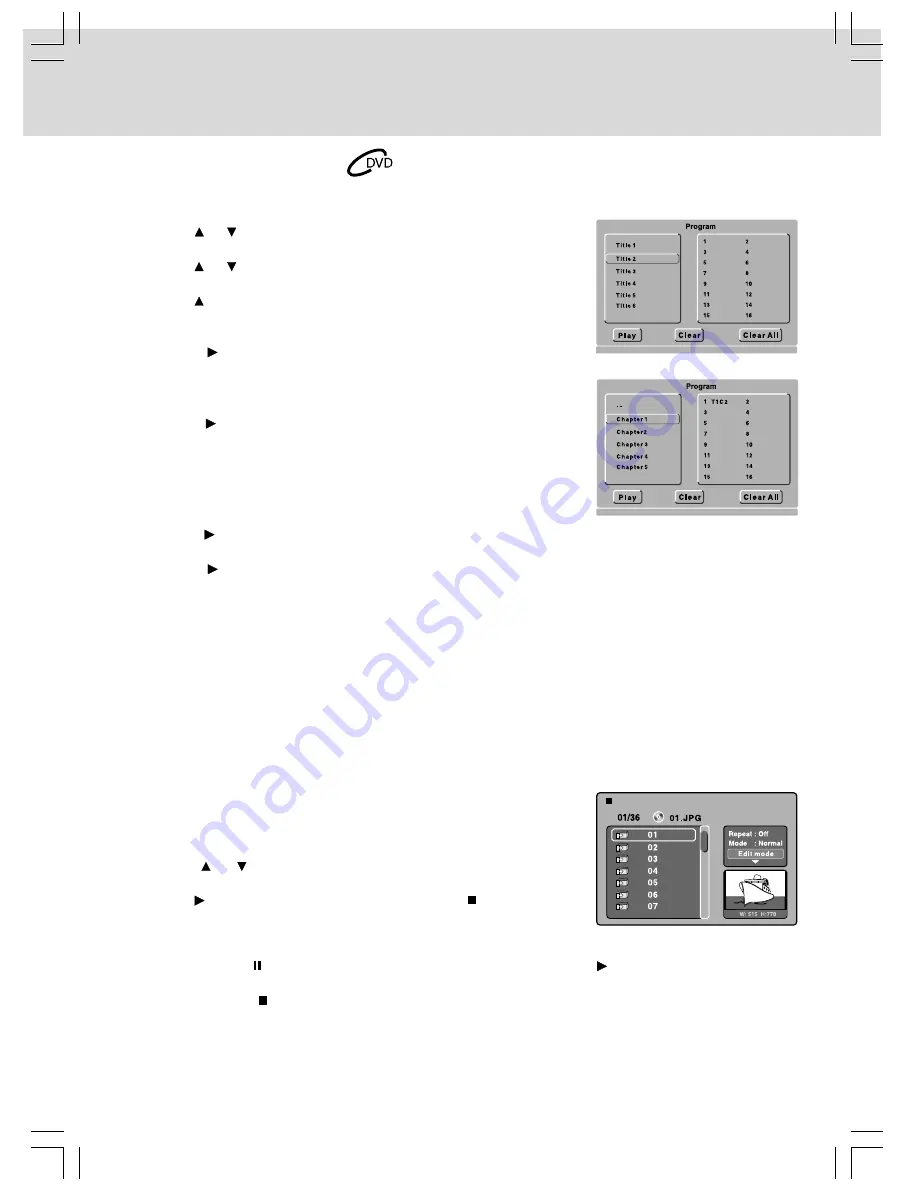
DVD Programmed Playback

You can combine your favorite titles/chapters and play them in the order you determine.

1. Press the

 MEMORY 

button on the remote control.

2. Use the   or   button to select the title you want, then press the

OK

 button on the remote control to confirm.

3. Use the   or   button to select the chapter you want, then press

the 

OK

 button on the remote control to confirm.

4. Use the   button to move the cursor to the top of the chapter list

and press the 

OK

 button to return to 

Title

 window. Then repeat

steps 2 to 3 to add additional titles and chapters.

5. Press the 

 PLAY

 button to start the programmed playback.

To Change the Programmed Selections

1). Press the

 MEMORY

 button.

2). Press the   button to select “Clear”, then press the 

OK 

button to

clear them one by one.

3). Follow above steps 1-4 to program the new title and chapter.

To Resume Normal Playback from Programmed Playback

1). Press the

 MEMORY

 button.

2). Press the   button to select “Clear All”, then press the 

OK 

button.

All the programs will be cleared.

3). Press the 

 PLAY

 button to resume playback.

Notes:

• Some discs may not permit memory playback operation.
• To exit the Program menu, press the 

MEMORY

 button.

• The programmed selections will be cleared when you open the disc tray or turn off the DVD player.

VIEWING JPEG FILES

This unit can play JPEG files recorded on a CD-R/RW discs.

Viewing JPEG Files

1. Open the disc tray.
2. Place a disc onto the disc tray with the label side up.
3. Close the disc tray. A list of folders/files will appear on the screen.
4. Press the   or   button to select your desired file, the selected

picture will appear in the lower right corner.

5. Press the   

PLAY

 button to start playback. Press the 

 STOP 

button

to display a folder list.

Notes:

• You can press the 

 PAUSE

 button to freeze the picture, and press the   

PLAY

 button to resume slide

show.

• You can press the 

 STOP 

button to quit playback.

• You can use the number buttons on the remote control to jump immediately to the desired picture.
• You can press the 

ANGLE

 buttonon the remote control to rotate direction of the picture by 90

o

.

• Some discs may not permit this operation.

Содержание DV 7300

Страница 1: ...Model DV7300 FOR ASSISTANCE CALL CUSTOMER SERVICE AT 1 800 645 4994 OR VISIT US AT WWW AUDIOVOX COM 128 8108 HOME THEATER 350 Watt 1 2 3 2 1 Channel Home Theater System OPERATING INSTRUCTIONS...

Страница 2: ...G TO QUALIFIED SERVICE PERSONNEL TO PREVENT FIRE OR SHOCK HAZARD DO NOT EXPOSE THIS APPLIANCE TO RAIN OR MOISTURE CAUTIONS USE OF CONTROLS OR ADJUSTMENTS OR PERFORMANCE OF PROCEDURES OTHER THAN THOSE...

Страница 3: ...Follow all instructions 5 Do not use this apparatus near water 6 Clean only with a dry cloth 7 Do not block any of the ventilation openings Install in accordance with the manufacturer s instructions 8...

Страница 4: ...tenna Wire 9 Connecting Your TV 9 Connecting a VCR 10 Connecting Other Equipment Amplifier 10 Connecting the Speakers Subwoofer 11 Positioning the Speakers Subwoofer 11 Plugging in the Unit 11 Turning...

Страница 5: ...D Titles Chapters and Tracks DVDs are divided into titles and chapters If the disc has more than one movie on it each movie would be a separate title Chapters are sections of titles Audio CDs are divi...

Страница 6: ...s they become weak Weak batteries can leak and severely damage the remote control WARNING Do not dispose of batteries in a fire Batteries may explode or leak To Install Batteries 1 Open the battery do...

Страница 7: ...ent with the cursor buttons PAUSE Button Press to pause playback frame advance PLAY Button Press to start playback MENU Button Press to open and close DVD s menu GOTO Button Press to skip directly to...

Страница 8: ...e disc tray 6 VOLUME Control Adjusts the volume level 7 USB Port Use to charge other equipment such as a MP3 player not included 8 STANDBY ON Button Turns on the unit and puts it in standby mode 9 PLA...

Страница 9: ...There is no disc in the tray 2 The disc type is not playable in this unit 3 The disc is not loaded correctly upside down etc The display changes to show other indicators total time etc Freezes the ima...

Страница 10: ...your TV the PB VIDEO OUT jack blue plug on your unit to the PB VIDEO IN jack on your TV and the PR VIDEO OUT jack red plug on your unit to the PR VIDEO IN jack on your TV to view the highest quality p...

Страница 11: ...instructions included with it to select the VIDEO function which corresponds to the VIDEO IN jack that is connected to the main unit 3 Turn on theVCR and follow the instructions included with it to pl...

Страница 12: ...T AUDIO IN FM ANT 300 AC LEFT RIGHT SUBWOOFER To wall outlet Coaxial Digital Audio cable not supplied Audio cable not supplied Amplifier of stereo system etc not included ANALOGUE CONNECTION Audio equ...

Страница 13: ...ecting External Equipment via the AUX IN jack To listen to audio from external equipment connect the plug to the AUX IN jack on the front panel LISTENING TO THE CONNECTED EQUIPMENT 1 Press the FUNCTIO...

Страница 14: ...ances one frame Stopping Playback Press the STOP button at the location where you want to interrupt playback To resume playback at the position where the disc was stopped press the PLAY button If you...

Страница 15: ...is playing press the SUBTITLE button to display the current language setting as shown in the example below 2 Press the SUBTITLE button repeatedly to select the desired subtitle language If no button...

Страница 16: ...arks 1 Press the GOTO button until Bookmark1 appears then use the or button to select Bookmark2 Bookmark3 2 Press the OK button Notes Some discs may not work with marking operation The marking is canc...

Страница 17: ...indicator displays on the screen Notes A B repeat can only be used within the same title If the start and end of the section to be repeated are in different titles A B repeat is cancelled The A B repe...

Страница 18: ...elect Clear All then press the OK button All the programs will be cleared 3 Press the PLAY button to resume playback Notes Some discs may not permit memory playback operation To exit the Program menu...

Страница 19: ...or button to select Program view then press the OK button The programmed tracks files appear on the left side of the window 3 Use the cursor buttons to select the programmed tracks files then press th...

Страница 20: ...ed on the disc DVD Menu 1 Press the SETUP button 2 Press the button Use the or button to select DVD Menu 3 Press the button Use the or button to make adjustments then press the OK button 4 Press the R...

Страница 21: ...ed Displays pictures cropped to fill your TV screen Sides of the picture are cut off Note Depending on the DVDs you may not be able to view the mode as selected Video Out 1 Press the SETUP button 2 Pr...

Страница 22: ...IO 2 Use the TUNING SKIP control on the front panel or the TUNING button on the remote to tune in to a desired station FM Stereo Press the MONO STEREO button on the remote control until appears on the...

Страница 23: ...in Slow motion Play mode Press the PLAY button to return to normal play mode Fast forward or fast reverse is performed Press the PLAY button to return to normal play mode Make sure the AUDIO output a...

Страница 24: ...remove dust Important Note Before transporting the unit remove the disc from the disc compartment Cleaning the Disc A defective or soiled disc inserted into the unit can cause sound to drop out during...

Отзывы: