SDMI 25
Smart Digital MOST Interface
deutsch / english
Страница 1: ...SDMI25 Smart Digital MOST Interface deutsch english ...
Страница 2: ...ude an diesem Produkt wünscht Ihnen das Team von AUDIOTEC FISCHER Herzlichen Glückwunsch Garantiehinweis Die Garantieleistung entspricht der gesetzlichen Regelung Von der Garantieleistung ausgeschlossen sind Defekte und Schäden die durch Überlastung oder unsachgemäße Behandlung entstanden sind Eine Rücksendung kann nur nach vorheriger Absprache in der Originalverpa ckung einer detaillierten Fehler...
Страница 3: ...icht in der Nähe von wärmeabstrahlenden Teilen oder elek tronischen Steuerungen des Fahrzeuges Im Sinne der Unfallsicherheit muss der SDMI25 professionell befestigt werden Dies geschieht über Schrauben die in eine Montagefläche ein geschraubt werden die wiederum genügend Halt bieten muss Bevor Sie die Schrauben im Montagefeld befestigen vergewissern Sie sich dass keine elektrischen Kabel und Kompo...
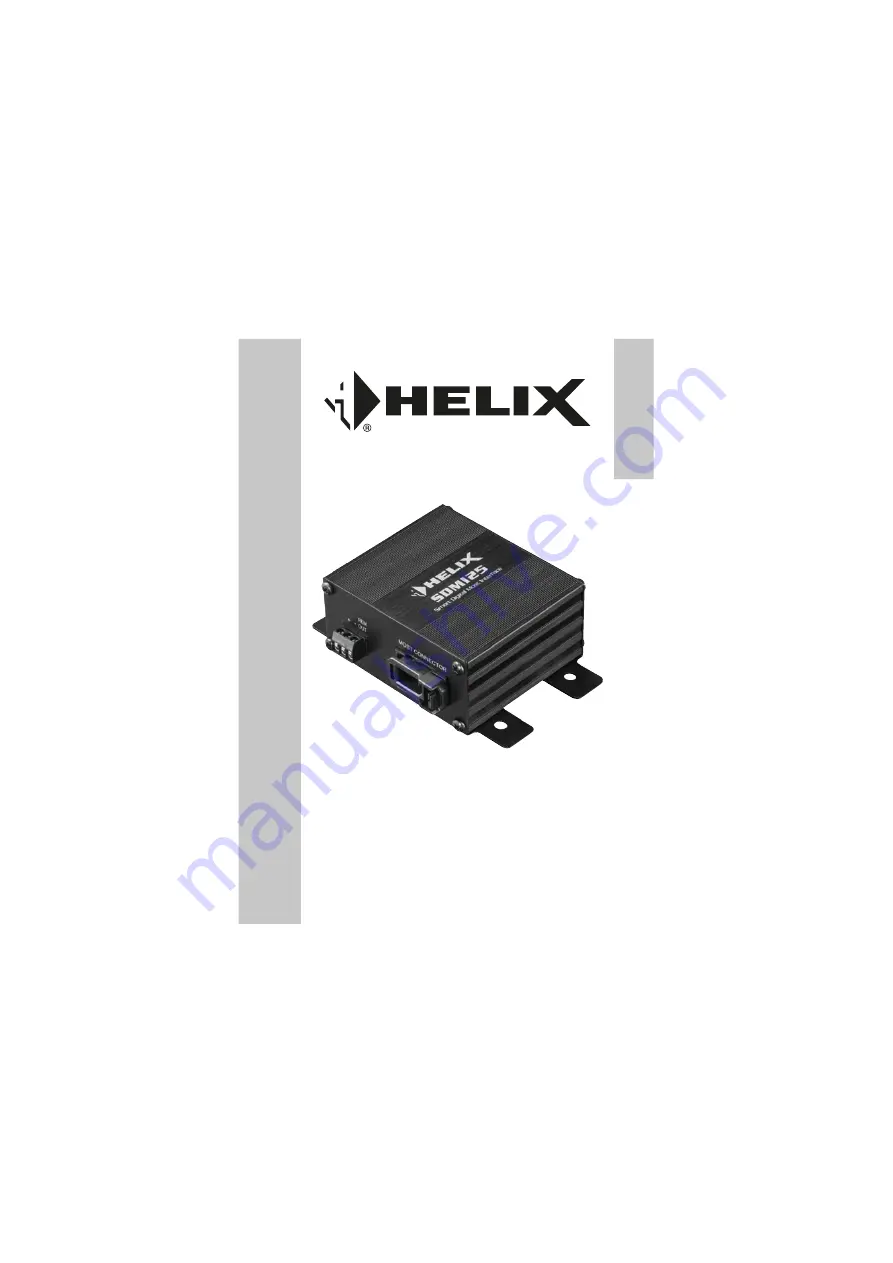
Страница 4: ...muss zum Ein und Ausschalten weiterer Komponenten angeschlossen werden 2 MOST Connector Zum Anschluss der MOST Lichtleiterverbindung des Fahrzeugs Anschluss und Bedienelemente 1 3 4 2 3 Optical Out Optischer digitaler Stereo Signalausgang im SPDIF Format 4 Jumper Zur fahrzeugspezifischen Konfiguration des SDMI25 ...
Страница 5: ...M OUT Dieser Ausgang dient zum Einschalten des am Optical Out angeschlossenen Signalprozessors DSP oder DSP Verstärkers Schließen Sie den Remote Ausgang an den Remote Eingang Ihres DSP Produkts an Um Störgeräusche beim Ein und Ausschalten zu vermeiden sollte der Remote Ausgang in jedem Fall belegt werden Achtung Verwenden Sie ausschließlich den mitgelieferten Stecker mit integrierten Schraubklemme...
Страница 6: ...sound Formate wie Dolby oder DTS werden nicht unterstützt 4 Jumper Mit Hilfe der Jumper muss der SDMI25 für den Einsatz im gewünschten Fahrzeug konfiguriert werden Dazu Stecken Sie die Jumper einfach auf die entsprechenden Positionen Eine Übersicht der Jumper Konfigurati onen finden Sie in der Übersicht auf Seite 7 Inbetriebnahme und Funktionen Eingang 1 x MOST25 Ausgang 1 x Optisch SPDIF 48 kHz 2...
Страница 7: ...mper Info MMI 2G MMI 3G MMI 3G Hersteller Jumper Info MMI 3G NTG2 5 NTG4 NTG4 5 Mercedes NTG1 ohne AGW NTG2 Lamborghini VW VW Touareg Porsche bis 2008 PCM2 0 PCM2 1 ab 2008 PCM3 0 S60 V60 Volvo XC60 Premium S40 V50 XC90 XC70 ab 2011 XC70 S80 bis 2012 S60 V60 XC60 Range Rover Sport ab 2012 BMW System Signalton Einstellung E65 E66 E F G Serie Land Rover Freelander 2 Freelander 2 HSE Discovery 3 und ...
Страница 8: ...8 Einbau und Installation Autoradio OEM Modul SDMI25 DSP OEM Modul IN OUT IN OUT IN OUT IN OUT OEM Verstärker Standard Anwendungsfall Der SDMI25 ersetzt den OEM Verstärker SPDIF ...
Страница 9: ...n Fahrzeugtypen muss der Einbau nach einem ge sonderten Ablauf erfolgen Informationen dazu finden Sie auf Seite 11 1 SDMI25 Jumper auf gewünschtes Fahrzeug einstellen siehe Seite 7 2 OEM Verstärker bei ausgeschaltetem System aus dem MOST Bus ausbauen 3 MOST Stecker entriegeln und herausziehen Abb 2 1 Abb 3 1 ...
Страница 10: ...otodio de im MOST Connector des SDMI25 entfernt werden Siehe rote Markierung in Abbildung 4 1 5 MOST Stecker in den SDMI25 einstecken 6 Signalprozessor oder DSP Verstärker an Optical Out anschließen 7 Remote Ausgang mit dem Remote Eingang des DSP Produkts ver binden sowie die Stromversorgung an den SDMI25 anschließen 8 System einschalten Entfernen IN OUT Abb 4 1 Abb 4 2 Abb 5 1 Einbau und Installa...
Страница 11: ...ie folgt vor 1 Alle drei Jumper vom SDMI25 entfernen siehe Seite 4 Punkt 4 2 SDMI25 bei ausgeschaltetem System in den MOST Bus einbauen siehe Seite 10 Punkt 4 5 und 7 WICHTIG Der OEM Verstärker muss gleichzeitig verbaut sein Hierzu wird ein optionales MOST Lichtleiter Y Kabel benötigt siehe nachfolgende Abbildung Autoradio OEM Modul SDMI25 OEM Modul IN OUT IN OUT IN OUT IN OUT OEM Verstärker IN OU...
Страница 12: ...e fahren ist 6 Die konfigurierten Signalton Einstellungen sind nun fest im Gerät gespeichert Beim nächsten Einschalten haben der Hochton und Bassregler wieder ihre normale Funktion Hinweis Um Signalton Lautstärke erneut einzustellen müssen alle Schritte wiederholt werden Besondere Einbauhinweise 3 System einschalten Während des Systemstarts wird die Seriennum mer des OEM Verstärkers automatisch in...
Страница 13: ... art technology We wish you many hours of enjoyment with your new HELIX MOST converter Yours AUDIOTEC FISCHER Team Congratulations Warranty Disclaimer The limited warranty comply with legal regulations Failures or damages caused by overload or improper use are not covered by the warranty Please return the defective product only with a valid proof of purchase and a detailed malfunction description ...
Страница 14: ...em of the vehicle Install your SDMI25 in a dry location and ensure that it is not appreciably warmed up by other components close to it Do not mount the device near to electronic controls of the vehicle For safety reasons the SDMI25 must be professionally installed There fore the device should be secured to a solid mounting surface using proper mounting hardware Before mounting carefully examine t...
Страница 15: ...ote output must be used to switch on external components 2 MOST Connector For connecting the MOST fibre optic cable of the vehicle Connectors and control units 1 3 4 2 3 Optical Out Optical digital stereo signal output in SPDIF format 4 Jumper For vehicle specific configuration of the SDMI25 ...
Страница 16: ...he vehicle chassis i e an area which has been cleaned of all paint residues REM OUT The remote output is used for turning on off a signal proces sor DSP or amplifier with DSP that is connected to the Optical Out of the SDMI25 Connect this remote output to the remote input of your DSP product This is essential to avoid any interfering signals Attention Solely use the pluggable screw terminal which ...
Страница 17: ...round sound formats such as Dolby or DTS are not supported 4 Jumper These jumpers must be used to configure the SDMI25 to the individual car model Therefore plug the jumpers to the appropriate positions An overview of the jumper configurations can be found on page 18 Input 1 x MOST25 Output 1 x Optical SPDIF 48 kHz 24 Bit Frequency response 10 22 000 Hz Operating voltage 9 6 18 Volts 5 sec down to...
Страница 18: ...Jumper Info MMI 2G MMI 3G MMI 3G Car make Jumper Info MMI 3G NTG2 5 NTG4 NTG4 5 Mercedes NTG1 without AGW NTG2 Lamborghini VW VW Touareg Porsche till 2008 PCM2 0 PCM2 1 from 2008 PCM3 0 S60 V60 Volvo XC60 Premium S40 V50 XC90 XC70 from 2011 XC70 S80 till 2012 S60 V60 XC60 BMW System Sound Adjustment E65 E66 E F G series E65 E66 Range Rover Sport from 2012 Land Rover Freelander 2 Freelander 2 HSE D...
Страница 19: ...19 Installation Head unit OEM module SDMI25 DSP OEM module IN OUT IN OUT IN OUT IN OUT OEM amplifier Default application The SDMI25 replaces the OEM amplifier ...
Страница 20: ...allation must be carried out according to a special procedure Further information can be found on page 23 1 Adjust the SDMI25 jumpers to the appropriate car model see page 18 2 Remove the OEM amplifier from the MOST bus when the system is switched off 3 Unlock and unplug the MOST connector Fig 2 1 Fig 3 1 Installation ...
Страница 21: ...ode in the SDMI25 MOST Connector must be removed before the first installation see red marking in figure 4 1 5 Plug the MOST connector into the SDMI25 6 Connect a signal processor or DSP amplifier to the Optical Out of the SDMI25 7 Connect the remote output to the remote input of the DSP product and the SDMI25 to the power supply 8 Switch on the system Entfernen IN OUT Fig 4 1 Fig 4 2 Fig 5 1 ...
Страница 22: ...ove all three jumpers from the SDMI25 see page 15 item 4 2 Install SDMI25 in the MOST bus when the system is switched off see page 21 point 4 5 and 7 IMPORTANT The OEM amplifier must be installed at the same time For this purpose an optional MOST fibre optic Y cable is required for installation see the following picture Head unit OEM module SDMI25 OEM module IN OUT IN OUT IN OUT IN OUT OEM amplifi...
Страница 23: ... MOST bus is shut down 6 The system sound configuration is now permanently saved in the de vice The functionality of the bass and treble controls will be restored with the next boot up Please note To adjust the system sounds again please repeat all steps starting from 1 3 Switch on the system During system start up the serial number of the OEM amplifier is automatically copied into the memory of t...
Страница 24: ...Audiotec Fischer GmbH Hünegräben 26 57392 Schmallenberg Germany Tel 49 2972 9788 0 Fax 49 2972 9788 88 E mail helix audiotec fischer com Internet www audiotec fischer com ...