background image

OWNER’S MANUAL

S3D60 Soundbar

with 

AudioSource®

13970 SW 72nd Ave. 

Portland, OR 97223

877.715.5439

www.audiosource.net

S3D60 Owner’s Manual 8100.3D60A

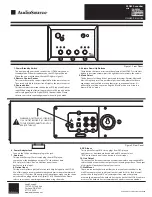
1. Power/Standby Switch

    The front panel power switch switches the S3D60 between on or
    standby mode. When in standby mode, the LED light will be red.
    When the unit is switched on, the red LED light will go off.

2. Remote Control Sensor

    This sensor detects the controls signaled from the remote control. 
    Take care not to block its direct line of sight to the remote control.

3. Source button

    This button selects between the Aux Input, RCA Input and Optical
    Input. When using the Optical Input, make sure the source unit the
    cable is plugged into is in Digital PCM (2 Channel) Mode. Please
    refer to your source’s operating manual when using this mode.

4. Volume Down/Up Buttons

    These buttons decrease or increase the volume of the S3D60. Press the left
    button to decrease volume; press the right button to increase the volume. 

5. Mode Select

    This button cycles through the 3 preset audio settings: Normal, Movie and
    Music. Using the presets are a matter of personal taste; please feel free to
    experiment until you find a setting that suites your personal tastes. It is 
    perfectly fine to listen to music using the “Movie” mode or to listen to a 
    movie in “Music” mode.  

Figure 1. Front Panel

Figure 2. Rear Panel

6. Power Adapter Jack

    Connect the 26V power adapter plug in this jack.

7. Aux Input

    This input will accept 3.5mm stereo plugs from MP3 players, 
    computers or the headphone output of TV’s that do not have 
    RCA style jacks. Select “Aux” on the front panel Source
    button to use this input.
    

8. Optical Input

    This input uses a fiber optic cable to transmit a digital signal to the S3D60.
    Use of this input is recommended for advanced users who are familiar with 
    the source’s OSD system. When using the Optical input, make sure the source
    unit the cable is plugged into is in Digital PCM (2 Channel) Mode. Please 
    refer to your source’s operating manual when using this mode.

9. RCA Input

    This input will accept RCA stereo plugs from DVD players, 
    cable boxes or any standard device with an RCA output. Select
    “RCA” on the front panel Source button to use this input.

10. Line Output

    This output can be connected to an external subwoofer using standard RCA
    cables to add even more bass output to your listening experience. The output 
    of this jack will track the volume of your source.

11. Wall Mount

    These convenient keyhole slots allow you to mount your soundbar to the 
    wall. Please ensure you use a drywall anchor rated for 20lbs. Each drywall
    anchor should be placed 16” on center apart from each other; please
    measure the distance of the keyhole slots on the back of the S3D60 to ensure
    accuracy. The keyhole slots accommodate #9 woodscrews or equivalent.

3

5

4

1

2

6

7

8

9

10

WARNING: DON’T PLUG AC CORD INTO
115V OUTLET BEFORE IT IS CONNECTED
TO THE POWER CONNECTOR ON THE 
REAR OF THE UNIT.   

11

AUX IN

RCA IN

LINE OUT

OPTICAL

MODE

SOURCE

Содержание S3D60

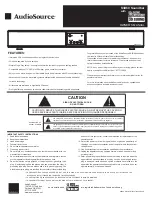
Страница 1: ...ERVICING TO QUALIFIED PERSONNEL IMPORTANT SAFETY INSTRUCTIONS 1 Read these instructions 2 Keep these instructions 3 Heed all warnings 4 Follow all instructions 5 Do not use this apparatus near water 6 Clean only with dry cloth 7 Do not block any ventilation openings Install in accordance with the manufacturer s instructions 8 Do not install near heat sources such as radiators heat registers stoves...

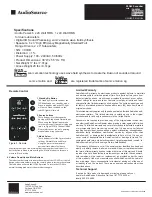
Страница 2: ...power adapter plug in this jack 7 Aux Input This input will accept 3 5mm stereo plugs from MP3 players computers or the headphone output of TV s that do not have RCA style jacks Select Aux on the front panel Source button to use this input 8 Optical Input This input uses a fiber optic cable to transmit a digital signal to the S3D60 Use of this input is recommended for advanced users who are famili...

Страница 3: ... mishandling misapplication alteration faulty installation modification service by anyone other than AudioSource or damage that is attributable to Acts of God It does not cover costs of transportation to AudioSource or damage in transit The customer should return his defective product freight prepaid and insured to AudioSource only after receiving a Return Authorization This warranty will become vo...

Страница 4: ...us adressez en cas de réparations qu à un personnel qualifié Des réparations sont requises lorsque l appareil a été endommagé de quelque manière que ce soit tel que lorsqu un cordon d alimentation ou une fiche est endommagé lorsqu un liquide a été versé ou des objets sont tombés à l intérieur de l appareil que l appareil a été exposé à la pluie ou à l humidité ne fonctionne plus normalement ou est...

Страница 5: ...ous utilisez ce mode 9 Entrée RCA Cette entrée acceptera les prises stéréo RCA des lecteurs DVD des boîtes de connexion ou de tout appareil standard ayant une sortie RCA Sélectionnez RCA sur le bouton Source du panneau avant pour utiliser cette sortie 10 Sortie haut niveau Cette sortie peut être connectée à un caisson de basse externe en utilisant des câbles RCA standards pour ajouter davantage de...

Страница 6: ...Desenchufe el aparato durante tormentas eléctricas o cuando no sea usado por largos períodos de tiempo 13 Refiera todo el servicio técnico al personal calificado Se requiere servicio técnico cuando el aparato ha sido dañado de alguna forma como cuando el cable de alimentación o el enchufe es dañado o cuando se han derramado líquidos u objetos han entrado en el aparato o cuando ha sido expuesto a l...

Страница 7: ...a los modos de la SD360 entre encendido y espera Cuando está encendido la luz LED es de color azul cuando está en espera la luz LED es de color rojo 2 Sensor de control remoto Este sensor detecta los controles que indican las señales del control remoto Procure no bloquear su línea de visión directa con el control remoto 3 Botón de fuente Con este botón se seleccione entre entrada auxiliar entrada ...

Страница 8: ...tos botones aumentan o reducen el volumen de la S3D60 Presione el botón derecho para bajar el volumen presione el botón central para subir el volumen El botón izquierdo calla a la S3D60 si se presiona Para que la S3D60 vuelva al modo de sonido normal presione otra vez el botón de silencio Especificaciones Potencia de audio 6 x 20 Watt RMS 1 x 40 Watt RMS para los amplificadores de bajos Altavoces ...

Отзывы: