background image

            WD752-BD-N 

150Mbps Wireless Lite N USB Adapter 


- 11 -


Edit a profile 


Import a profile 


Export a profile 


Add a WPS profile 


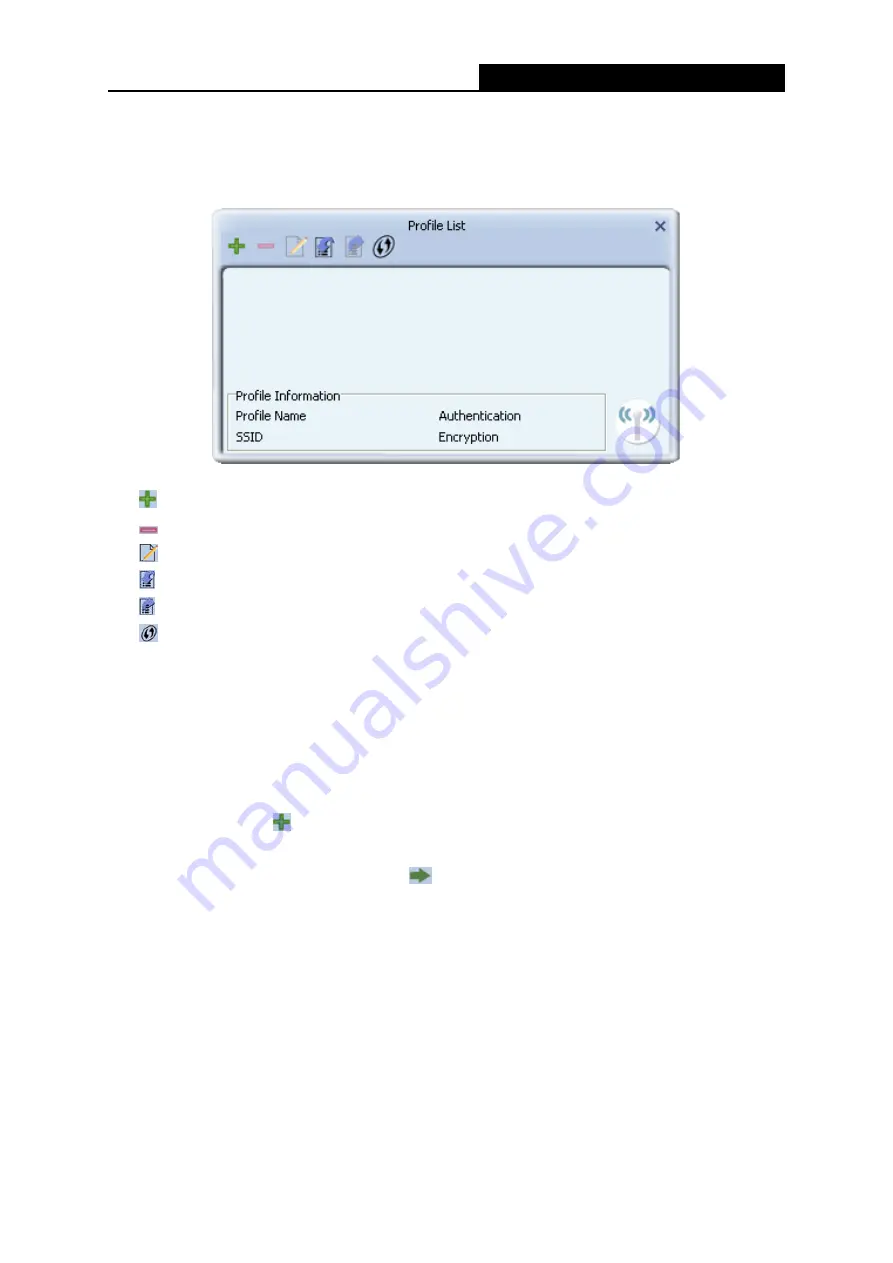
Figure 3-3 Profile List 


-

 Click to add a new profile. 


-

 Deletes an existing profile. 


-

 Click to edit an existing profile. 


-

 Imports an existing profile. 


-

 Exports an existing profile. 


Add a WPS profile 


Profile Name -

 Name of profile, preset to PROF* (* indicate 1, 2, 3...). 


SSID -

 The access point or Ad-hoc name. 


Authentication - 

Indicates the authentication mode used. 


Encryption -

 Indicates the encryption type used. 

3.1.2.1.  Add a profile 

1.  Click the 

Add

 icon 

  on the Profile List screen (Figure 3-3), the 

Profile

 configuration screen 

will appear as shown in Figure 3-4. Enter the 

Profile Name

 and choose the 

SSID

 from the 

pull-down list, then click the 

Next

 icon 

  to continue. 

Содержание WD752-BD-N

Страница 1: ...WD752 BD N 150Mbps Wireless Lite N USB Adapter ...

Страница 2: ...connected Consult the dealer or an experienced radio TV technician for help This device complies with part 15 of the FCC Rules Operation is subject to the following two conditions 1 This device may not cause harmful interference 2 This device must accept any interference received including interference that may cause undesired operation Any changes or modifications not expressly approved by the pa...

Страница 3: ...r outdoor use and public service France Outdoor use limited to 10 mW e i r p within the band 2454 2483 5 MHz Military Radiolocation use Refarming of the 2 4 GHz band has been ongoing in recent years to allow current relaxed regulation Full implementation planned 2012 Italy If used outside of own premises general authorization is required Luxembourg None General authorization required for network a...

Страница 4: ...sse B est conforme àla norme NMB 003 du Canada This device complies with RSS 210 of Industry Canada This Class B device meets all the requirements of the Canadian interference causing equipment regulations Cet appareil numérique de la Classe B respecte toutes les exigences du Règlement sur le matériel brouilleur du Canada ...

Страница 5: ... the driver software from your PC 8 Chapter 3 Configuration 9 3 1 Configuration of Utility 9 3 1 1 Site Survey 10 3 1 2 Profile 10 3 1 3 Link Information 22 3 1 4 Advanced 24 3 1 5 About 25 3 1 6 An example for application 25 3 2 Configure with Windows XP Wireless Zero Configuration 26 Chapter 4 AP Mode 28 4 1 Config AP 29 4 2 Advanced 30 4 3 Access Control List 31 4 4 Associate List 33 4 5 About ...

Страница 6: ...BD N Wireless Adapter One USB extension cable Quick Installation Guide One Resource CD for WD752 BD N Wireless Adapter including Drivers and Utility User Guide Other Helpful Information Note Make sure that the package contains the above items If any of the listed items are damaged or missing please contact with your distributor ...

Страница 7: ...rmation from being exposed The adapter is easy to install and manage The WD752 BD N supports WPS function which can help you create a wireless connection immediately Quick Setup Wizard is supported and detailed instructions are provided step by step in this user guide Featuring high performance transmission rates simple installation and adaptability as well as strong security the WD752 BD N Wirele...

Страница 8: ...ion 2 2 1 Overview The Adapter s Setup Wizard will guide you through the installation of the Utility and drivers Before you install the software please connect the USB adapter with your computer by USB cable After that you will be prompted Found New Hardware Wizard click the Cancel button and run the Setup Wizard program on the CD ROM Note The Setup steps for Windows XP Vista 7 are very similar so...

Страница 9: ...ite N USB Adapter 4 Figure 2 1 Start the Installation 2 You ll see the screen as below You can choose which to be installed and click Next Figure 2 2 Setup Type 3 In the following screen select the configuration tool and click Next ...

Страница 10: ...ireless N Client Utility please select the Wireless Configuration Tool 2 If you only want to use the Microsoft Zero Configuration Tool to configure the wireless connection please select Microsoft Zero Configuration Tool 4 Choose the destination location and click Next Figure 2 4 Choose Destination Location ...

Страница 11: ...tall the Program 6 The following screen for installing will appear Figure 2 6 Setup Status Note While files are copying a warning box about Windows Logo testing shown in Figure 2 7 may pop up please click Continue Anyway to continue the installation for our drivers have been tested thoroughly and are able to work with the operating system ...

Страница 12: ...7 After the files have been successfully copied the screen in Figure 2 8 will appear Click the Finish button to finish the installation and reboot the system Figure 2 8 InstallShield Wizard Complete After installing the driver successfully you should see an icon or in your system tray ...

Страница 13: ...ninstall the utility software from your PC 2 3 2 Uninstall the driver software from your PC 1 On the Windows taskbar click the Start button and then click Control Panel 2 Click the System icon click on the Hardware tab in the System window 3 Click on the Device Manager button double click Network adapters and then right click Wireless N Client Adapter Figure 2 9 Device Manager 4 Click Uninstall sh...

Страница 14: ...you can run the utility by clicking Start All programs Wireless RL52 Wireless N Client Utility If the icon still does not appear the driver or utility may be installed incorrectly or the adapter is unplugged please try again Icon means the connection has been established Icon means there is no connection Right click the icon and choose Launch Config Utility the configuration screen of the utility ...

Страница 15: ...scan icon to refresh the list at any time Add to Profile Choose an SSID and click the Add to Profile icon to add the network to the profile Connect Choose an SSID and click the Connect icon to connect to an available network without adding it to the profile 3 1 2 Profile Click the icon on the screen of the Utility and the Profile List screen will appear as Figure 3 3 The Profile List keeps a recor...

Страница 16: ...ng profile Add a WPS profile Profile Name Name of profile preset to PROF indicate 1 2 3 SSID The access point or Ad hoc name Authentication Indicates the authentication mode used Encryption Indicates the encryption type used 3 1 2 1 Add a profile 1 Click the Add icon on the Profile List screen Figure 3 3 the Profile configuration screen will appear as shown in Figure 3 4 Enter the Profile Name and...

Страница 17: ... Ad Hoc Directly connecting to another computer for peer to peer communication using wireless network adapters on each computer such as two or more WD752 BD N wireless adapters Note 1 An Infrastructure network contains an Access Point or wireless router All the wireless devices or clients will connect to the wireless router or access point 2 An Ad Hoc network contains only clients such as laptops ...

Страница 18: ...only one option WEP When you select WPA WPA PSK or WPA2 PSK as Authentication there are two options TKIP and AES When you select WPA2 as Authentication four options are available TKIP AES TKIP MFP and AES MFP 3 In the screen that follows enter the key of the AP in the empty field Here takes Key 1234567890 for example If the wireless network you are trying to connect is security enabled you must en...

Страница 19: ...old If you are not sure please leave it default here Use Fragment Threshold This value is the maximum size determining whether packets will be fragmented Setting the Fragment Threshold too low may result in poor network performance because of excessive packages You are recommended to leave it default if you are not sure about it 6 Click the Active icon in the screen below to connect to the chosen ...

Страница 20: ...lick the Delete icon The profile will be removed from the list Figure 3 10 Delete a Profile 3 1 2 3 Edit a profile Highlight the desired profile name on Profile List and click the Edit icon the Profile configuration screen will appear as shown in Figure 3 11 You can make some changes of the profile for instance you can change the Profile Name to name it like My Network ...

Страница 21: ... the profile is located 3 Highlight the profile name 4 Click Open the imported profile will then appear in the Profile List Figure 3 12 Import a Profile 3 1 2 5 Export a profile 1 From the Profile List screen shown in Figure 3 9 highlight the profile to be exported 2 Click Export icon the Export Profile window will then appear below 3 Browse the directory to export the profile to 4 Click Save The ...

Страница 22: ...ofile List If the wireless card supports WPS Wi Fi Protected Setup or QSS Quick Secure Setup you can establish a wireless connection between wireless card and router using either Push Button Configuration PBC method or PIN method For the configuration of WPS here takes the Wireless Router of our company for example Note To build a successful connection by WPS you should also do the corresponding c...

Страница 23: ...ter to the Access Point by Push Button Configuration PBC method Step 1 Press the WPS button on your Access Point device Figure 3 15 Press the WPS Button Step 2 Click the Add WPS Profile icon on the screen as Figure 3 14 Step 3 Select Push Button Configuration PBC on the screen below Figure 3 16 Push Button Configuration Step 4 Click Start PBC Figure 3 17 Start PBC ...

Страница 24: ...igure 3 19 II PIN Method If your Access Point supports Wi Fi Protected Setup and the PIN method you can add the adapter to the network by the following two ways 1 Enter the PIN into my Access Point Step 1 Click the Add WPS Profile icon on the screen as Figure 3 14 Step 2 Tick PIN numeric code and then select the desired SSID from the WPS AP List take Network for example on the screen below ...

Страница 25: ...the PIN code of the adapter here takes 51349417 in the screen for example into the configuration utility of the AP For the detailed instructions of the AP configuration please refer to the User Guide of the AP Figure 3 21 Enrollee Mode Step 4 Click Start PIN on the following screen Figure 3 22 Start PIN Step 5 When Figure 3 19 appears the configuration is complete ...

Страница 26: ...ake Network for example on the screen below Figure 3 23 Step 3 Choose the Config Mode as Registrar and enter the PIN of AP here takes 97056270 for example into the field beside the Pin Code as Figure 3 24 shows For the detailed instructions of the AP configuration please refer to the User Guide of the AP And then click Next icon to continue Figure 3 24 Registrar Mode Step 4 Click Start PIN on the ...

Страница 27: ... 26 Link Status The following table describes the items found on the Link Status screen Status Current connection status If no connection it will show Disconnected Otherwise the SSID and BSSID will show here Extra Info Here displays the link status in use Authentication Shows the authentication mode in use Encrtption The encryption type in use is displayed here Network Type The type of network and...

Страница 28: ...transmit and receive throughput in unit of Mbps When clicking the Statistics icon you will see the following screens respectively displaying the receiving and transmitting statistical information Click the Reset Counter icon to reset all the counters to zero Figure 3 28 Transmit Statistics Transmitted Successfully Frames successfully sent Retransmitted Successfully Successfully retransmitted frame...

Страница 29: ...of Resource The number of frames dropped due to a resource issue Duplicate Frames Received The number of duplicate frames received 3 1 4 Advanced Click the Advanced icon of the Utility and then you can choose the wireless mode on the following screen Figure 3 30 Advanced Wireless Mode Specifies 2 4 GHz 150 Mbps 2 4 GHz 54 Mbps or 2 4 GHz 11 Mbps operation in an access point network The Wireless ad...

Страница 30: ...s Utility Date The creation date of this utility Driver Date The creation date of the wireless network adapter driver SDK Date The creation date of the SDK Firmware Version The version of the adapter firmware EEPROM Version The version of this EEPROM MAC Address The MAC address of the wireless network adapter Note For more help information you can go to website of our company 3 1 6 An example for ...

Страница 31: ...ty will establish a connection with this AP by configured profile 3 2 Configure with Windows XP Wireless Zero Configuration 1 Right click the icon on the bottom of the desktop first and you will see Figure 3 32 Click the Use Zero Configuration as Configuration Utility option to enable Wireless Zero Configuration function Figure 3 32 Use Zero Configuration as Configuration utility 2 After that doub...

Страница 32: ...WD752 BD N 150Mbps Wireless Lite N USB Adapter 27 Figure 3 34 Enter Network Key 4 If the connection is finished you will see the screen as Figure 3 35 shows Figure 3 35 Connected ...

Страница 33: ...his function WD752 BD N can serve as wireless router based on the selected card connecting to the Internet which will make the APs of the LAN share the Internet Figure 4 2 The configuration utility screen will then appear as shown in the figure below By clicking the corresponding icon you can configure the AP make some advanced settings and view the AP s status The tools section shown in the follo...

Страница 34: ...ollowing screen will pop up Click Next icon to continue Figure 4 4 Config AP SSID Enter the SSID of your soft AP for example you can name it My Network instead of the default name SoftAP 58 Step 2 Here you can select country region and set the AP s channel Figure 4 5 Channel Select the channel from the drop down list This field determines which operating frequency will be used ...

Страница 35: ...ly by entering the corresponding key can other computers establish a successful connection with your AP Figure 4 7 4 2 Advanced Click the Advanced icon the following screen will appear Here you can make some advanced settings and click Apply to make these settings take effect Figure 4 8 Beacon Interval ms Enter a value between 20 1000 milliseconds for Beacon Interval here The beacons are the packe...

Страница 36: ...allowed to connect to your AP in the empty field beside MAC Address and then click to add it to the list shown in Figure 4 10 Highlight an existing Mac address in the list and click to remove it from the list as shown in Figure 4 11 When clicking you will clear all the Mac addresses in the Access Control List as Figure 4 12 Figure 4 9 Access Control Function Access Policy This field allows you to ...

Страница 37: ...WD752 BD N 150Mbps Wireless Lite N USB Adapter 32 Figure 4 10 Add an Mac Address to the List Figure 4 11 Remove an existing Mac Address from the List ...

Страница 38: ...Figure 4 12 Clear All MAC Addresses 4 4 Associate List Figure 4 13 shows the link status page It displays detailed station information of current connection Figure 4 13 Mac Table Function MAC Address The station s Mac address of the current connection ...

Страница 39: ...rent connection Power Saving Mode Support Power Saving Mode on the currently connected station Status The link status of the current connection 4 5 About The About page displays the wireless card and driver version information as shown in Figure 4 14 Figure 4 14 About Page ...

Страница 40: ...the WD752 BD N Adapter driver should be properly installed Please operate as follows Step 1 Connect the website of X LINK http www teamxlink co uk to register and download the latest software of X LINK Kai Step 2 Install the X LINK Kai software click Start All programs XLink Kai Configure Kai then set as Figure 5 1 Figure 5 1 Step 3 After completing the settings please click Start All programs XLi...

Страница 41: ...eless N Client Adapter and select Properties Then set the value of PSP Xlink Mode as Enable following the red marked instruction in the figure Figure 5 2 Step 6 Click Start Control Panel Network Figure 5 3 Step 7 Right click Wireless Network Connection icon and select Properties In the following prompt page highlight Internet Protocol TCP IP and click Properties ...

Страница 42: ...igure 5 5 Note Please set the IP address in different network segment with the other network card to avoid conflict Step 9 Launch RL52 Wireless N Client Utility then highlight the Network Name SSID beginning with PSP in the Network page and click Connect Step 10 Check whether your PSP device is detected in the Diagnostics mode of Kai as Figure 5 6 shown Click the icon first and then click the fold...

Страница 43: ...D N 150Mbps Wireless Lite N USB Adapter 38 Figure 5 6 Step 11 Click the icon on the right top corner to enter the Arena Mode highlight the arena of your wanted game and then join or start a new game Figure 5 7 ...

Страница 44: ...s an Independent Basic Service Set IBSS or as peer to peer mode and is useful at a departmental scale or SOHO operation DSSS Direct Sequence Spread Spectrum DSSS generates a redundant bit pattern for all data transmitted This bit pattern is called a chip or chipping code Even if one or more bits in the chip are damaged during transmission statistical techniques embedded in the receiver can recover...

Страница 45: ...acter maximum alphanumeric key identifying a wireless local area network For the wireless devices in a network to communicate with each other all devices must be configured with the same SSID This is typically the configuration parameter for a wireless PC card It corresponds to the ESSID in the wireless Access Point and to the wireless network name WEP Wired Equivalent Privacy A data privacy mecha...

Страница 46: ...m 54M 68dBm 11M 85dBm Spread Spectrum Direct Sequence Spread Spectrum DSSS Wireless Radio Data Rate Up to 150Mbps Modulation 11n OFDM 11g OFDM 11b CCK DSSS Media Access Protocol CSMA CA with ACK Data Security WPA 64 128 bits WEP TKIP AES IEEE 802 1X authentication Physical Environmental Working Temperature 0 40 32 104 Storage Temperature 40 70 40 158 Humidity 10 90 RH Non condensing Only 2 412GHz ...

Отзывы: