background image

19

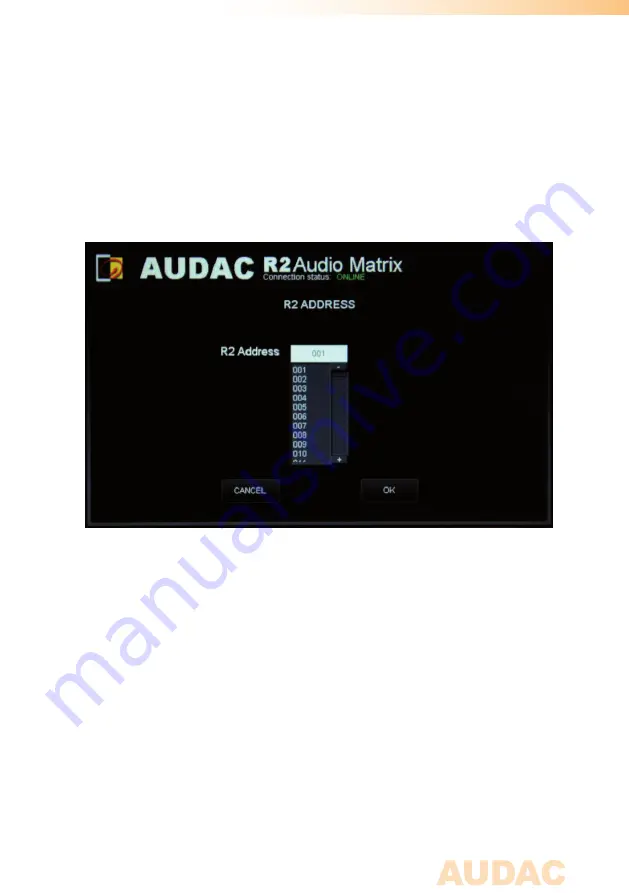
Settings >> Address settings

In this menu, the address of the R2 can be set. This address default is  “001” and is
selectable between “001” and “999”. 
When only one R2 is available, the default address can be left to its default value.
When two or more R2’s are cascaded through the fibre interconnection bus, they 
need to have a unique address. The first R2 starts with address “001”, and every 
subsequent R2 should be assigned an address with a higher value.

Click the “OK” button to confirm the address settings.

Содержание R2DIS

Страница 1: ...R2DIS User Manual www audac eu ...

Страница 2: ...2 ...

Страница 3: ...interface 5 Login screen 5 Main screen 7 Zone settings 10 Sound settings 11 Test signals 12 Settings screen 13 Digital input selection 14 Time settings 14 Display configuration 15 Address settings 19 Password settings 20 Factory settings 21 Notes 22 ...

Страница 4: ...ith the DSP processor This unit allows the user to operate the control functions of the matrix systems without any external equipment This can be useful when the system is installed in a technical room where no external control devices are within reach Touchscreen precautions Tap the touchscreen gently Never use force Don t use any sharp object to tap the touchscreen Don t use a pen but only use y...

Страница 5: ...5 User interface Login screen ...

Страница 6: ...with the user password you only get access to the basic functions of the main screen such as changing the volume and changing the routing for a particular output zone The factory default password for user access is user After pressing the text field a keyboard screen is displayed and you can enter the password After the password is entered press the OK button and you will be redirected to the main...

Страница 7: ...ted the mute button is Red If the zone is unmuted the mute button is Green The mute can be toggled from mute to unmuted by pressing it again Assign zone names This option is only available if logged in as ADMINISTRATOR For a better overview of all output zones every fader has a zone name The name of the zone can be changed by pressing and holding the name for 2 seconds After 2 seconds a keyboard s...

Страница 8: ...ilable if logged in as ADMINISTRATOR or USER The desired input signal for a zone can be selected by pressing the button below the zone name A dropdown list shows 8 audio input signals together with the options Off and Other If logged in as administrator the list can be changed in the Zone settings screen ...

Страница 9: ...ATOR By pressing this button you can save the settings To make sure the changed zone settings are still effective after shutdown and restart of the R2 the Save button on the main screen of the R2 need to be pressed At the same time the volume and routing settings will be saved Setup This option is only available if logged in as ADMINISTRATOR In the top right corner is a Setup button displayed Afte...

Страница 10: ...one is muted If S PDIF is selected the optical or coaxial input will be routed to the output zone The selection between the optical or coaxial input should be made in the Setup Menu under Digital Input If one of the 8 analog Cinch Inputs is selected the corresponding RCA connector input on the rear panel of the R2 is routed to the output zone If one of the 8 Wall Inputs is selected the correspondi...

Страница 11: ...requency can be set between 10Hz and 22kHz the crossover frequency is displayed on the right side of the slider scale Two band tone control On the right of the screen there are 2 sliders for tone control The leftmost fader indicated with Bass offers the possibility to adjust the level of the low frequencies The rightmost fader indicated with Treble offers the possibility to adjust the level of the...

Страница 12: ...ls can be patched to any output zone When one of the test signals is selected Other will appear in the Input Selection box on the main screen Select white noise to route white noise to the output zone Select pink noise to route pink noise to the output zone Select Sine Generator to route a sine wave to the output zone The frequency of the sine wave can be changed by the up and down arrows ...

Страница 13: ...dow the next settings can be changed Select the digital input source Change the time of the R2 Configure the LCD Set the address of the R2 amplifier Change the password of the R2 Restore the factory settings of the R2 If you want to change some settings just click on the corresponding icon All settings will be saved automatically and are still effective after shutdown and restart of the R2 ...

Страница 14: ...e selected The S PDIF input can be Coaxial implemented with an RCA connector Optical implemented with a Toslink connector Settings Time settings In this window the time and date of the R2 can be set This can be done by selecting the values from a dropdown list Press Set Clock to set time and date ...

Страница 15: ...f the backlight Auto Logoff When enabled the system logs off after some time of no activity The administrator has to log on again Push Logoff time to change the time Limited control When enabled there is no logon screen At start up the main screen is shown The user can only change volume and mute For other functions the password will be asked Keyboard Type 3 types of keyboard can be selected AZERT...

Страница 16: ...on the firmware of the display unit will be updated not the firmware of the R2 The software can be updated by placing a USB memory stick in the USB port at the rear side of the display unit and holding the Update software button for 3 seconds After 3 seconds an update screen appears and the system starts updating When finished updating the display unit restarts and a login screen appears ...

Страница 17: ...to be touched three times in a row to calibrate the touchscreen correctly To make an accurate calibration it should be touched exactly at the center position of the cross ATTENTION Don t use any sharp object to tap the touchscreen Don t use a pen but only use your fingertips or stylus especially meant for use with touchscreens The use of sharp objects can cause permanent damage to the touchscreen ...

Страница 18: ...inserted to the USB port at the back side of the display unit this indicator should also be green The dimming of the backlight can be tested by moving the slider The touchscreen can be tested by making a drawing in the white field Use the Clear button to erase the field Use the Update software button to update the software of R2DIS Use the Calibration button to calibrate the touchscreen Use the BA...

Страница 19: ...only one R2 is available the default address can be left to its default value When two or more R2 s are cascaded through the fibre interconnection bus they need to have a unique address The first R2 starts with address 001 and every subsequent R2 should be assigned an address with a higher value Click the OK button to confirm the address settings ...

Страница 20: ...or the User password can be changed For changing the password enter the old password in the provided field and enter the new password twice in the provided fields After this all is completed push the OK button When the old password is correct and the new password filled in both fields match the old password will be changed into the new password The factory default password for Administrator is R2 ...

Страница 21: ...his button It will recall the ORIGINAL factory settings It does not recall the previously saved settings but it recalls the original factory setting and the previous made settings will be lost Click the OK button to reset the settings to factory default ...

Страница 22: ...22 Notes ...

Страница 23: ...23 Notes ...

Страница 24: ...24 Notes ...

Отзывы: