


VIA 82C694 ATX Mainboard
HARDWARE SETUP
3-1
3.
HARDWARE SETUP
Before you can start to install this mainboard, some hardware setting is required.
To configure the mainboard is a simple task, only a few jumpers, connectors,
cables and sockets need to be selected and configured. This section will show all
the connectors and jumpers on the mainboard.
IMPORTANT
There is always the standby voltage active on the mainboard.
Be sure to remove the power cable from the PC system
when installing CPU or any other components onto the mainboard
.
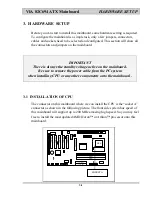
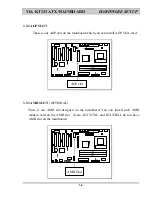
3.1
INSTALLATION OF CPU
The connector on this mainboard where we can install the CPU is the “socket A”
connector as shown in the following picture. The front side system bus speed of
this mainboard will support up to 200 MHz amazing high speed. So you may feel
free to install the most updated AMD Duron™ or Athlon™ processor onto this
mainboard.
USB
DIMM3
A
G
P S
L
O
T
CPU
CN9 IDE 1
CN10 IDE2
DIMM2
DIMM1
1
2
3
CN8 FDC
4
A
B
C
P
C
I S
L
O
T
A
M
R
JP8
PC
I S
L
O
T
P
C
I S
L
O
T
P
C
I S
L
O
T
PC
I S
L
O
T
SOCKET A


