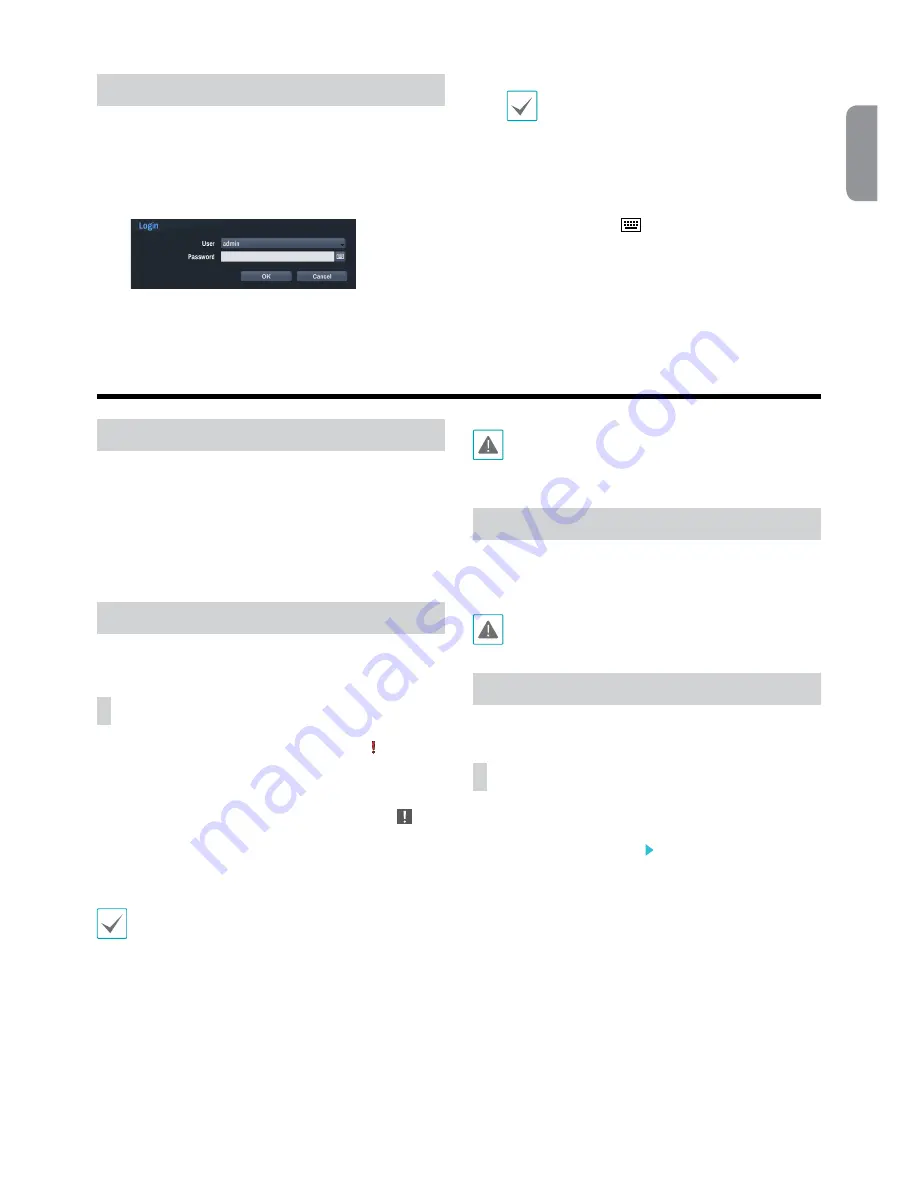
AtVideo DR-6232H Скачать руководство пользователя страница 9

9

English

Login

Configuring the NVR’s settings and accessing its searching 
and other functions require an authorized user login.

While in Live mode, right-click on the mouse and 
select Login and either press the SETUP button on 
the remote control.

Select a user, enter the password, and then select OK.

•  There is no default password for the admin 

account. Select admin and then OK without 
entering a password to log in.

•  Leaving the admin account unassigned with 

a password poses a security risk. Please assign 
a password at your earliest convenience. A 
warning message will continue to be displayed 
until a password is assigned.

•  Click on the 

 button next to the password 

field using the mouse. This will bring up a 
virtual keyboard you can use to assign a 
password.

To log out, right-click on the mouse and select 

Logout.


Basic Feature

Live Mode

Once Camera Registration is complete, the system will enter 
Live Mode. 
Press the MENU button on the NVR’s front panel while in 
Live mode to bring up the Live menu on the right edge 
of the screen. Press MENU button once more to hide the 
menu. Use the Arrow buttons on the remote control to 
select the menu options.

Video Recording

Records the live video.
Refer to the Operation Manual for more information.

Panic Recording

Select Live or Search menu's Panic Recording   icon or 
press the Panic button on the front panel or the remote 
control to commence panic recording on all registered 
cameras.
To stop Panic Recording, select the Panic Recording   icon 
or press the Panic button again. If the Panic Recording 

Duration option under Record Setup > General has been 
configured, Panic Recording will automatically terminate 
after the specified duration of time has elapsed.

•  Panic Recording takes place irrespective of any 

recording schedule set up by the user.

•  Panic Recording video profile from Record Setup – 

General applies to all Panic Recording videos.

Panic Recording will not take place if recording mode 
is not set to Recycle and the HDD has reached 100% 
of its capacity.

Audio Recording

If the Record Audio option under Record Setup > General 
has been enabled, the camera will record audio along with 
video. 

Check your local laws and regulations on making 
audio recordings.

Video Recording Playback

You can play back video recordings by using a mouse or 
remote control.

All Channel Playback

Press the Menu button while in Live mode.

Select the Search Mode   icon and then select Time-

Lapse Search or Event Log Search

The selected search mode will be initiated.

Содержание DR-6232H

Страница 1: ...Hybrid Network Video Recorder Quick Guide ...

Страница 2: ... refer servicing to qualified service personnel under the following conditions A When the power supply cord or the plug has been damaged B If liquid is spilled or objects have fallen into the equipment C If the equipment has been exposed to rain or water D If the equipment does not operate normally by following the operating instructions adjust only those controls that are covered by the operating...

Страница 3: ...DVOIDTHEUSER SAUTHORITY TOOPERATETHEEQUIPMENT THISCLASSOFDIGITALAPPARATUSMEETSALLREQUIREMENTSOFTHECANADIANINTERFERENCECAUSINGEQUIPMENT REGULATIONS WEEE WasteElectrical ElectronicEquipment Correct Disposal of This Product Applicable in the European Union and other European countries with separate collection systems Thismarkingshownontheproductoritsliterature indicatesthatitshouldnotbedisposedwithot...

Страница 4: ...TA2 Cables Overview Front Panel 1 2 3 4 5 6 7 8 9 0 1 Camera Buttons 2 LEDs 3 Jog Dial Shuttle Ring 4 Enter Button 5 Arrow Buttons 6 Playback Control Buttons 7 PTZ Button 8 Alarm Button 9 Panic Recording Button 0 Freeze Button Bookmark Button Zoom Button Status Button Display Button Menu Button USB Ports For more details on USB ports and LEDs of the front panel refer to the operation manual Rear P...

Страница 5: ... Port Power In Port For more details on rear panel connections refer to the operation manual Connections on the Rear Panel Speaker VGA Monitor HDMI Monitor Network Camera Remote Monitoring Keyboard Sensor Alarm Power POS eSATA Storage Device Network Analog Camera Microphone ...

Страница 6: ...tons 4 Freeze Button 5 Alarm Button 6 Camera Buttons 7 Focus near far Button 8 Preset set view Button 9 Zoom in out Button 0 Menu Button PTZ Button Arrow Button Enter Button Zoom Button Panic Buttons Playback Buttons For more details on remote control buttons refer to the operation manual ...

Страница 7: ...d time settings will only be applied after clicking Next Record Method Setup Record Video Quality Setup Higher recording quality uses up more disk space Finish the Quick Setup Wizard Network Setup Wizard After exiting from Quick Wizard the network with Network Wizard will start automatically Start the Network Setup Wizard Internet Connection LAN Setup This test must be performed before proceeding ...

Страница 8: ...4 Name Indicates the camera s name 5 Status Identifies the camera s registration status registered or not registered Advanced Setup Video In IP Setup If the camera is networked but not scanned use this setup This setup allows you to change the network setting of the NVR s VIDEO IN port which is camera s network environment Check the camera s network setting first before you use this setup Make sur...

Страница 9: ...options Video Recording Records the live video Refer to the Operation Manual for more information Panic Recording Select Live or Search menu s Panic Recording icon or press the Panic button on the front panel or the remote control to commence panic recording on all registered cameras To stop Panic Recording select the Panic Recording icon or press the Panic button again If the Panic Recording Dura...

Страница 10: ...nter the following information in the address bar http IP Address Port Number NVR system s IP address and WebGuard port number configured under Network General Default Value 12088 Or http FEN server address FEN Name FEN Name NVR name configured on the FEN server Or http www dvronline net will be prompted to enter NVR s IP address or FEN name registered to the FEN server upon login Contact your net...

Страница 11: ...tallation window to proceed with the installation 3 When the installation window appears click Next 4 Select an installation path for the program and click Next 5 When the install confirmation window appears click Next NET Framework and Visual C Runtime Libraries will be installed automatically and it may take a few minutes If NET Framework and Visual C Runtime Libraries are already installed on t...

Страница 12: ...ocation Select a location for the subject device group When you select a device from the device List on the left it will be added to the Selected Device List on the right Click OK to register the device group 7 Make sure that the device has been added to the device group correctly Click Device Group on the Sites panel and click on next to Device Group When you click on a registered device group a ...

Страница 13: ... If the device is using an additional FEN server press Settings in the start up menu and enter the FEN server information Default site dvrnames net Default port number 10088 For more details contact your FEN server administrator Address Watch Enter the device name used to register the device to FEN If FEN feature is not enabled on the device deselect FEN checkbox and enter the device s IP address ...

Страница 14: ...or 0 3V NO threshold 5VDC Alarm Out 4 relay outputs NC NO 2A 125VAC 1A 30VDC Alarm Reset In 1 TTL terminal block Internal Buzzer 78dB at 10cm Network Connection 10Mbps 100Mbps 1Gbps Ethernet Audio In 16 lines RCA Audio Out 1 line Audio Out RCA Text In POS Interface ATM Interface Connector Video In Ethernet 1 port Composite 16 BNC Camera Power Out Composite 16 BNC Monitor Out HDMI 1 HDMI VGA 1 DB15...

Отзывы: