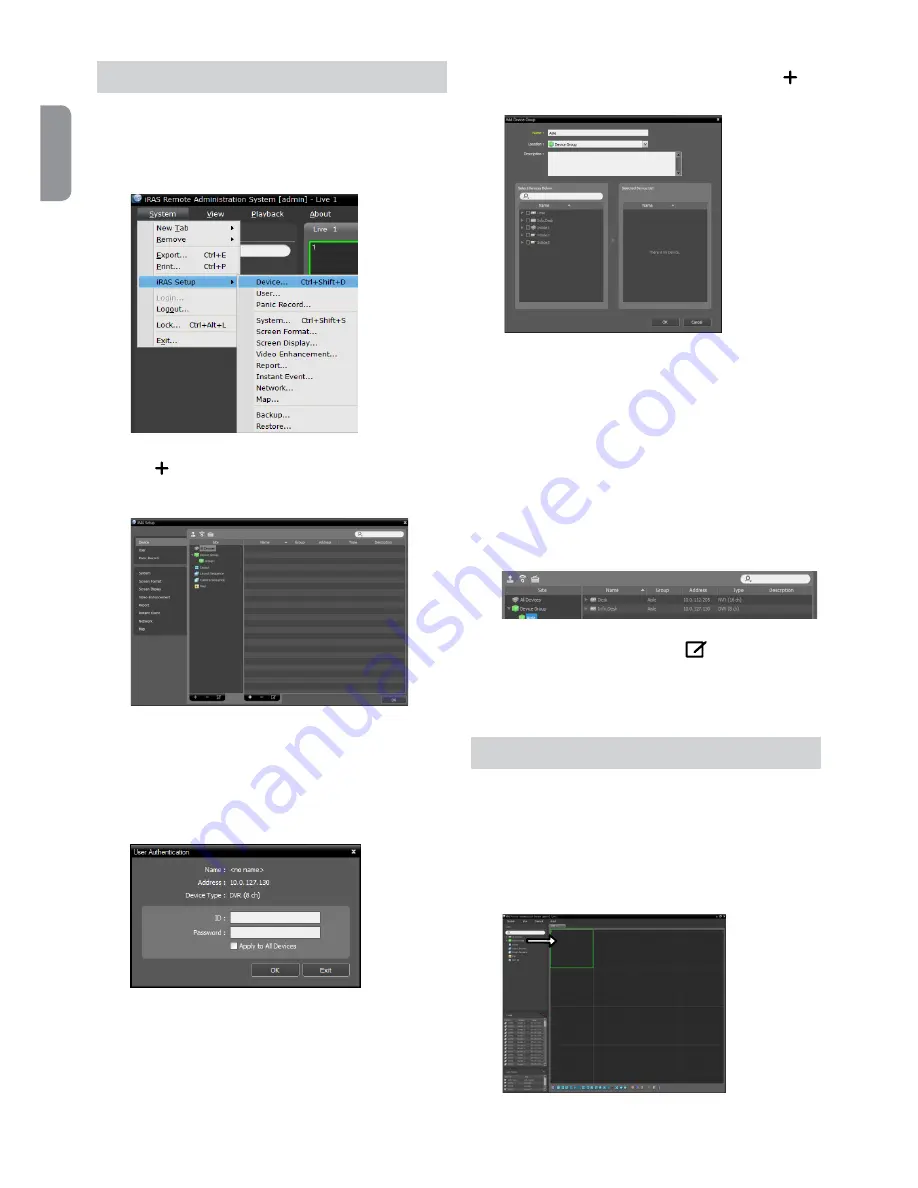
AtVideo DR-6232H Скачать руководство пользователя страница 12

12

English

Device Registration

To use the functions provided by iRAS, you must first 
register a device and add the device to a device group.

Select System > iRAS Setup > Device  in the menu at 
the top of the screen.

On the Site panel, click on All Devices, then click on 

the 

E

 button at the bottom of the Site List panel on 

the right. A Device Scan window will appear on the 

screen.

After selecting a scan mode, click on Start Scan button 

and the scan results will be displayed on the list. 

Click Add Devices at the bottom of the Device Scan 

window.

When user authentication window appears, enter the 

User ID and Password set up on each device, and then 

select OK for remote access.

Click Device Group on the Sites panel and click 

E

 at 

the bottom. Add Device Group window will appear.


Name: Enter a name for the device group.


Location: Select a location for the subject device 
group.

When you select a device from the device List on the 
left, it will be added to the Selected Device List on 
the right. Click OK to register the device group.

Make sure that the device has been added to the 

device group correctly. Click Device Group on the 

Sites panel and click on next to Device Group. When 

you click on a registered device group, a list of devices 

added the selected device group will be displayed on 

the right.

To modify a device group that has been registered, 
select a device group and click 

E

 on the bottom of 

the Sites panel. Modify Device Group window will 
appear. You can modify the selected device group 
from this window.

Live Video Mode

In the Site List, make sure that the device has been 
added to the device group.

In the panel tabs, click the Live tab. In the Site list, 

select a zone you wish to connect to. Then, drag & 

drop the selected site on the Live screen using your 

mouse. The live video of the selected site will be 

displayed on the screen. 

Содержание DR-6232H

Страница 1: ...Hybrid Network Video Recorder Quick Guide ...

Страница 2: ... refer servicing to qualified service personnel under the following conditions A When the power supply cord or the plug has been damaged B If liquid is spilled or objects have fallen into the equipment C If the equipment has been exposed to rain or water D If the equipment does not operate normally by following the operating instructions adjust only those controls that are covered by the operating...

Страница 3: ...DVOIDTHEUSER SAUTHORITY TOOPERATETHEEQUIPMENT THISCLASSOFDIGITALAPPARATUSMEETSALLREQUIREMENTSOFTHECANADIANINTERFERENCECAUSINGEQUIPMENT REGULATIONS WEEE WasteElectrical ElectronicEquipment Correct Disposal of This Product Applicable in the European Union and other European countries with separate collection systems Thismarkingshownontheproductoritsliterature indicatesthatitshouldnotbedisposedwithot...

Страница 4: ...TA2 Cables Overview Front Panel 1 2 3 4 5 6 7 8 9 0 1 Camera Buttons 2 LEDs 3 Jog Dial Shuttle Ring 4 Enter Button 5 Arrow Buttons 6 Playback Control Buttons 7 PTZ Button 8 Alarm Button 9 Panic Recording Button 0 Freeze Button Bookmark Button Zoom Button Status Button Display Button Menu Button USB Ports For more details on USB ports and LEDs of the front panel refer to the operation manual Rear P...

Страница 5: ... Port Power In Port For more details on rear panel connections refer to the operation manual Connections on the Rear Panel Speaker VGA Monitor HDMI Monitor Network Camera Remote Monitoring Keyboard Sensor Alarm Power POS eSATA Storage Device Network Analog Camera Microphone ...

Страница 6: ...tons 4 Freeze Button 5 Alarm Button 6 Camera Buttons 7 Focus near far Button 8 Preset set view Button 9 Zoom in out Button 0 Menu Button PTZ Button Arrow Button Enter Button Zoom Button Panic Buttons Playback Buttons For more details on remote control buttons refer to the operation manual ...

Страница 7: ...d time settings will only be applied after clicking Next Record Method Setup Record Video Quality Setup Higher recording quality uses up more disk space Finish the Quick Setup Wizard Network Setup Wizard After exiting from Quick Wizard the network with Network Wizard will start automatically Start the Network Setup Wizard Internet Connection LAN Setup This test must be performed before proceeding ...

Страница 8: ...4 Name Indicates the camera s name 5 Status Identifies the camera s registration status registered or not registered Advanced Setup Video In IP Setup If the camera is networked but not scanned use this setup This setup allows you to change the network setting of the NVR s VIDEO IN port which is camera s network environment Check the camera s network setting first before you use this setup Make sur...

Страница 9: ...options Video Recording Records the live video Refer to the Operation Manual for more information Panic Recording Select Live or Search menu s Panic Recording icon or press the Panic button on the front panel or the remote control to commence panic recording on all registered cameras To stop Panic Recording select the Panic Recording icon or press the Panic button again If the Panic Recording Dura...

Страница 10: ...nter the following information in the address bar http IP Address Port Number NVR system s IP address and WebGuard port number configured under Network General Default Value 12088 Or http FEN server address FEN Name FEN Name NVR name configured on the FEN server Or http www dvronline net will be prompted to enter NVR s IP address or FEN name registered to the FEN server upon login Contact your net...

Страница 11: ...tallation window to proceed with the installation 3 When the installation window appears click Next 4 Select an installation path for the program and click Next 5 When the install confirmation window appears click Next NET Framework and Visual C Runtime Libraries will be installed automatically and it may take a few minutes If NET Framework and Visual C Runtime Libraries are already installed on t...

Страница 12: ...ocation Select a location for the subject device group When you select a device from the device List on the left it will be added to the Selected Device List on the right Click OK to register the device group 7 Make sure that the device has been added to the device group correctly Click Device Group on the Sites panel and click on next to Device Group When you click on a registered device group a ...

Страница 13: ... If the device is using an additional FEN server press Settings in the start up menu and enter the FEN server information Default site dvrnames net Default port number 10088 For more details contact your FEN server administrator Address Watch Enter the device name used to register the device to FEN If FEN feature is not enabled on the device deselect FEN checkbox and enter the device s IP address ...

Страница 14: ...or 0 3V NO threshold 5VDC Alarm Out 4 relay outputs NC NO 2A 125VAC 1A 30VDC Alarm Reset In 1 TTL terminal block Internal Buzzer 78dB at 10cm Network Connection 10Mbps 100Mbps 1Gbps Ethernet Audio In 16 lines RCA Audio Out 1 line Audio Out RCA Text In POS Interface ATM Interface Connector Video In Ethernet 1 port Composite 16 BNC Camera Power Out Composite 16 BNC Monitor Out HDMI 1 HDMI VGA 1 DB15...

Отзывы: