Atop SE5002D-Fm Скачать руководство пользователя страница 85

Atop Serial Device Server 

SE5002D 

User Manual V. 1.1


Press any key to continue.   
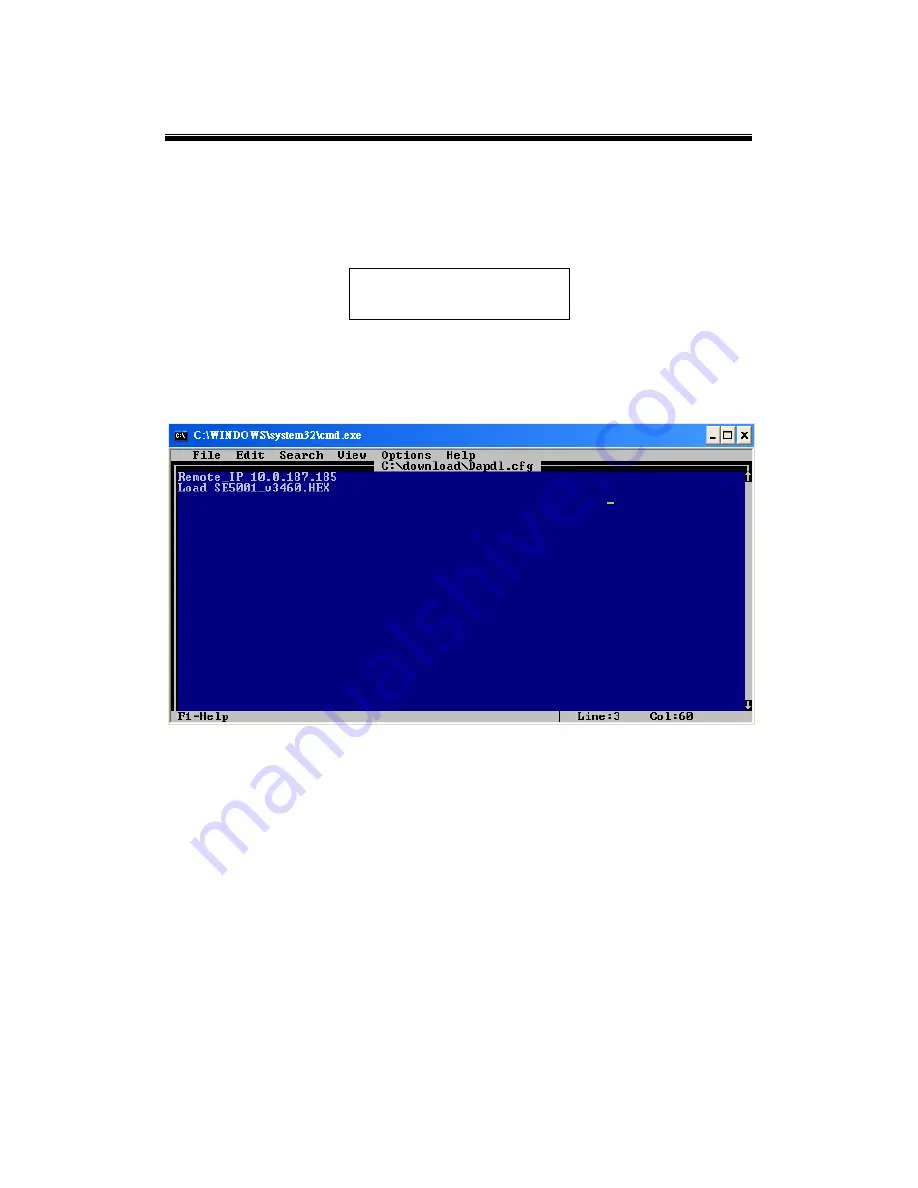
 

An editor will open 

dapdl.cfg

 automatically. Edit the content to match the SE5002D’s IP 

address and the new firmware file name; 

“dapl.cfg”

 has the following structure.   


Remote_IP 

10.0.50.100 

Load 

Firmware.hex 


The first line identifies the SE5002D’s IP address, the second line indentifies the firmware’s 

name (.hex) to be downloaded.   


Fig. 2


File → Save 

to save the file. 


File → Exit

 to exit the text editor. 


Enter the admin as the user ID and the password for SE5002D. If a password is not set, 

pres enter. The batch file will upgrade the system firmware. SE5002D will automatically 

restart after the new firmware is uploaded.   


Содержание SE5002D-Fm

Страница 1: ...SE5002D Serial Device Server User s Manual v 1 2 October 2017...

Страница 2: ...or registration of a utility model or design are reserved Disclaimer We have checked the contents of this manual for agreement with the hardware and software described Since deviations cannot be prec...

Страница 3: ...13 1 2 4 Tunneling Mode 14 2 Getting Started 15 2 1 Hardware Panel Layout 15 2 2 Pin Assignments 17 2 2 1 Serial Port 17 2 2 2 Ethernet port 18 2 2 3 RJ45 Pin Assignment 18 2 3 Buzzer 19 2 4 LED Indi...

Страница 4: ...3 2 12 Setting Packet Delimiter 34 3 2 13 Accept Control Command from COM port 36 3 2 14 Backup EEPROM to Flash 36 3 3 Configuration Using Web Browser 37 3 3 1 Login to the System 37 3 3 2 Networking...

Страница 5: ...58 3 7 1 COM Configuration 60 4 Using Virtual COM 62 4 1 Virtual COM Driver setup 62 4 1 1 System Requirements 62 4 1 2 Limitation 63 4 1 3 Installation 63 4 1 4 Uninstalling 63 4 2 Virtual COM 64 4 2...

Страница 6: ...ial IP with a Proxy Server 79 5 Diagnostics 80 Using Standard ping Command 80 Using Device Management Utility Configuration Utility 81 6 Specifications 82 Appendix 84 Upgrade System Firmware 84 Upgrad...

Страница 7: ...refer to the Glossary for technical terms and abbreviations if any Who Should Use This User Manual This manual is to be used by qualified network personnel or support technicians who are familiar wit...

Страница 8: ...interference in which case the user will be required to correct the interference at his own expense A shielded type power cord is required in order to meet FCC emission limits and also to prevent int...

Страница 9: ...ng or industrial automation areas SE5002D is used by field devices to directly connect to an Ethernet network The user can then use a network application or use Virtual COM software to simulate a virt...

Страница 10: ...al Manager Utility 1 Table 1 3 Optional Accessories Name Part Number Description WMK 454 Black 70100000000043G Black aluminum wall mount kit ADP DB9 F TB5 59906231G Female DB9 to Female 3 81 mm TB5 co...

Страница 11: ...figured as a TCP server in a TCP IP Network to listen for an incoming TCP client connection to a serial device After the connection is established between the serial device server and the host compute...

Страница 12: ...as a TCP client in TCP IP Network to establish a connection with a TCP server in the host computer After the connection is established data can be transmitted between a serial device and a host compu...

Страница 13: ...network protocol It does not guarantee the delivery of network datagrams SE5002D can be configured to transfer data using unicast or multicast UDP from the serial device to one or multiple host comput...

Страница 14: ...case that the serial device needs to communicate with each other without a host computer two SE5002D can be paired together pair connection to communicate over TCP or UDP transparently The serial dev...

Страница 15: ...Atop Serial Device Server SE5002D User Manual V 1 1 2 Getting Started 2 1 Hardware Panel Layout Fig 2 1 Fig 2 2...

Страница 16: ...Atop Serial Device Server SE5002D User Manual V 1 1 Fig 2 3...

Страница 17: ...Atop Serial Device Server SE5002D User Manual V 1 1 2 2 Pin Assignments 2 2 1 Serial Port Fig 2 4...

Страница 18: ...ition 568B Definition Pin 1 Green White Orange White Pin 2 Green Orange Pin 3 Orange White Green White Pin 4 Blue Blue Pin 5 Blue White Blue White Pin 6 Orange Green Pin 7 Brown White Brown White Pin...

Страница 19: ...Buzzer Beep twice Beep off Table 2 2 Message Description 1 sec Watchdog problem return service is required Memory problem return service is required 5 sec Startup OK but AP firmware is disabled 5 sec...

Страница 20: ...able 3 1 Property Default Value IP Address 10 0 50 100 Gateway 10 0 0 254 Subnet Mask 255 255 0 0 User Name admin Password default COM 1 9600 None 8 1 No flow control buffer disabled packet delimiter...

Страница 21: ...ility to change configuration settings of SE5002D by following the steps 3 2 1 Login to the System Open MS DOS command prompt window or any other telnet application Telnet to SE5002D using the command...

Страница 22: ...reen appears Fig 3 2 Fig 3 2 Note 1 If SE5002D does not receive any commands within 1 minute Telnet connection will terminate automatically 2 After 0 Exit is selected the console will ask the user to...

Страница 23: ...al V 1 1 Select 1 from Input choice and enter 0 5 to enter Overview Fig 3 3 Fig 3 3 This page gives one the general information of SE5002D including IP and MAC address SNMP information kernel and AP v...

Страница 24: ...2 Networking Select 2 from Input choice and enter 0 5 to enter Networking page as following Fig 3 4 Fig 3 4 Change network settings of the device including IP address subnet mask gateway IP address an...

Страница 25: ...the following screen appears Fig 3 5 Fig 3 5 3 2 4 COM1 Setup Select 4 from Input choice and enter 0 5 the following screen appears Fig 3 6 Fig 3 6 This page includes the option to configure differen...

Страница 26: ...002D User Manual V 1 1 3 2 5 Configure SE5002D as a TCP server Fig 3 7 Type 1 Link Mode from Input choice and enter 0 5 for COM1 Type 1 TCP Server in the Input choice 0 5 and enter Input local port in...

Страница 27: ...Input idle time in Please input idle time to send TCP alive packet x 10sec ex Input 2 to change the sending TCP keep alive packet period to 20 sec Note IP filtering function is disabled if setting FIL...

Страница 28: ...2 is selected the console will prompt for additional configurations Input idle time to disconnect in the Please input idle time to disconnect 0se 1 255 Input 0 to disable input 2 to disconnect TCP con...

Страница 29: ...ot guarantee packet delivery to the remote host The following figure Fig 3 9 shows how to setup UDP Fig 3 9 Type 3 in the Input choice 1 5 and enter Input SE5002D s local listening port in the Please...

Страница 30: ...002D User Manual V 1 1 3 2 8 Enable Disable Virtual COM Enable or disable Virtual COM on this page For more information on how to setup Virtual COM on different operating systems please refer to Chap...

Страница 31: ...nual V 1 1 3 2 9 Enable Disable Pair Connection Enable or disable Pair Connection on this page For more information on how to configure two serial device servers to work in pair connection please refe...

Страница 32: ...rt Setting Type 2 from Input choice and enter 0 5 of COM1 the following screen appears It is possible to give the COM port alias name set the baud rate and parity determine number of data bit and stop...

Страница 33: ...a TCP connection type 3 from Input choice and enter 0 5 for COM1 by default COM port serial buffer is enabled meaning that once a TCP connection is established old serial data received from serial de...

Страница 34: ...in the same Ethernet packet SE5002D provides two kinds of packet delimiter Timer and Character The default value for the timer is 2 ms 0 ms to disable this function This means that if SE5002D does not...

Страница 35: ...is character delimiter If the character delimiter is set to 0x0d this means SE5002D will send out all the serial data in buffer in one packet over Ethernet only if it reads 0x0d The following figure...

Страница 36: ...ore details and information about this function please contact our Technical Support 3 2 14Backup EEPROM to Flash Select 5 from Input choice and enter 0 5 the following screen should appear Fig 3 16 F...

Страница 37: ...s Click on Save Configuration to save settings Click Restart button in System link to make the change effective if necessary It is also possible to modify various settings through the web server inter...

Страница 38: ...erial Device Server SE5002D User Manual V 1 1 The following overview page should show Click on the links on the left to go to the different configuration pages which are Networking Security and COM Fi...

Страница 39: ...nts by checking Enable Fig 3 20 Fill in SNMP information in the fields under the SNMP header Enable different Alert Events to send these events to a SNMP Trap Server Cold Warm Start Triggers when the...

Страница 40: ...Server SE5002D User Manual V 1 1 Fig 3 20 After all the settings are entered please click on the Save Configuration button to save the changes Note that the settings would become active only after SE...

Страница 41: ...ig 3 21 Fig 3 21 Please enter the old password in the Old Password field and enter the new password in the New Password and the Verified Password fields Then click on the Save Configuration to save an...

Страница 42: ...on Backup EEPROM to backup the settings from the EEPROM to the Flash SE5002D would then show Have Backup Click on Erase Backup to erase the settings stored in the Flash SE5002D would then show No Bac...

Страница 43: ...4660 IP Filter only the designated IP address will be able to access the COM port if this option is enabled This option is disabled by default TCP Keep Alive specify the interval in the Idle Time Befo...

Страница 44: ...ration button to save the changes Go to the Application Configuration section to apply Virtual COM Pair Connection or Reverse Telnet applications if necessary Otherwise go to the COM Configuration for...

Страница 45: ...ime Before Disconnect and Waiting Time Between Re connect Attempts Serial Inactivity Time Before Disconnect determines how long SE5002D should wait before closing a TCP connection if there is no incom...

Страница 46: ...SE5002D User Manual V 1 1 Go to the Application Configuration section to apply Virtual COM Pair Connection or Reverse Telnet application if necessary Otherwise go to the COM Configuration for serial s...

Страница 47: ...re shows the UDP settings Fig 3 25 Click on the COM1 link on the left hand side Select UDP Destination IP and Port specify the Begin and End IP here Four groups of IP ranges are allowed This is the IP...

Страница 48: ...V 1 1 Scroll to the bottom of the page and click on Save Configuration button to save the changes Go to Section 3 6 3 to apply Pair Connection application if necessary Otherwise go to the COM Configu...

Страница 49: ...ible to keep your ordinary serial COM program The conversion virtualization of IP to COM is all done in the system driver transparently The following figure Fig 3 27 shows SE5002D in TCP Server mode w...

Страница 50: ...n the TCP Server mode To do so refer to Sec 3 5 to enable Virtual COM so that SE5002D becomes aware of the commands Note that there is no need to configure Virtual COM on the Operating System because...

Страница 51: ...Telnet Reverse Telnet application is a useful telnet program used to connect to SE5002D and the SE5002D s serial interface when connected to a Terminal Server Telnet programs in Windows Linux usually...

Страница 52: ...Atop Serial Device Server SE5002D User Manual V 1 1...

Страница 53: ...al option called Multiple_Connections as in Fig 3 30 The Multi Connection option will allow up to a maximum of four TCP Client connections SE5002D will broadcast serial data to all connected TCP Clien...

Страница 54: ...w control pins of RS 232 it is possible to setup pair connection in UDP mode Sec 3 6 3 After multi connection is enabled in the WebUI refer to the following table to setup Pair Connection as in Fig 3...

Страница 55: ...COM s Control Panel is not possible Fig 3 32 Follow Sec 3 2 6 to configure SE5002D in TCP Client mode properly Check Enable Virtual COM for Serial IP to enable Virtual COM application in SE5002D Scrol...

Страница 56: ...CP Client mode To do so refer to Sec 3 6 to enable Virtual COM so that SE5002D becomes aware of the commands Note that there is no need to configure Virtual COM on the OS because Virtual COM ports wil...

Страница 57: ...de properly Check Enable Pair Connection to enable Pair Connection application in SE5502D Scroll to the bottom of the page and click on Save Configuration button to save the changes Match the Destinat...

Страница 58: ...Modbus Master and six Modbus Slaves in UDP Fig 3 34 Note again that UDP does not guarantee data delivery and only data would be transmitted over Ethernet other serial pings are not transmitted If you...

Страница 59: ...5002D Master COM2 10 0 50 100 UDP 5001 10 0 50 200 10 0 50 207 5001 SE5002D Slave 1 COM1 10 0 50 200 UDP 5000 10 0 50 100 5000 SE5002D Slave 1 COM1 10 0 50 200 UDP 5001 10 0 50 100 5001 SE5002D Slave...

Страница 60: ...gs need to match the ones in the serial device Fig 3 35 Alias Name this field is for identification purposes only Baud Rate Select one of the baudrates from the dropdown box or select Other and then e...

Страница 61: ...way for packing data in serial communications It is designed to keep packets in track SE5002D provides two types of delimiters Time Delimiter and Character Delimiter When the selected delimiter condit...

Страница 62: ...1 System Requirements Windows 7 2008 Vista 2003 XP 2000 NT 4 0 9x Microsoft NT 2000 2003 Terminal Server Citrix MetaFrame Access Suite native and virtual 32 and 64 bit versions Note that upgrading th...

Страница 63: ...un the Virtual COM setup file included in the CD or download a copy from our website to install the Virtual COM driver for your OS Turn off your antivirus software and try again if the installation fa...

Страница 64: ...o our WebUI It is located under COM configuration Following figures show how to enable Virtual COM in SE5002D For detailed Link Mode configuration with Virtual COM please refer to the previous section...

Страница 65: ...ontrol Panel In the Windows Control Panel open the Serial IP applet In the Windows notification area Fig 4 3 right click on the Serial IP tray icon and click on Configure to open the Control Panel Fig...

Страница 66: ...ports from the list The right hand side of the Control Panel shows the configurations of the selected Virtual COM port marked in blue Each Virtual COM port can have its own settings Note the changes...

Страница 67: ...evice server If the serial device server is running in TCP Client mode Serial IP should be the TCP server waiting for SE5002D to connect it Accept Connections and enter the Port Number The Port Number...

Страница 68: ...test the Virtual COM connections click the Configuration Wizard button and then click on Start button in the pop up window Fig If the test passes all checks should b in green To apply the changes in t...

Страница 69: ...Server SE5002D User Manual V 1 1 4 3 1 Exceptions Fig 4 8 If the exclamation mark begins with Warning timeout trying x x x x Fig 4 8 recheck the Virtual COM IP and Port configuration or the PC s netw...

Страница 70: ...vice Server SE5002D User Manual V 1 1 Fig 4 9 If there is a check with Raw Connection Detected and an exclamation mark with Client not licensed for this server Fig 4 9 enable Virtual COM in the serial...

Страница 71: ...ck with Telnet Protocol Detected and an exclamation mark with Client not licensed for this server Fig 4 10 this means that there is a licensing issue between the serial device server and Serial IP Ple...

Страница 72: ...ser Manual V 1 1 Fig 4 11 If the exclamation mark begins with Server requires username password login Fig 4 11 it means Virtual COM Authentication in the serial device server is enabled but credential...

Страница 73: ...vice Server SE5002D User Manual V 1 1 Fig 4 12 If the exclamation mark begins with Username and or password incorrect Fig 4 12 this means the wrong username and or password was entered and the authent...

Страница 74: ...Manual V 1 1 Fig 4 13 If the exclamation mark begins with No login password prompts received from server Fig 4 13 it means credentials in the Serial IP are enabled but Virtual COM Authentication in t...

Страница 75: ...ig 4 3 right click on the Serial IP tray icon and click on Port Monitor to open the Port Monitor Click on the Port Monitor button in the Serial IP Control Panel 4 4 2 The Activity Panel Fig 4 14 The A...

Страница 76: ...15 The Trace panel provides a detailed time stamped real time display for all Serial IP COM ports operations Fig 4 15 Click on Enable Trace to start logging Virtual COM communication Click on File Sav...

Страница 77: ...closed Attempt Server Connection terminates pending connection attempts if they do not succeed in a specified amount of time Synchronize with Server Upon COM Port Open required by NT Systems 2000 XP V...

Страница 78: ...l Keep Alive controls the interval at which Virtual COM will issue the keep alive message while there is no activity Maximum Connection Recovery Interval controls the maximum time for Restore Failed C...

Страница 79: ...orts TCP network connections made through a proxy server which may be controlling access to external networks such as the Internet from a private network that lacks transparent IP based routing such a...

Страница 80: ...erver Using Standard ping Command From the Windows Start menu select Run and type in ping TCP Server IP address If the serial device server can receive ping requests sent from the host it will reply t...

Страница 81: ...ration utility that comes with the product CD or download it from our website to check the serial device server s status The status and version can be read from the tool For example S means that COM1...

Страница 82: ...ate 1200 230 kbps Data Bits 7 8 Stop Bits 1 2 Flow Control None Xon Xoff RTS CTS Power Characteristics Input Voltage 9VDC 48VDC Input Current 9VDC 0 45 A Power Consumption Approx 5 85 W max Reverse Po...

Страница 83: ...P TCP UDP DHCP Client SNMP HTTP Telnet RFC2217 Configuration Device Management Utility Web UI Telnet Virtual COM Windows Linux redirection software Link Modes TCP Server 4 connectors Virtual COM or Re...

Страница 84: ...After the new firmware is downloaded follow the procedures below to upgrade SE5002D Connect a PC Windows and the SE5002D to the same subnet Use ping command or the Device Management Utility utility to...

Страница 85: ...Remote_IP 10 0 50 100 Load Firmware hex The first line identifies the SE5002D s IP address the second line indentifies the firmware s name hex to be downloaded Fig 2 File Save to save the file File Ex...

Страница 86: ...error during it SE5002D will clear the corresponding memory and the system will remain intact as it was Error Messages Firmware upgrade may not be successful if errors occur during the process Table 1...

Страница 87: ...downloaded and the system crashes while loading the AP To disable the AP firmware and prevent it from executing please do the following Power off the device While the reset button is pressed power on...

Отзывы: