


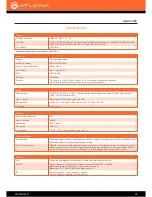


AT-OMNI-521
76
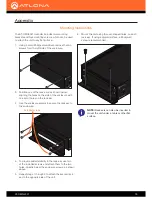
The AT-OMNI-521 decoder includes two mounting
brackets and four mounting screws, which can be used
to attach the unit to any flat surface.
1.
Using a small Phillips screwdriver, remove the two
screws from the left side of the enclosure.
2.
Position one of the rack ears, as shown below,
aligning the holes on the side of the enclosure with
one set of holes on the rack ear.
3. Use the enclosure screws to secure the rack ear to
the enclosure.
4.
To provide added stability to the rack ear, use two
of the included screws and attach them to the two
holes, directly below the enclosure screws, as shown
above.
5. Repeat steps 1 through 4 to attach the second rack
ear to the opposite side of the unit.
6.
Mount the unit using the oval-shaped holes, on each
rack ear. If using a drywall surface, a #6 drywall
screw is recommended.
TM
O
MNI
S
TREAM
LINK
PW
R
R
-
T
YPE
ID
Mounting Instructions
NOTE:
Rack ears can also be inverted to
mount the unit
under a table or other flat
surface.
Included screws
TM
O
MNI
S
TREAM
LINK
PW
R
R
-
T
YPE
ID
TM
O
MNI
S
TREAM
LINK
PW
R
R
-
T
YPE
ID
Appendix