background image

Installing the Hardware and Software     17

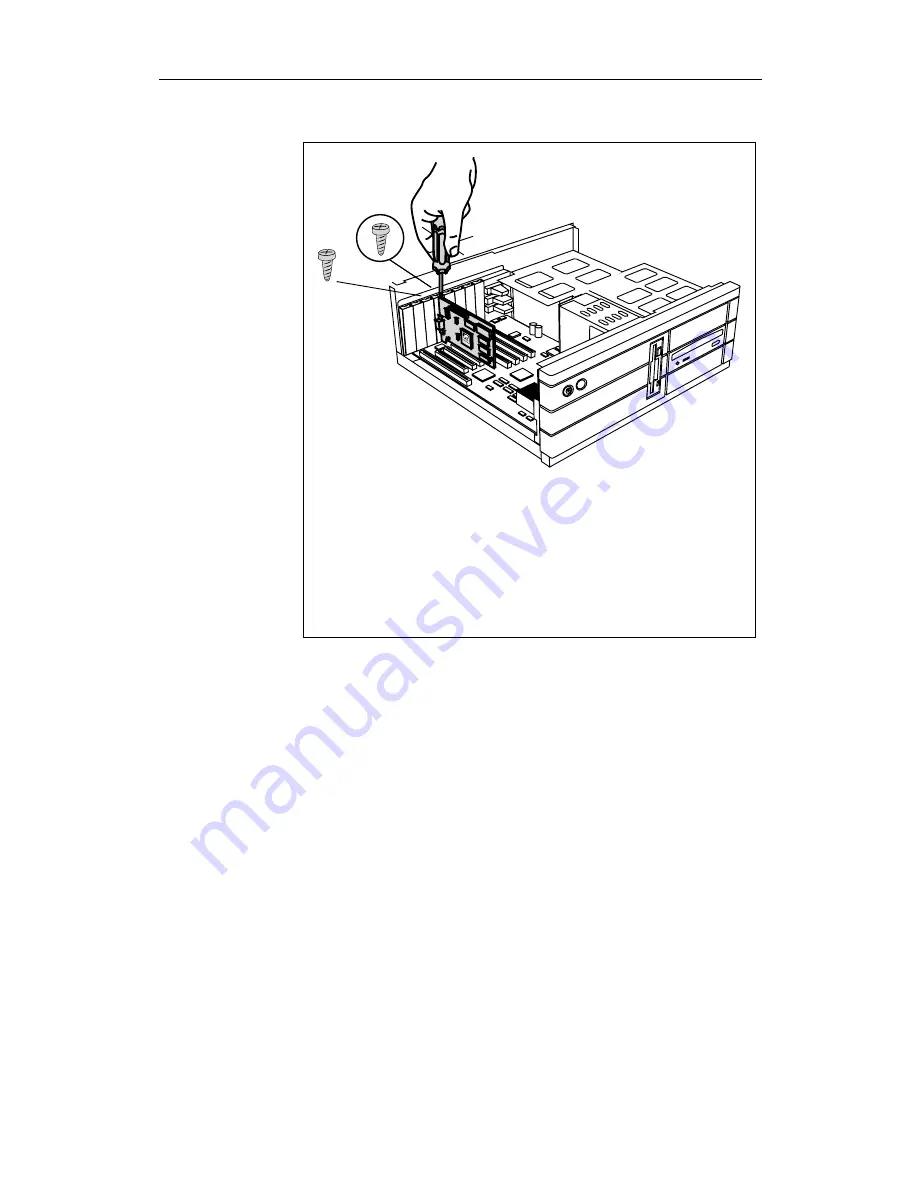
Replace the screws to fasten the card in place

.

Reassemble your computer.

5

Align the slot in the mounting bracket of the card 
with the screw holes in the rear panel of the 
computer case.

Use the screws you removed from the expansion 
slot cover or a previously installed graphics card 
to secure the card in place.

6

• Secure ribbon cables and gently push them down and 

out of the way before you replace the system cover.

• Replace the computer cover.

• Reconnect any peripheral equipment cables you may 

have disconnected.

Содержание FireGL X1-256p

Страница 1: ...ctive owners Features performance and specifications are subject to change without notice Product may not be exactly as shown in the diagrams FireGL FIRE GL HYDRAVISION ATI Technologies Inc Athlon Adv...

Страница 2: ...r products and documentation provided herein ATI Technologies Inc reserves the right to make changes without further notice to a product or system described herein to improve reliability function or d...

Страница 3: ...mpleting the Installation 18 Installing the Software 22 Before you Start Information Tips and Hints 23 Software Installation for Windows 2000 and Windows XP 24 Using Your FireGL Card 26 Using Two Moni...

Страница 4: ...ference 41 Removing the FireGL Drivers 41 Troubleshooting 43 Technical Details 46 Product Specifications 46 Pin Assignments 48 Video Modes 50 Customer Care and Warranty Service 52 Compliance Informati...

Страница 5: ...ions Features of your FireGL workstation graphics accelerator Real time photo realistic rendering and animation Stable and reliable software support for Windows and Linux platforms Optimized support f...

Страница 6: ...ality of some images on screen or in print may be affected The organization of this guide is as follows Installing the Hardware and Software on page 8 provides instructions for installing your FireGL...

Страница 7: ...inside this manual may be active as well Go directly to a Web FTP site or E mail program simply by clicking on an active link This manual might be displayed with slightly reduced magnification in you...

Страница 8: ...int precision frame buffer for photo realistic renderings 256 bit memory interface for fast 3D graphics Pixel pipeline architecture provides enhanced rendering power FireGL VPU Video Memory Rendering...

Страница 9: ...nalog or digital monitors High resolutions up to 2048 x 1536 32 bit Independent resolutions and refresh rates for any two connected monitors 9 1 Mpixel 3840 x 240single display support Quad buffer ste...

Страница 10: ...Service Pack 1 or higher Windows XP Linux XFree86 4 X 0 Service Pack Information for Windows2000 You must be running Windows 2000 updated with Service Pack 1 or higher prior to installing the FireGL...

Страница 11: ...Chapter 3 Installation Steps 1 Un install the drivers and software for your old graphics card 2 Disable any on board graphics solution on the motherboard 3 Shut down and disconnect your computer syste...

Страница 12: ...ling the Hardware The hardware installation includes the following steps Preparing your Computer Installing the Card Connecting the Cables and Completing the Installation IN THIS CHAPTER Installing th...

Страница 13: ...ystem Contact your supplier or motherboard chipset manufacturer to obtain and install the latest AGP chipset driver for your motherboard An incorrect or missing chipset driver can result in AGP memory...

Страница 14: ...allation What do you need to use your FireGL card System Requirements and Tools Motherboard with free AGP Pro slot Note The bracket of the FireGL card also covers the expansion slot next to the AGP Pr...

Страница 15: ...take advantage of the DDC1 DDC2b features 2 You can use the full power of the graphics card only if your monitor supports the horizontal kHz and vertical Hz refresh rates as required by the graphics c...

Страница 16: ...otherboard manufacturer to determine how to disable your on board graphics Illustrations The illustrations provided in this section are for instructional use only the card shown may look different tha...

Страница 17: ...from the electrical source 1 Note If you are disconnecting a peripheral from the computer or are removing a component from the system board wait 10 20 seconds after disconnecting the computer from the...

Страница 18: ...move the computer cover If necessary consult your computer system manual about removing the cover 2 Remember to discharge your body s static electricity by touching the power supply or the metal surfa...

Страница 19: ...ttached to your existing graphics card Then pull the card straight out If the old graphics card sticks rock it gently from end to end Remember to save the screw If your computer has any on board graph...

Страница 20: ...from the AGP Pro slot and the adjacent slot Save the screws to secure the graphics card later Align the FireGL card with the AGP Pro slot and press it in firmly until fully seated 4 AGP cards are des...

Страница 21: ...screw holes in the rear panel of the computer case Use the screws you removed from the expansion slot cover or a previously installed graphics card to secure the card in place 6 Secure ribbon cables a...

Страница 22: ...ors with VGA connector Securely attach the data cable of your first monitor to the DVI output connector 1 on the card Attach the cable to the monitor according to the monitor s instructions Refer to t...

Страница 23: ...d Setting the Monitor Impedance If you can switch the impedance values on your monitor use the following recommended settings RGB video input 75 Ohm Sync 2 2 kOhm Try other Sync settings if you cannot...

Страница 24: ...L card package Connect your stereo glasses or stereo shutter device to the 3 pin Mini DIN stereo sync connector 3 on the card Connect only stereo glasses or stereo shutter devices with shielded cable...

Страница 25: ...rast controls of your monitor If you have problems during start up restart your computer in Safe Mode While starting Windows 2000 and Windows XP press and hold F8 until you see the Windows Advanced Op...

Страница 26: ...d or upgraded your operating system 1 To install or remove the FireGL drivers you need administrator rights or you must be logged on as a user with administrator rights under Windows 2000 and Windows...

Страница 27: ...have re installed your operating system or if you want to perform a manual installation You can always install the drivers using the ATISETUP utility on the ATI INSTALLATION CD ROM The ATISETUP utilit...

Страница 28: ...ws XP 1 Start your system When the Found New Hardware Wizard comes up click Cancel When the System Settings Change window asks you to restart your computer click No 2 Run the ATISETUP utility The ATIS...

Страница 29: ...er now and click Finish 9 After Windows 2000 Windows XP reboots the Found New Hardware message may display the Digital Signature Not Found message Click Yes or Continue to complete the driver installa...

Страница 30: ...formation tab displays card specific hardware and driver information This information may be helpful when contacting Tech Support Click Display Properties Settings Advanced Information Use the Adjustm...

Страница 31: ...on the second monitor special video mode for high resolution monitors Use the Configuration tab to customize application profiles for individual application settings Use the Advanced Settings tab to e...

Страница 32: ...onitor Click the Apply or OK button to enable your settings HYDRAVISION multi monitor and desktop management software enables you to tailor your two monitor desktop to the way you work For more inform...

Страница 33: ...your DualScreen configuration 2 Select High Resolution Mode to extend the display of a high resolution monitor to the full size of the monitor Note The option High Resolution Mode is active only with...

Страница 34: ...when you start your computer 1 Select a refresh rate of 120 MHz in the Display Properties Settings tab 2 Enable Quad Buffer Stereo in the Advanced Settings tab Changing the Video Settings The tabs in...

Страница 35: ...rate from the Refresh Frequency list Screen refresh rates in Windows XP 5 Click Apply 6 To preview the new settings click OK 7 To accept the settings click Yes otherwise click No 8 If the display bec...

Страница 36: ...ed Monitor to select and set your specific monitor settings 3 Use the DualScreen tab Display Properties Settings Advanced DualScreen to enable the following functions duplicate the display of the prim...

Страница 37: ...play Using this tab you can adjust the display of the connected monitor For more information on adjusting the monitor s display refer to the context sensitive online help 1 Select the Adjustment tab v...

Страница 38: ...tton to set the Monitor Tuning to the manufacturer s default settings 1 First use the hardware setting controls on your monitor if available to adjust your display size or position Then if needed use...

Страница 39: ...rect reproduction of the image s brightness The effect of display gamma is to darken the midtones relative to the dark and light regions The gamma correction adjustment affects the entire screen displ...

Страница 40: ...he following diagnostic purposes fine tuning a specific application system configuration specific settings recommended by your hardware or software documentation tuning your application system environ...

Страница 41: ...configuration parameters Modifying the configuration parameters To change the configuration settings of a specific application for example CATIA select the application from the list in the Configurati...

Страница 42: ...the refresh rate of the monitor Enabling will lower the frame rate but reduce visual artifacts such as tearing Disabling allows your application to run at the highest possible frame rate regardless o...

Страница 43: ...ng jagged edges Anti Aliasing from 3D images resulting in smoother more natural looking objects Anti aliasing Application Preference This gives OpenGL Direct 3D applications the ability to enable anti...

Страница 44: ...quency on high resolution displays Resolves display corruption or no image at high resolutions for example 1280x1024 at 75Hz using a digital DVI display This setting has no effect when using a DVI to...

Страница 45: ...e close all open application programs and disable any anti virus software that is running on your computer until the driver is removed 2 To install or uninstall the FireGL drivers you need administrat...

Страница 46: ...Display Driver 8 Click Yes to restart your computer After you have removed the software according to the instructions you may remove the hardware 1 Shut down your computer 2 Remove the computer case a...

Страница 47: ...ted and lined up properly in its AGP Pro slot and that the monitor cable is firmly and correctly connected to the card For more information please refer to Installing the Hardware on page 8 Make sure...

Страница 48: ...our supplier or the manufacturer of the DFP monitor for information on how to obtain a suitable data cable plug Operating system warns that the video card is not configured properly Check the driver i...

Страница 49: ...t Conflicts To support the special graphics processor on the FireGL card the system BIOS should automatically assign a system interrupt to the AGP slot where the card is installed However there may be...

Страница 50: ...8 6 mm 9 0 inches Width 108 0 mm 4 25 inches Power requirements 3 3 Volts DC 9 4 Amps 5 Volts DC 0 6 Amps 12 Volts DC 2 0 Amps maximum Bus System AGP 3 0 AGP Pro 50 connector Video memory DDR SDRAM un...

Страница 51: ...emale H V Sync output signals Separate horizontal and vertical sync at TTL levels FireGL card addresses The FireGL card is 100 IBM VGA compatible and occupies the same memory area and specific address...

Страница 52: ...C5 Analog Common Ground Return Red Green Blue Video Out 1 2 3 4 5 6 7 8 9 10 11 12 13 14 15 16 17 18 19 20 21 22 23 24 T M D S Data2 T M D S Data2 T M D S Data2 4 Shield T M D S Data4 T M D S Data4 DD...

Страница 53: ...Reference 49 Stereo Sync Output Connector Pin Function 1 2 3 5 V DC fused 750 mA ground StereoSync...

Страница 54: ...5 37 5 43 3 50 9 60 75 85 100 16 32 800 x 600 37 7 46 9 54 1 63 9 60 75 85 100 16 32 1024 x 768 48 4 60 0 68 7 81 4 60 75 85 100 16 32 1152 x 864 53 7 67 5 77 1 91 5 60 75 85 100 16 32 1280 x 1024 64...

Страница 55: ...DVI connector Resolution Refresh Rate Hz Color Depth Bits 640 x 480 60 75 16 32 800 x 600 60 75 16 32 1024 x 768 60 75 16 32 1152 x 864 60 75 16 32 1280 x 1024 60 75 16 32 1600 x 1000 60 16 32 1600 x...

Страница 56: ...s available to workstation users at no additional cost long distance charges may apply For complete details please visit http www ati com online customercare Mail ATI TECHNOLOGIES INC Attention Custom...

Страница 57: ...Replacement to minimize downtime for design professionals For Advanced Parts Replacement service instructions contact one of our Customer Care Representatives using one of the aforementioned means Wa...

Страница 58: ...e sent in for repair or replacement only ATI makes no other representations or warranties as to fitness for a particular purpose merchantability or otherwise in respect of the product No other represe...

Страница 59: ...Increase the separation between the equipment and receiver Connect the equipment to an outlet on a circuit different from that to which the receiver is connected Consult the dealer or an experienced...

Страница 60: ...asse B Limites et m thodes de mesure des caract ristiques d interf rences radiophoniques Mat riel des technologies de l information EN 55024 1998 Norme sur l immunit de mat riel des technologies de l...

Страница 61: ...2 1978 USA Phone 508 303 3900 MIC Certification Information FireGL X1 256p Product Name Model Fire GL X1 Holder ATI Technologies Inc Date 2002 12 20 Manufacturer Country of origin ATI Technologies Inc...

Отзывы: