background image

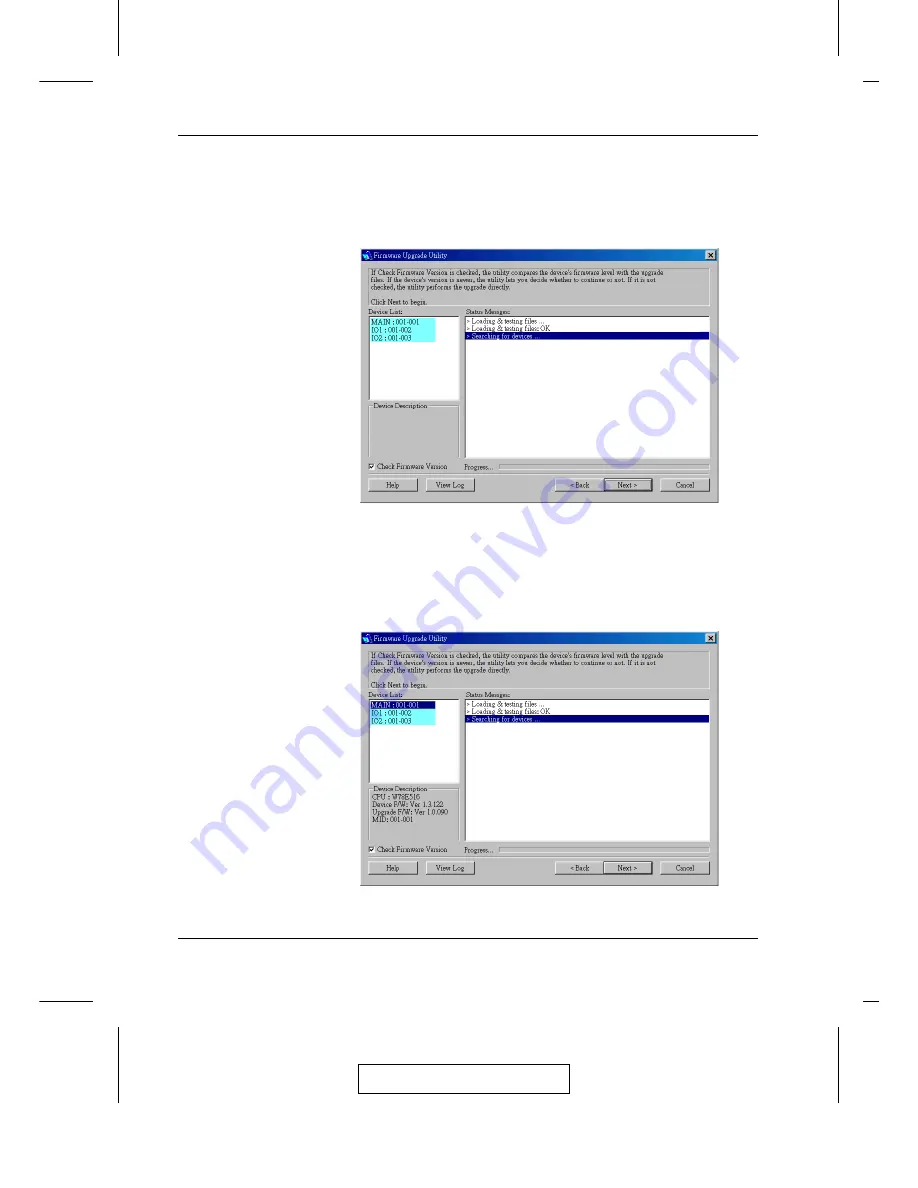
3. Click Next to continue. The Firmware Upgrade Utility main

screen appears:

The Utility inspects your installation. All the devices capable of
being upgraded by the package are listed in the Device List panel.

4. As you select a device in the list, its description appears in the

Device Description panel.

2003-06-20

ACS-1208A / ACS-1216A User Manual

5-4

Содержание Master View ACS-1208A

Страница 1: ...User Manual ACS 1208A ACS 1216A 2003 06 20...

Страница 2: ...ations However there is no guarantee that interference will not occur in a particular installation If this equipment does cause harmful interference to radio or television reception which can be deter...

Страница 3: ...that nothing got damaged in shipping If you encounter a problem contact your dealer Read this manual thoroughly and follow the installation and operation procedures carefully to prevent any damage to...

Страница 4: ...ar View 1 10 2 Installation Before you Begin 2 1 Single Stage Installation 2 1 Daisy Chaining 2 2 Hot Plugging 2 5 Port ID Numbering 2 6 Powering Off and Restarting 2 6 3 Hotkey Operation Hotkey Port...

Страница 5: ...n 5 2 Performing the Upgrade 5 3 Starting the Upgrade 5 3 Upgrade Succeeded 5 6 Upgrade Failed 5 7 Firmware Upgrade Recovery 5 8 Appendix ACS 1208A ACS 1216A Connection Tables A 1 ACS 1208A A 1 ACS 12...

Страница 6: ...complete 32 switch daisy chained operation Chapter 3 Hotkey Operation details all of the concepts and proce dures involved in the Hotkey operation of your ACS 1208A ACS 1216A installation Chapter 4 O...

Страница 7: ...e brackets or anything that appears inside of them just press the key For example if a procedure tells you to type Install Enter You should type the word Install then press the Enter key M If you need...

Страница 8: ...Notes 2003 06 20 ACS 1208A ACS 1216A User Manual viii...

Страница 9: ...w can control up to eight ACS 1208A or 16 ACS 1216A computers As many as 31 additional switches can be added in a daisy chain configuration allowing up to 512 computers to be controlled from a single...

Страница 10: ...shed either by entering Hotkey combinations from the keyboard or by means of a powerful menu driven OSD On Screen Display system A convenient Auto Scan feature also permits automatic scanning and moni...

Страница 11: ...ont panel LED indicates station s position M Port names automatically reconfigured when station sequence is changed M Two level password security only authorized users view and control the computers u...

Страница 12: ...Computers The following equipment must be installed on each computer M A VGA SVGA or Multisync card M A 6 pin mini DIN PS 2 style mouse port M Either a 6 pin mini DIN PS 2 Style keyboard port with 5V...

Страница 13: ...ng 2L 1700 0 6 m 2L 1701 1 8 m KVM Switch to Computer 2L 5201P 1 2 m 2L 5202P 1 8 m 2L 5203P 3 0 m Note 1 The ACS 1208A ACS 1216A does not support serial mice You cannot use Serial to PS 2 adapters wi...

Страница 14: ...EEN to indicate that the computer attached to its corresponding port is the one that has the KVM focus The LED is steady under normal conditions but flashes when its port is accessed under Auto Scan M...

Страница 15: ...If this is a Single Station installation see p 2 1 or the First Station on a Daisy Chained installation see p 2 2 the ACS 1208A has a Station ID of 01 On a Daisy Chained installation the ACS 1208A aut...

Страница 16: ...EEN to indicate that the computer attached to its corresponding port is the one that has the KVM focus The LED is steady under normal conditions but flashes when its port is accessed under Auto Scan M...

Страница 17: ...is a Single Station installation see p 2 1 or the First Station on a Daisy Chained installation see p 2 2 the ACS 1216A has a Station ID of 01 On a Daisy Chained installation the ACS 1216A auto sense...

Страница 18: ...ug in here The shape of these connectors has been specifically modified so that only cables designed to work with this switch can plug in see the Cables section on p 1 5 for details 3 Cable Tie Slot I...

Страница 19: ...rmware Upgrade Recovery Switch During normal operation and while performing a fimware upgrade this switch should be in the NORMAL position See p 5 8 for details about the use of this switch 7 Console...

Страница 20: ...Notes 2003 06 20 ACS 1208A ACS 1216A User Manual 1 12...

Страница 21: ...ure that all devices on the installation are properly grounded Single Stage Installation In a Single Stage installation there are no additional switches daisy chained down from the first unit To set u...

Страница 22: ...st unit As many as 512 computers can be controlled from a single console in a complete installation Tables showing the relation between the number of computers and the number of Master View ACS 1208A...

Страница 23: ...alling 4 Repeat the above steps for any additional ACS 1208A ACS 1216A units you wish to add to the chain 5 Power up the installation according to the following procedure a Plug in the power adapter f...

Страница 24: ...2003 06 20 ACS 1208A ACS 1216A User Manual 2 4...

Страница 25: ...onfigure the OSD to reflect the new port information See SCAN SKIP MODE under the F3 SET function p 4 6 and the two Set Port selections under the F4 ADM function p 4 8 for details Note If the computer...

Страница 26: ...example a computer attached to Port 6 of Station 12 would have a Port ID of 12 06 Powering Off and Restarting If it becomes necessary to Power Off one of the switches unplug its power adapter cable f...

Страница 27: ...vides the following Hotkey port access features M Selecting the Active Port M Auto Scanning M Skip Mode Switching Invoking Hotkey Mode All Hotkey operations begin by invoking Hotkey Mode Invoking Hot...

Страница 28: ...licks described in the sections that follow can be input Pressing Esc exits Hotkey Mode Selecting the Active Port Each CPU port is assigned a Port ID see Port ID Numbering p 2 6 You can directly acces...

Страница 29: ...the Scan Duration setting of the OSD F3 SET function see p 4 7 This setting can be changed before activating Hotkey Auto Scanning with the following combination 1 Invoke Hotkey Mode see p 3 1 2 Key i...

Страница 30: ...the message Auto Scan Paused Pausing when you want to keep the focus on a particular computer is more convenient than Exiting Auto Scan Mode because when you resume scanning you start from where you...

Страница 31: ...sible port previous to it See Scan Skip Mode p 4 7 for information regarding accessible ports Skips from the current port to the next accessible port Skips from the current port to the last accessible...

Страница 32: ...ID T n Enter Sets the Auto Scan interval to n seconds where n is a number from 1 255 A Invokes Auto Scan Mode When Auto Scan Mode is in effect P or Left Click pauses Auto Scanning Pressing Any Key or...

Страница 33: ...With this method the Ctrl keys must be on the same side both left or both right The OSD incorporates a two level Administrator User password system Before the OSD Main Screen comes up a dialog box ap...

Страница 34: ...at the same position it was in the last time it was closed 3 Only the ports that have been set accessible by the Administrator for the currently logged in User are visible see SET ACCESSIBLE PORTS p...

Страница 35: ...the screen will scroll w To activate a port Double Click it or move the Highlight Bar to it then press Enter w After executing any action you automatically go back to the menu one level above OSD Main...

Страница 36: ...it then pressing Enter 3 Press Esc to return to the previous menu level F1 GOTO GOTO allows you to switch directly to a port either by keying in the port s Name or its Port ID w To use the Name metho...

Страница 37: ...sts all of the ports on the installation QVIEW Lists only the ports that have been selected as Quick View Ports see SET ACCESSIBLE PORTS p 4 10 POWERED ON Lists only the ports whose computers are Powe...

Страница 38: ...grams running on the computers the default is the Scroll Lock combination PORT ID DISPLAY POSITION Allows you to position where the Port ID appears on the screen The default is the upper right corner...

Страница 39: ...s are ALL All the Ports which have been set Accessible see SET ACCESSIBLE PORTS p 4 10 QUICK VIEW Only those Ports which have been set Accessible and have been selected as Quick View Ports see SET QUI...

Страница 40: ...hat allows you to key in the password appears The password may be up to 15 characters long and can consist of any combination of letters and numbers A Z 0 9 3 For each individual key in the Username a...

Страница 41: ...u have finished editing press Enter to have the change take effect To abort the change press Esc RESTORE DEFAULT VALUES This function is used to undo all changes except for the Names settings and retu...

Страница 42: ...ere will display on the List w If one of the Quick View options is chosen for Auto Scanning see SCAN SKIP MODE p 4 7 only a Port that has been selected here will be Auto Scanned The default is for no...

Страница 43: ...the OSD so that the OSD Station information corresponds to the new physical layout Note Only the Station Numbers get updated Except for the Port Names all Administrator settings such as Set Accessibl...

Страница 44: ...o switch to the last computer on the previous station in the List press to switch to the first computer on the next station in the List Note When you Skip you only Skip to the the previous or next ava...

Страница 45: ...function see p 4 5 is used to broaden or narrow the focus of which Ports appear on the OSD Main Screen When you Broadcast a command it only goes to the Ports currently selected to be listed on the OSD...

Страница 46: ...ut is powered Off the monitor screen will be blank and the mouse and keyboard will have no effect Simply wait after the Scan Duration time is up the Scan function will move on to the next port w As ea...

Страница 47: ...ere all you have to do to reenter the OSD is tap the OSD Hotkey Note 1 When you reenter the OSD after logging out the screen stays blank except for the OSD Main Screen You must input your password bef...

Страница 48: ...Notes 2003 06 20 ACS 1208A ACS 1216A User Manual 4 16...

Страница 49: ...ility FWUpgrade exe is to provide an automated process for make upgrad ing the KVM switch s firmware as smooth and painless as possible The Utility comes as part of a Firmware Upgrade Package that is...

Страница 50: ...connect a COM port on your computer to the Firmware Upgrade Port of your device Note On a daisy chained installation connect the cable to the First Station Master unit The chained stations Slaves wil...

Страница 51: ...re Upgrade Package file either by double clicking the file icon or by opening a command line and entering the full path to it The Firmware Upgrade Utility Welcome screen appears 2 Read and Agree to th...

Страница 52: ...The Utility inspects your installation All the devices capable of being upgraded by the package are listed in the Device List panel 4 As you select a device in the list its description appears in the...

Страница 53: ...n the upgrade version it brings up a dialog box informing you of the situation and gives you the option to Continue or Cancel If you didn t enable Check Firmware Version the Utility installs the upgra...

Страница 54: ...e Succeeded After the upgrade has completed a screen appears to inform you that the procedure was successful Click Finish to close the Firmware Upgrade Utility 2003 06 20 ACS 1208A ACS 1216A User Manu...

Страница 55: ...box appears asking if you want to retry Click Yes to retry If you Click No the Upgrade Failed screen appears Click Cancel to close the Firmware Upgrade Utility See the next section Firmware Upgrade R...

Страница 56: ...Firmware Upgrade Recovery Switch see p 1 11 to the Recover position 2 Power off and restart the switch according to the instructions given in the Powering Off and Restarting section p 2 6 3 Slide the...

Страница 57: ...d the number of computers that they control ACS 1208A MVs Computers MVs Computers MVs Computers MVs Computers 1 1 8 9 65 72 17 129 136 25 193 200 2 9 16 10 73 80 18 137 144 26 201 208 3 17 24 11 81 88...

Страница 58: ...353 368 31 481 496 8 113 128 16 241 256 24 369 384 32 497 512 OSD Factory Default Settings The factory default settings are as follows Setting Default OSD Hotkey Scroll Lock Scroll Lock Port ID Displa...

Страница 59: ...per labeled Default Password at the right front of the switch s main board 3 Power on the switch When you power the switch on the following message appears on the LCD display USERNAME AND PASSWORD INF...

Страница 60: ...use 1 x 6 pin mini DIN F Video 1 x HDB 15 F Computer Port Connectors 8 x SPDB 15 F 16 x SPDB 15 F Daisy Chain Ports 1 x DB 25 M 1 x DB 25 F Scan Interval OSD Select User Specified 1 255 secs Emulation...

Страница 61: ...nto either the front or the back of the unit so that it can attach to the front or the back of the rack To rack mount the unit do the following 1 Screw the mounting brackets into the sides of the unit...

Страница 62: ...T SHALL THE DIRECT VENDOR S LIABILITY EXCEED THE PRICE PAID FOR THE PRODUCT FROM THE DIRECT INDIRECT SPECIAL INCIDENTAL OR CON SEQUENTIAL DAMAGES RESULTING FROM THE USE OF THE PRODUCT DISK OR ITS DOCU...

Страница 63: ...les A 1 E F Edit Port Names 4 9F F1 GOTO 4 4 F2 LIST 4 5 F3 SET 4 6 F4 ADM 4 8 F5 SKP 4 12 F6 BRC 4 13 F7 SCAN 4 14 F8 LOUT 4 15 Factory Default Settings A 2 Firmware upgrade 5 1 cable 5 2 port 1 11 5...

Страница 64: ...4 10 Rack Mounting A 5 Recovery switch 1 11 Reset Station IDs 4 11 Restore Default Values 4 9 S SCAN 4 14 Scan Duration 4 7 SCAN SKIPMODE 4 7 Screen Blanker 4 7 Selecting the Active Port 3 2 SET 4 6...

Отзывы: