background image

CL6708MW User Manual

10

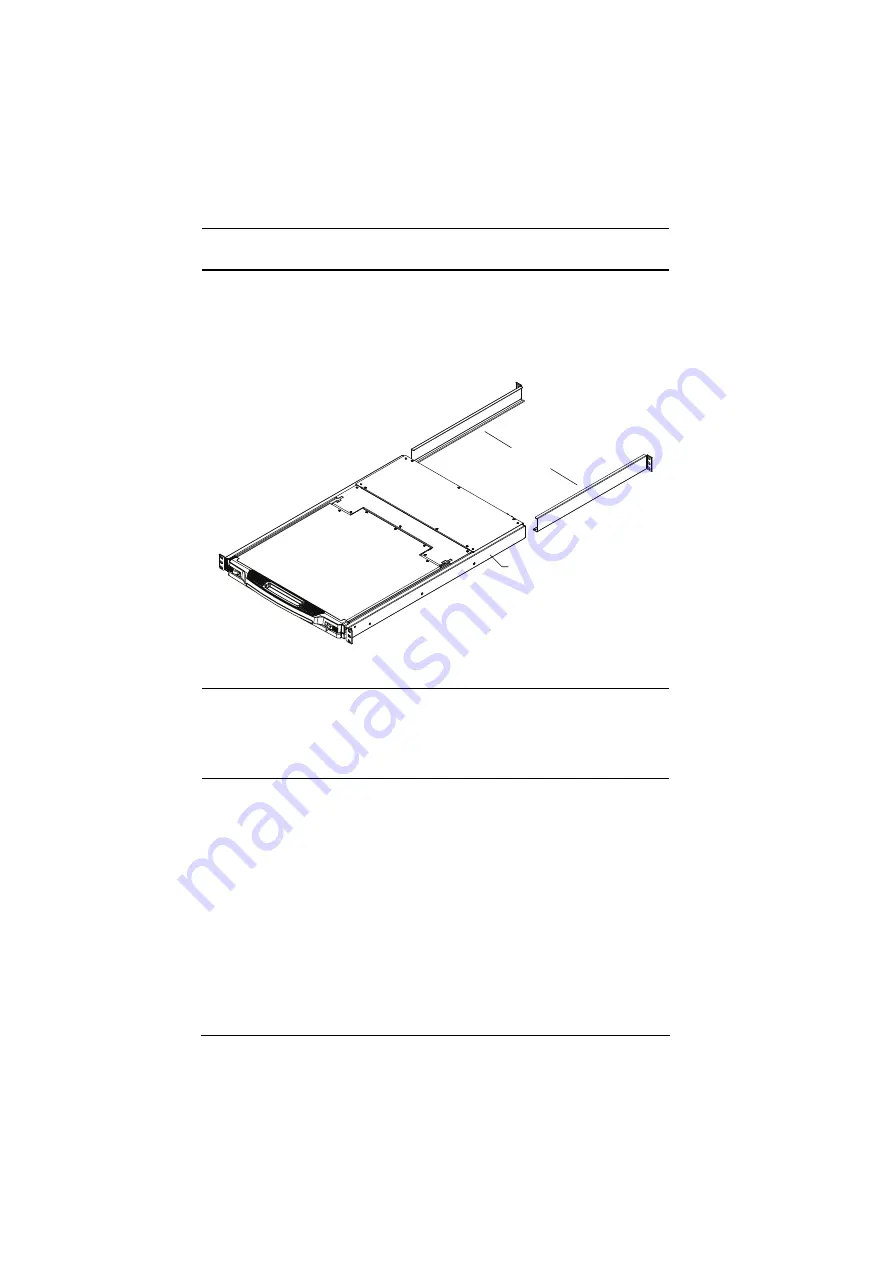
Standard Rack Mounting

A standard rack mounting kit is provided with your CL6708MW and can be 
mounted in 1U of rack space. The installation procedures are described in the 
following sections. Below is an image of the parts included with your package 
that will be needed for rack installation.

Note:

It takes two people to mount the console.

The standard rack mounting kit does not include screws or cage 
nuts. If you need additional screws or cage nuts, contact your rack 
dealer.

Side Mountng
Brackets

Left & Right L-shaped Brackets

Содержание CL6708MW

Страница 1: ...Single Rail 8 Port DVI FHD LCD KVM Switch CL6708MW User Manual www aten com ...

Страница 2: ...n a residential area is likely to cause harmful interference in which case the user will be required to correct the interference at his own expense The device complies with Part 15 of the FCC Rules Operation is subject to the following two conditions 1 this device may not cause harmful interference and 2 this device must accept any interference received including interference that may cause undesi...

Страница 3: ...ve defective following their purchase the buyer and not the manufacturer its distributor or its dealer assumes the entire cost of all necessary servicing repair and any incidental or consequential damages resulting from any defect in the software The manufacturer of this system is not responsible for any radio and or TV interference caused by unauthorized modifications to this device It is the res...

Страница 4: ...act your dealer Read this manual thoroughly and follow the installation and operation procedures carefully to prevent any damage to the unit and or any of the devices connected to it Changes may have been made to the manual since it was published Please visit our web site to download the most up to date version of the manual Copyright 2020 ATEN International Co Ltd Manual Date 2020 08 14 ATEN and ...

Страница 5: ...verview 1 Features 2 Requirements 4 External Console 4 Computers 4 Cables 4 Operating Systems 5 Components 6 Front View 6 Rear View 8 Chapter 2 Hardware Setup Overview 9 Before You Begin 9 Standard Rack Mounting 10 Optional Rack Mount Kits 12 Grounding 12 Single Level Installation 13 Cabling Diagrams 15 Multi Level Installation 16 Chapter 3 Basic Operation Opening the Console 19 Closing the Consol...

Страница 6: ...ain Screen Headings 29 OSD Navigation 30 OSD Functions 30 F1 GOTO 31 F2 LIST 31 F3 SET 32 F4 ADM 34 F5 SKP 37 F6 BRC 37 F7 SCAN 38 F8 LOUT 39 Chapter 5 Keyboard Port Operation Hotkey Port Control 41 Invoke Hotkey Mode 41 Dedicated Invocation Key 41 Number Lock and Minus Keys 42 Control and F12 Keys 42 Select the Active Port 42 Auto Scan Mode 43 Invoking Auto Scan 43 Skip Mode 45 Computer Keyboard ...

Страница 7: ...he Upgrade 55 Upgrade Succeeded 57 Upgrade Failed 58 Appendix Safety Instructions 59 General 59 Rack Mounting 61 Consignes de sécurité 62 Général 62 Montage sur bâti 64 Technical Support 66 International 66 North America 66 Manufacturing Number 66 Specifications 67 Connection Table 69 CL6708MW to Compatible 8 Port Switches 69 Supported KVM Switches 69 Restoring Factory Default Settings 70 OSD Fact...

Страница 8: ... complete 17 switch two level operation are provided Chapter 3 Basic Operation explains the fundamental concepts involved in operating the CL6708MW Chapter 4 OSD Operation provides a complete description of the CL6708MW OSD on screen display and how to work with it Chapter 5 Keyboard Port Operation details all of the concepts and procedures involved in the hotkey operation of your CL6708MW install...

Страница 9: ...Indicates keys you should press For example Enter means to press the Enter key If keys need to be chorded they appear together in the same bracket with a plus sign between them Ctrl Alt 1 Numbered lists represent procedures with sequential steps Bullet lists provide information but do not involve sequential steps Indicates selecting the option on a menu or dialog box for example that comes next Fo...

Страница 10: ...CL6708MW User Manual x This Page Intentionally Left Blank ...

Страница 11: ...ting the need to configure software Switching between computers is easily accomplished by pressing front panel pushbuttons entering hotkeys or via a menu driven on screen display OSD The CL6708MW incorporates the YUV video format for greater compatibility with high definition signals from source devices Similarly the CL6708MW is HDCP compatible making it effective for use with content protected me...

Страница 12: ...om the console to all computers to perform operations simultaneously Supports YUV video format for greater compatibility DVI monitor support fully compliant with the DVI specifications Video DynaSync exclusive ATEN technology eliminates boot up display problems and optimizes responsiveness when switching between ports HDCP compatible Superior video quality 1920 x 1080 60Hz DDC DDC2 DDC2B Compatibl...

Страница 13: ...lish German Japanese Traditional Chinese and Simplified Chinese Standard 105 key keyboard Sun keyboard emulation Keyboard Language support English US English UK German German Swiss French Spanish Traditional Chinese Japanese Korean Swedish Italian Russian Hungarian and Greek Note 1 Video DynaSyncTM only works in conjunction with digital video sources 2 PC keyboard combinations emulate Mac Sun keyb...

Страница 14: ...n is 1920 x 1080 60Hz Make sure that none of the computer resolution settings exceed the LCD monitor s maximum resolution At least one USB port Direct support Sun USB systems or for Sun legacy systems an ATEN CV130A Sun Console Converter Cables Substandard cables may damage the connected devices or degrade overall performance For optimum signal integrity and to simplify the layout we strongly reco...

Страница 15: ...systems are shown in the table below OS Version Windows 2000 or later Linux RedHat 9 0 or later SuSE 10 or later Debian 3 1 or later Ubuntu 7 04 or later UNIX AIX 4 3 or later FreeBSD 5 5 or later Sun Solaris 8 or later Novell Netware 5 0 or later Mac OS 9 or later ...

Страница 16: ...CL6708MW User Manual 6 Components Front View 8 2 2 1 3 4 6 7 9 10 11 12 16 15 14 5 13 ...

Страница 17: ...the unit See Standard Rack Mounting page 10 for details 11 Lock LEDs The Num Lock Caps Lock Scroll Lock LEDs are located here 12 Reset Switch Located to the right of the Lock LEDs Press this recessed switch in with a thin object to perform a system reset 13 Port LEDs Port Switches An orange ONLINE LED lights to indicate that the computer attached to its corresponding port is up and running A green...

Страница 18: ...and off 3 External Console Section For flexibility and convenience the CL6708MW supports an independent external KVM console The external console s USB keyboard and mouse DVI VGA or HDMI monitor and audio cables plug in here 4 KVM Port Section The custom KVM cable supplied with the package for linking the CL6708MW to a computer or switch plugs in here 5 Grounding Terminal The grounding wire used t...

Страница 19: ... cables of various lengths are listed on page 4 Consult your dealer to find out which custom KVM cables best fit your needs Before You Begin 1 Important safety information regarding the placement of this device is provided on page 59 Please review it before proceeding 2 Make sure that power to all the devices you will be connecting up has been turned off You must unplug the power cords of any comp...

Страница 20: ...s are described in the following sections Below is an image of the parts included with your package that will be needed for rack installation Note It takes two people to mount the console The standard rack mounting kit does not include screws or cage nuts If you need additional screws or cage nuts contact your rack dealer Side Mountng Brackets Left Right L shaped Brackets ...

Страница 21: ... first person still holds the unit in place the second person slides the left right L shaped brackets into the unit s side mounting brackets from the rear installing four screws in the brackets to secure them in place 3 After the L shaped brackets are secured tighten all the screws Allow at least 5 1 cm on each side for proper ventilation and at least 12 7 cm at the back for the power cord and cab...

Страница 22: ...uide Grounding To prevent damage to your installation it is important that all devices are properly grounded Use a grounding wire to ground the CL6708MW by connecting one end of the wire to the grounding terminal and the other end of the wire to a suitable grounded object Mounting Kit Description Standard Long Rack Mount Kit This kit is the long railed version of your standard mounting kit that le...

Страница 23: ... choose to connect an external console to the CL6708MW connect the keyboard monitor and mouse to their respective ports in the External Console Section See Console Cable Installation page 15 Note 1 Connecting an external console is optional 2 The CL6708MW only supports USB keyboards and mice 3 For each of the computers you are installing use a KVM cable set listed in Cables page 4 to connect any a...

Страница 24: ...CL6708MW User Manual 14 Single Level Installation Diagram 3 4 2 1 ...

Страница 25: ...Chapter 2 Hardware Setup 15 Cabling Diagrams Console Cable Installation KVM Cable Installation DVI USB 2 USB KVM Cable Connection ...

Страница 26: ...t any available KVM Port on the first level switch to the Console port on the second level unit 3 Use custom DVI KVM cable sets described in the Cables section page 4 to connect any available KVM port on the either of the two switches to the keyboard video and mouse ports of the computers you are installing 4 Repeat the steps above to cascade additional switches to the installation 5 The Power On ...

Страница 27: ...Chapter 2 Hardware Setup 17 Two Level Installation Diagram CL6708MW CS1768 1 2 3 5 3 CONSOLE CONSOLE 5 ...

Страница 28: ...CL6708MW User Manual 18 This Page Intentionally Left Blank ...

Страница 29: ...d raise the cover Note As a safety precaution to keep the console from accidentally sliding out the console is locked into the In position Before you can pull the console module out you must release it by pushing the catches on the unit s front panel toward the center of the switch To slide the console module out do the following 1 Push the catches inward ...

Страница 30: ...odule all the way out until it automatically locks in place 3 Open the cover Closing the Console To slide the console module back in do the following 1 Close the cover 2 Push the module all the way in until it automatically locks in place ...

Страница 31: ... on the keyboard module as you work Wrong DO NOT lean your body weight on the keyboard module DO NOT place heavy objects on the keyboard module The maximum load bearing capacity of the keyboard module is 30kg Failure to heed the information below can result in damage to the keyboard module ...

Страница 32: ...s of any computers that have the Keyboard Power On function Otherwise the CL6708MW will still receive power from the computers 2 Unplug the CL6708MW from its power source 3 Wait 10 seconds then plug the CL6708MW back in 4 After the CL6708MW has started and ascertained its station ID power on the computers Note If you have shut down more than one station power up the highest station first and work ...

Страница 33: ...ght or Up When making an adjustment it increases the value When navigating through the menus this button moves you Left or Down When making an adjustment it decreases the value EXIT LIGHT When you have not entered the LCD OSD Menu function pressing this button performs an auto adjustment An auto adjustment automatically configures all the settings for the LCD panel to what the OSD considers their ...

Страница 34: ...g is visible on the display your LCD may have the wrong clock setting Adjust the clock setting to eliminate vertical banding H Position Positions the display area on the LCD panel horizontally moves the display area left or right V Position Positions the display area on the LCD panel vertically moves the display area up or down Color Temperature Adjusts the color quality of the display You can adj...

Страница 35: ...nually reconfigure the OSD to reflect the new port information See the F3 SET page 32 and F4 ADM page 34 functions for details Note If the computer s operating system does not support hot plugging this function may not work properly Port Selection The CL6708MW provides three port selection methods to access the computers on the installation Manual OSD on screen display and Hotkeys See Chapter 4 OS...

Страница 36: ...Operation page 41 A computer attached to the first unit has a two digit Port ID that corresponds to the KVM port number that it is connected to A computer attached to a cascaded unit has a four digit Port ID The first two digits represent the KVM port number on the first unit and the second two digits represent the KVM port number on the cascaded unit that the computer is connected to For example ...

Страница 37: ...u have administrator privileges with access to all administrator and user functions and can set up operations including password authorization as you like If the password function has been set you must provide an appropriate administrator user password in order to access the OSD OSD Hotkey You can display the OSD on the console monitor while also viewing the display of any port on the CL6708MW by ...

Страница 38: ...CL6708MW User Manual 28 Note Press once to invoke the feature press again to exit ...

Страница 39: ...port list is collapsed click on a switch number or move the highlight bar to it then press the right arrow key to expand the list Similarly to collapse a switch s port list click on the switch number or move the highlight bar to it then press the left arrow key to collapse the list OSD Main Screen Headings PN This column lists the port ID numbers for all the KVM ports on the installation The simpl...

Страница 40: ...hat can appear on the main screen the screen will scroll To activate a port double click it or move the highlight bar to it then press Enter After executing any action you automatically go back to the menu one level above OSD Functions OSD functions are used to configure and control the OSD For example you can rapidly switch to any port scan selected ports limit the list you wish to view designate...

Страница 41: ...ut making a choice press Esc F2 LIST This function lets you broaden or narrow the scope of which ports the OSD displays on the main screen The submenu choices and their meanings are given in the table below Move the highlight bar to the choice you want then press Enter An icon appears before the choice to indicate that it is the currently selected one Choice Meaning ALL Lists all of the ports on t...

Страница 42: ...l Lock combination PORT ID DISPLAY POSITION Allows each user to customize the position where the port ID appears on the screen The default is the upper left corner but users can choose to have it appear anywhere on the screen Use the mouse or the arrow keys plus Pg Up Pg Dn Home End and 5 on the numeric keypad with Num Lock off to position the port ID display then double click or press Enter to lo...

Страница 43: ...k view ports and are powered on The default is ALL Note The quick view choices only show up on the administrator s screen since only he has Quick View setting rights see SET QUICK VIEW PORTS page 36 for details SCREEN BLANKER If there is no input from the console for the amount of time set with this function the screen is blanked Key in a value from 1 30 minutes then press Enter The default settin...

Страница 44: ...ame and password appears Usernames and passwords can be from 1 to 16 characters long and can consist of any combination of letters and numbers A Z 0 9 and some additional keys space 3 For each individual key in the username and password confirm the password then press Enter 4 To modify or delete a previous username and or password use the backspace key to erase individual letters or numbers Press ...

Страница 45: ...a port name 1 Click the port or use the navigation keys to move the highlight bar to it then press Enter 2 Key in the new port name or modify delete the old one The maximum number of characters allowed for the port name is 12 Legal characters include All alpha characters A Z All numeric characters 0 9 and Space Case does not matter the OSD displays the port name in all capitals no matter how they ...

Страница 46: ... list select the port for which you wish to set the com puter s operating system 2 Set the operating system by pressing Spacebar to cycle through WIN MAC SUN or OTHER 3 Press Esc to exit The operating system you selected is assigned to the KVM port FIRMWARE UPGRADE In order to upgrade the CL6708MW firmware see page 53 you must first enable Firmware Upgrade mode with this setting When you bring up ...

Страница 47: ...at port a left right triangle symbol appears before its port ID display While skip mode is in effect the console will not function normally You must exit skip mode in order to regain control of the console To exit skip mode press Spacebar or Esc F6 BRC F6 is an administrator only function Clicking the F6 field or pressing F6 invokes Broadcast BRC mode When this function is in effect commands sent ...

Страница 48: ... Duration setting under the F3 SET function see page 32 When you want to stop at a particular location press the Spacebar to stop scanning If the scanning stops on an empty port or one where the computer is attached but is powered Off the monitor screen will be blank and the mouse and keyboard will have no effect After the Scan Duration time is up the scan function will move on to the next port As...

Страница 49: ...egain access to the OSD whereas with Esc all you have to do to reenter the OSD is tap the OSD hotkey Note 1 When you reenter the OSD after logging out the screen stays blank except for the OSD main screen You must input your username and password before you can continue 2 If you reenter the OSD after logging out and immediately use Esc to deactivate the OSD without having selected a port from the ...

Страница 50: ...CL6708MW User Manual 40 This Page Intentionally Left Blank ...

Страница 51: ...the Beeper Setting the Quick Hotkey Setting the OSD Hotkey Setting the Port Operating System Restoring the OSD Default Values Invoke Hotkey Mode All hotkey operations begin by invoking Hotkey mode There are two possible keystroke sequences used to invoke Hotkey mode though only one can be operational at any given time Note Make sure that the Hotkey Command Mode function is enabled and that you key...

Страница 52: ... The command line prompt is the word Hotkey in white text on a blue background and displays the subsequent hotkey information that you key in Ordinary keyboard and mouse functions are suspended only hotkey compliant keystrokes described in the sections that follow can be input Pressing Esc exits Hotkey mode Select the Active Port Each KVM port is assigned a port ID see Port ID Numbering page 26 Yo...

Страница 53: ...t as accessible under Scan Skip Mode so that their activity can be monitored automatically See SCAN SKIP MODE page 33 for more information Invoking Auto Scan To start Auto Scan key in the following Hotkey combination 1 Invoke hotkey mode with the Num Lock or Ctrl F12 combination 2 Press A After you press A then Enter you automatically exit hotkey mode and enter Auto Scan mode While you are in Auto...

Страница 54: ... Auto Scan mode is in effect ordinary keyboard and mouse functions are suspended only Auto Scan mode compliant keystrokes and mouse clicks can be input You must exit Auto Scan mode in order to regain normal control of the console 3 To exit Auto Scan mode press Esc or Spacebar Auto scanning stops when you exit Auto Scan mode ...

Страница 55: ... arrow keys After you press an arrow you automatically exit hotkey mode and enter Skip mode where you can switch ports as follows Once you are in Skip mode you can keep on skipping by pressing the arrow keys You don t have to use the Num Lock combination again While Skip mode is in effect ordinary keyboard and mouse functions are suspended only Skip mode compliant keystrokes can be input You must ...

Страница 56: ...Press F5 After you press F5 you automatically exit Hotkey mode and regain keyboard and mouse control on the computer connected to the KVM port If you fail to regain keyboard mouse control on the computer after pressing F5 perform a console keyboard and mouse reset Hotkey Beeper Control The beeper see ACTIVATE BEEPER page 35 can be hotkey toggled on and off To toggle the beeper key in the following...

Страница 57: ...EN CHANGED for one second then the message disappears and you automatically exit Hotkey mode OSD Hotkey Control The OSD Hotkey see OSD HOTKEY page 32 can be toggled between Scroll Lock Scroll Lock and Ctrl Ctrl To toggle the OSD Hotkey key in the following hotkey combination 1 Invoke hotkey mode with the Num Lock or Ctrl F12 combination 2 Press T After you press T the command line displays HOTKEY ...

Страница 58: ...omatically exit Hotkey mode Set USB Speed Users could use the hotkey to set USB speed of the selected KVM port as low full speed to compliant with the connected computers 1 Invoke hotkey mode with the Num Lock or Ctrl F12 combination 2 Press F11 L F11 F 3 Press Enter L Indicates the selected KVM port set as USB low speed R Indicates the selected KVM port set as USB full speed If users need to set ...

Страница 59: ...E DEFAULT VALUES page 35 To restore the default values key in the following hotkey combination 1 Invoke hotkey mode with the Num Lock or Ctrl F12 combination 2 Press R 3 Press Enter After you press Enter the command line displays RESET TO DEFAULT SETTING for three seconds then the message disappears and you automatically exit Hotkey mode ...

Страница 60: ...eyboard mouse reset on the target computer B Enables Disables the buzzer R Enter Resets hotkey settings to their default values See RESTORE DEFAULT VALUES page 35 D Invokes Video DynaSync ATEN s exclusive technology that eliminates boot up display problems and optimizes resolution when switching between ports M Enables Disables mouse emulation Skips to the previous computer on the list in Skip Mod...

Страница 61: ...The emulation mappings are listed in the table below Note When using key combinations press and release the first key Ctrl then press and release the activation key PC Keyboard Mac Keyboard Shift Shift Ctrl Ctrl Ctrl 1 Ctrl 2 Ctrl 3 Ctrl 4 Alt Alt Print Screen F13 Scroll Lock F14 Enter Return Backspace Delete Insert Help Ctrl F15 ...

Страница 62: ...r keys The corresponding functions are shown in the table below Note When using key combinations press and release the first key Ctrl then press and release the activation key PC Keyboard Sun Keyboard Ctrl T Stop Ctrl F2 Again Ctrl F3 Props Ctrl F4 Undo Ctrl F5 Front Ctrl F6 Copy Ctrl F7 Open Ctrl F8 Paste Ctrl F9 Find Ctrl F10 Cut Ctrl 1 Ctrl 2 Ctrl 3 Ctrl 4 Ctrl H Help Compose ...

Страница 63: ...available new firmware upgrade packages are posted on our website Check the website regularly to find the latest information and packages Downloading the Firmware Upgrade Package To download the firmware upgrade package 1 From a computer that is not part of your KVM installation go to our website and choose the model name that relates to your device A list of available firmware upgrade packages ap...

Страница 64: ... connect a COM port on your computer to the Firmware Upgrade Port of your switch 2 Shut down all the computers on the KVM installation 3 From your KVM switch console log into the OSD as the administrator see page 27 and select the F4 ADM function 4 Scroll down to FIRMWARE UPGRADE Press Enter then press Y to invoke Firmware Upgrade mode see page 36 ...

Страница 65: ...ware Upgrade Utility welcome screen appears Note The screens shown in this section are for reference only The wording and layout of the actual screens put up by the Firmware Upgrade Utility may vary slightly from these examples 2 Read and Agree to the License Agreement enable the I Agree radio button 3 Click Next to continue The Firmware Upgrade Utility main screen appears The devices capable of b...

Страница 66: ...is higher than the upgrade version it brings up a dialog box informing you of the situation and gives you the option to continue or cancel If you did not enable Check Firmware Version the Utility installs the upgrade files without checking whether they are a higher level or not As the upgrade proceeds status messages appear in the Status Messages panel and the progress toward completion is shown o...

Страница 67: ...pter 7 The Firmware Upgrade Utility 57 Upgrade Succeeded After the upgrade has completed a screen appears to inform you that the procedure was successful Click Finish to close the Firmware Upgrade Utility ...

Страница 68: ... is interrupted When a firmware upgrade procedure fails To recover a failed firmware upgrade do the following 1 Click Cancel to close the Firmware Upgrade Utility 2 Power off the unit 3 Connect the Firmware Upgrade Cable to its Firmware Upgrade Port 4 Slide the Firmware Upgrade Switch to the Recover position 5 Power the unit back on and repeat the upgrade procedure see Starting the Upgrade on page...

Страница 69: ...entilation has been provided Never spill liquid of any kind on the device Unplug the device from the wall outlet before cleaning Do not use liquid or aerosol cleaners Use a damp cloth for cleaning The device should be operated from the type of power source indicated on the marking label If you are not sure of the type of power available consult your dealer or local power company The device is desi...

Страница 70: ... fire or electrical shock Do not attempt to service the device yourself Refer all servicing to qualified service personnel If the following conditions occur unplug the device from the wall outlet and bring it to qualified service personnel for repair The power cord or plug has become damaged or frayed Liquid has been spilled into the device The device has been exposed to rain or water The device h...

Страница 71: ...and stable before extending a device from the rack Do not overload the AC supply branch circuit that provides power to the rack The total rack load should not exceed 80 percent of the branch circuit rating Make sure that all equipment used on the rack including power strips and other electrical connectors is properly grounded Ensure that proper airflow is provided to devices in the rack Ensure tha...

Страница 72: ... de ventilation se trouveraient bloquées De même l unité ne doit pas être placée dans un meuble fermé à moins qu une ventilation adaptée ne soit assurée Ne renversez jamais de liquides de quelque sorte que ce soit sur l unité Débranchez l unité de la prise murale avant de la nettoyer N utilisez pas de produits de nettoyage liquide ou sous forme d aérosol Utilisez un chiffon humide pour le nettoyag...

Страница 73: ...stème et les câbles d alimentation avec précaution veillez à ce que rien ne repose sur aucun des câbles Lors du branchement ou du débranchement à des blocs d alimentation permettant la connexion à chaud veuillez respecter les lignes directrices suivantes Installez le bloc d alimentation avant de brancher le câble d alimentation à celui ci Débranchez le câble d alimentation avant de retirer le bloc...

Страница 74: ...urs avant et latéraux sur un même bâti ou bien les stabilisateurs avant si plusieurs bâtis sont réunis avant de travailler sur le bâti Chargez toujours le bâti de bas en haut et chargez l élément le plus lourd en premier Assurez vous que le bâti est à niveau et qu il est stable avant de sortir une unité du bâti Agissez avec précaution lorsque vous appuyez sur les loquets de libération du rail d un...

Страница 75: ...pérature ambiante de fonctionnement de l environnement du bâti ne dépasse pas la température ambiante maximale spécifiée pour l équipement par le fabricant Ne marchez sur aucun appareil lors de la maintenance d autres appareils d un bâti ...

Страница 76: ...e of operations that led up to the error Any other information you feel may be of help Manufacturing Number The MFG Number Manufacturing Number is an internal serial number used by ATEN s factory and technical support staff to identify products This number does not affect products warranty If your product requires after sales services you may provide the MFG Number to ATEN s sales or technical sup...

Страница 77: ...EC 60320 C14 LEDs Online 8 Orange Selected 8 Green Power 1 x KVM Power Dark Green 1 x LCD Power Orange Lock 1 x Num Lock Green 1 x Caps Lock Green 1 x Scroll Lock Green Switches KVM Reset 1 x Semi recessed Pushbutton Firmware Upgrade 1 x Slide Switch Power 1 x Rocker Switch LCD Control 4 x Pushbutton LCD Power 1 x LED Pushbutton Port Selection 8 x Pushbutton Emulation Keyboard Mouse USB Video up t...

Страница 78: ...CL6708MW User Manual 68 Physical Properties Housing Metal Plastic Weight 12 70 kg 27 97 lb Dimensions L x W x H 48 00 x 68 92 x 4 40 cm 18 9 x 27 13 x 1 73 in Function CL6708MW ...

Страница 79: ...ble 8 Port Switches Supported KVM Switches The table below lists the KVM switch that is compatible with the CL6708MW and the type of expansion that it uses The switch listed below is sold separately Contact your dealer for details Number of Switches Computers 1 1 8 2 9 16 3 17 24 4 25 32 5 33 40 6 41 48 7 49 56 8 57 64 Expansion Type Brand Model Name Cascade ATEN CS1768 8 Port USB DVI KVM Switch ...

Страница 80: ...rom the unit chassis 2 Short the jumper labeled Default Password on the unit s main board using a jumper cap 3 Power on the unit and the following message will appear USERNAME AND PASSWORD INFORMATION AND PORT USER INFORMATION HAS BEEN CLEARED PLEASE POWER OFF THE SWITCH REMOVE THE JUMPER CLOSE THE CASE THEN RESTART 4 Power off the unit again and remove the jumper cap 5 Replace the unit s top cove...

Страница 81: ...Scroll Lock Scroll Lock Port ID Display Position Upper Left Corner Port ID Display Duration 3 Seconds Port ID Display Mode Port Number plus Port Name Scan Duration 5 Seconds Scan Skip Mode All Screen Blanker 0 Disabled Logout Timeout 0 Disabled Beeper Y Activated Accessible Ports F Full For all Users on all Ports ...

Страница 82: ... adapter that was supplied with the unit is plugged in and functioning properly There are ghost images on the external monitor The distance between the external console and the CL6700MW is too great The maximum DVI cable distance should not exceed 20m and in some cases may need to be shorter Replace the DVI cable with one of an appropriately short length Some characters I enter from the keyboard d...

Страница 83: ...ide a repair service without charge during the Warranty Period If a product is detective ATEN will at its discretion have the option to 1 repair said product with new or repaired components or 2 replace the entire product with an identical product or with a similar product which fulfills the same function as the defective product Replaced products assume the warranty of the original product for th...

Отзывы: