ATEN CE800b Скачать руководство пользователя страница 26

CE800

B

 User Manual

18

Likewise, if the system is in Remote Mode, the Local unit’s selection switch is 
inactive – the Local operator cannot take over control. The Local selection 
switch only becomes active after the Remote selection switch is pressed to put 
the system back into Auto Mode.

Picture Compensation

The quality of the video display can deteriorate with distance. The Picture 
Compensation switches adjust the picture quality of the remote console.

Depending on the distance from the console, if it becomes necessary to adjust 
the video signal, press the plus button (+) to increase the video signal gain; 
press the minus button (-) to decrease the video signal gain.

LED Display

The CE800

B

 Local and Remote Units have front panel LEDs to indicate their 

operating status, as shown in the following tables:
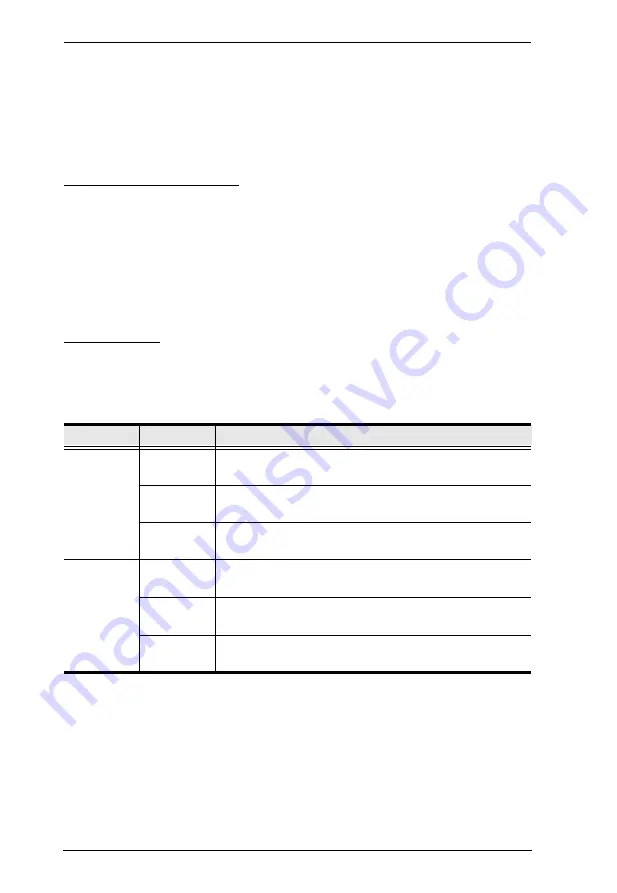
CE800

BL

 (Local Unit)

LED

Status

Indication

Local

On

Local Mode is in effect. The Local console has keyboard 
and mouse input control.

Off

Remote Mode is in effect. The Remote console has 
keyboard and mouse input control.

Flashing

Auto Mode is in effect. The first console to establish 
keyboard or mouse input takes control.

Remote

On

Remote Mode is in effect. The Remote console has 
keyboard and mouse input control.

Off

Local Mode is in effect. The Local console has keyboard 
and mouse input control.

Flashing

Auto Mode is in effect. The first console to establish 
keyboard or mouse input takes control.

Содержание CE800b

Страница 1: ...USB KVM Extender CE800B User Manual www aten com...

Страница 2: ...protection against harmful interference when the equipment is operated in a commercial environment This equipment generates uses and can radiate radio frequency energy and if not installed and used i...

Страница 3: ...his system is not responsible for any radio and or TV interference caused by unauthorized modifications to this device It is the responsibility of the user to correct such interference The manufacture...

Страница 4: ...em contact your dealer Read this manual thoroughly and follow the installation and operation procedures carefully to prevent any damage to the unit and or any of the devices connected to it Features m...

Страница 5: ...m Requirements 3 Consoles 3 Computers 3 Cables 3 Operating Systems 4 CE800BL Local Unit Front View 5 CE800BR Remote Unit Front View 6 CE800BL CE800BR Rear View 7 Side View 7 2 Hardware Setup Before Yo...

Страница 6: ...g Platform 27 USB Reset 28 Hotkey Summary Table 28 4 Keyboard Emulation Mac Keyboard 29 Sun Keyboard 30 5 The Firmware Upgrade Utility Before You Begin 31 Starting the Upgrade 33 Upgrade Succeeded 35...

Страница 7: ...es how to set up your installation Chapter 3 Operation explains the fundamental concepts involved in operating the CE800B provides a complete description of the CE800B s OSD On Screen Display and how...

Страница 8: ...ndicates keys you should press For example Enter means to press the Enter key If keys need to be chorded they appear together in the same bracket with a plus sign between them Ctrl Alt 1 Numbered list...

Страница 9: ...e KVM data The CE800B USB KVM Extender further improves on previous designs by using compact Cat 5e cable the kind commonly used in Ethernet networks instead of bulkier more expensive standard cables...

Страница 10: ...in when connecting an external USB flash drive on the remote unit Supports VGA SVGA and multisync monitors local monitor supports DDC DDC2 DDC2B High Resolution Video up to 1920 x 1200 60Hz 30 m 1600...

Страница 11: ...resolution that the DDC monitor can provide Computers The following equipment must be installed on each computer that is to be connected to the system A VGA SVGA or multisync card USB Host Controller...

Страница 12: ...rating systems are shown in the table below OS Version Windows 2000 and higher Linux RedHat 7 1 and higher Mandrake 9 0 and higher SUSE 10 and higher UNIX FreeBSD 4 2 and higher IBM AIX 4 3 and higher...

Страница 13: ...E800B package to this port and the other end to a USB Type A port on the local computer If you are using a KVM switch in your CE800B installation connect the other end of the cable to a USB Type A por...

Страница 14: ...s 3 Picture Compensation LED Flashes to indicate that picture quality has been adjusted See Picture Compensation page 18 for details 4 Operating Mode Selection Pushbutton Pressing this pushbutton togg...

Страница 15: ...nects the Remote and Local units plugs into this connector 4 Firmware Upgrade Port Local Unit only The Firmware Upgrade Cable that transfers the firmware upgrade data from the administrator s computer...

Страница 16: ...CE800B User Manual 8 This Page Intentionally Left Blank...

Страница 17: ...Kit screw the mounting bracket into the bottom of the unit as shown in the diagram below 1 Important safety information regarding the placement of this device is provided on page 37 Please review it b...

Страница 18: ...CE800B User Manual 10 2 Screw the bracket into any convenient location on the rack Note The rack screws are not provided We recommend that you use M5 x 12 Phillips Type I cross recessed type screws...

Страница 19: ...connecting one end of the wire to the grounding terminal and the other end of the wire to a suitable grounded object 2 Make sure that the computer that the CE800BL connects to and the monitor that th...

Страница 20: ...wire Solder this wire to the RJ 45 connector as shown in the diagram below b The second method is to use the STP cable shielding for grounding In this case make sure that the shielding makes tight con...

Страница 21: ...standard CE800B to PC installation a Plug the connectors on the other end of the KVM cable into the appropriate ports on the computer system The connectors are color coded and marked with an icon to...

Страница 22: ...es mouse keyboard monitor microphone and speakers into their ports on the rear panel of the Remote Unit CE800BR 7 Connect one of the power adapters provided with this package into an AC source connect...

Страница 23: ...2 Hardware Setup 15 Standard Installation CE800B to PC 4 1 CE800BL rear 3a 5 CE800BR rear 6 7 Cat 5e Cable up to 250 m 2 CE800BL front Custom KVM cable USB Cable 3b 9 CE800BR front 9...

Страница 24: ...CE800B User Manual 16 Advanced Installation CE800B to KVM Switch CE800BL front Custom KVM cable USB Cable USB KVM Switch rear 4b 4a...

Страница 25: ...Although operators at both consoles can see the display only the local console operator has keyboard and mouse access and control Remote Only the remote console has complete access Although operators...

Страница 26: ...nal gain press the minus button to decrease the video signal gain LED Display The CE800B Local and Remote Units have front panel LEDs to indicate their operating status as shown in the following table...

Страница 27: ...tor must log in with a valid username and password before being able to continue LED Status Indication Remote On Remote Mode is in effect The Remote console has keyboard and mouse input control Off Lo...

Страница 28: ...e the hotkey to the Ctrl key see OSD HOTKEY page 22 and see Alternate OSD Activation Keys page 26 The login dialog box appears 2 Key in a valid username and password then press Enter Note If this is t...

Страница 29: ...or down through the list one line at a time Click the Up and Down Triangle symbols or use the Up and Down Arrow Keys To select a menu item click it or move the highlight bar to it with the arrow keys...

Страница 30: ...or Password use the backspace key to erase individual letters or numbers OSD HOTKEY Selects which Hotkey activates the OSD function Scroll Lock Scroll Lock or Ctrl Ctrl Since the Ctrl key combination...

Страница 31: ...s and returns the CE800B s setup to the original factory default settings SET OPERATING SYSTEM This function specifies the operating platform of the computer attached to the CE800BL Choices are Win Ma...

Страница 32: ...looks similar to the one below The configuration settings that users are allowed to make are explained in the table below Setting Function CHANGE PASSWORD Users can use this function to change the pas...

Страница 33: ...Hotkey Mode is active The Caps Lock and Scroll Lock LEDs flash in succession to indicate that HSM is in effect They stop flashing and revert to normal status when you exit HSM A Command Line appears...

Страница 34: ...Num Lock Minus method invoke HSM then press and release the H key again Alternate OSD Activation Keys The OSD activation method can be changed from tapping the Scroll Lock key twice to tapping the Ct...

Страница 35: ...for a PC Compatible keyboard operating platform If you have a Mac or a Sun on your installation you can change the keyboard operating platform as follows 3 Invoke HSM see page 25 4 Press and release t...

Страница 36: ...press the indicated keys do not type the brackets Key Function H Toggles between the default Num Lock and alternate Ctrl F12 Hotkey invocation keys T Toggles between the default Scroll Lock Scroll Lo...

Страница 37: ...he emulation mappings are listed in the table below Note When using key combinations press and release the first key Ctrl then press and release the activation key PC Keyboard Mac Keyboard Shift Shift...

Страница 38: ...keys The corresponding functions are shown in the table below Note When using key combinations press and release the first key Ctrl then press and release the activation key PC Keyboard Sun Keyboard C...

Страница 39: ...nformation relating to them http www aten com Before You Begin To prepare for the firmware upgrade do the following 1 Unplug the power adapters from both units and disconnect the KVM cable to the loca...

Страница 40: ...in the Local unit s power adapter 7 Wait until both green front panel LEDs on the Local unit are flashing on and off then release the Selection button 8 Make sure the orange LED on the front panel of...

Страница 41: ...g a command line and entering the full path to it The Firmware Upgrade Utility Welcome screen appears Note The screens shown in this section are for reference only The wording and layout of the actual...

Страница 42: ...the upgrade If you enabled Check Firmware Version the Utility compares the device s firmware level with that of the upgrade files If it finds that the device s version is higher than the upgrade vers...

Страница 43: ...he Firmware Upgrade Utility After successfully upgrading the firmware the switches automatically exit Firmware Upgrade Mode Please power the unit off and on after you have exited Firmware Upgrade Mode...

Страница 44: ...CE800B User Manual 36 This Page Intentionally Left Blank...

Страница 45: ...placed in a built in enclosure unless adequate ventilation has been provided Never spill liquid of any kind on the device Unplug the device from the wall outlet before cleaning Do not use liquid or a...

Страница 46: ...isk of fire or electrical shock Do not attempt to service the device yourself Refer all servicing to qualified service personnel If the following conditions occur unplug the device from the wall outle...

Страница 47: ...el and stable before extending a device from the rack Use caution when pressing the device rail release latches and sliding a device into or out of a rack the slide rails can pinch your fingers After...

Страница 48: ...orehand Product model number serial number and date of purchase Your computer configuration including operating system revision level expansion cards and software Any error messages displayed at the t...

Страница 49: ...eo Jack Green N A Microphone 1 x Mini Stereo Jack Pink N A F W Upgrade 1 x 4 conductor 3 5 mm jack N A Power 1 x DC Jack Black Unit to Unit Link 1 x RJ 45 Pushbuttons Operating Mode Selection 1 x Push...

Страница 50: ...Diagram TP Pin Assignments Problem Action No video Make sure that all cables are securely plugged into their ports Poor video quality The video quality can be improved by reducing the refresh rate Tou...

Страница 51: ...following procedure 1 Power off the CE800B and remove its housing 2 Short the jumper labeled J7 3 Power on the switch The on screen display will show a message informing you that the password informa...

Страница 52: ...SPECIAL INCIDENTAL OR CONSEQUENTIAL DAMAGES RESULTING FROM THE USE OF THE PRODUCT DISK OR ITS DOCUMENTATION The direct vendor makes no warranty or representation expressed implied or statutory with r...

Страница 53: ...25 Hotkeys Enable Disable 27 I Installation Grounding 11 K Keyboard Emulation Mac 29 Sun 30 Keyboard Language 23 Keyboard Operating Platform 27 M Mode Selection 17 O Online Registration iii Operating...

Страница 54: ...anual 2 Rack mounting 39 SET Password 22 SJ T 11364 2006 ii T Technical Support 40 Telephone support iii U USB Reset 28 USB Mass Storage 19 User Authentication 22 User Configuration 24 User Notice iii...

Отзывы: