


Now,
you
can
enter
an
IP
address
for
this
unit,
and
also
a
friendly
device
name.
Some
rules
‐
of
‐
thumb:
Because
the
DT11
/
DT70
units
will
not
be
interacting
with
any
other
devices
on
your
network,
the
IP
address
should
be
on
a
subnet
which
is
currently
not
used
by
any
device
on
your
network.
For
example,
if
your
router
and
DHCP
server
use
the
192.168.1.x
subnet,
you
set
all
your
DT11
/
DT70
devices
to
another
subnet,
such
as
its
current
factory
subnet
192.168.168.x.
However,
be
sure
that
every
DT11
/
DT70
unit
has
a
unique
address.
For
the
Device
Name,
use
a
descriptive
name
which
can
easily
be
identified
by
the
user.
See
example
below.
When
done,
click
on
SAVE,
then
EXIT.
The
unit
will
restart.
1.7.
Disconnect
the
Ethernet
cable
from
your
computer
and
the
unit.
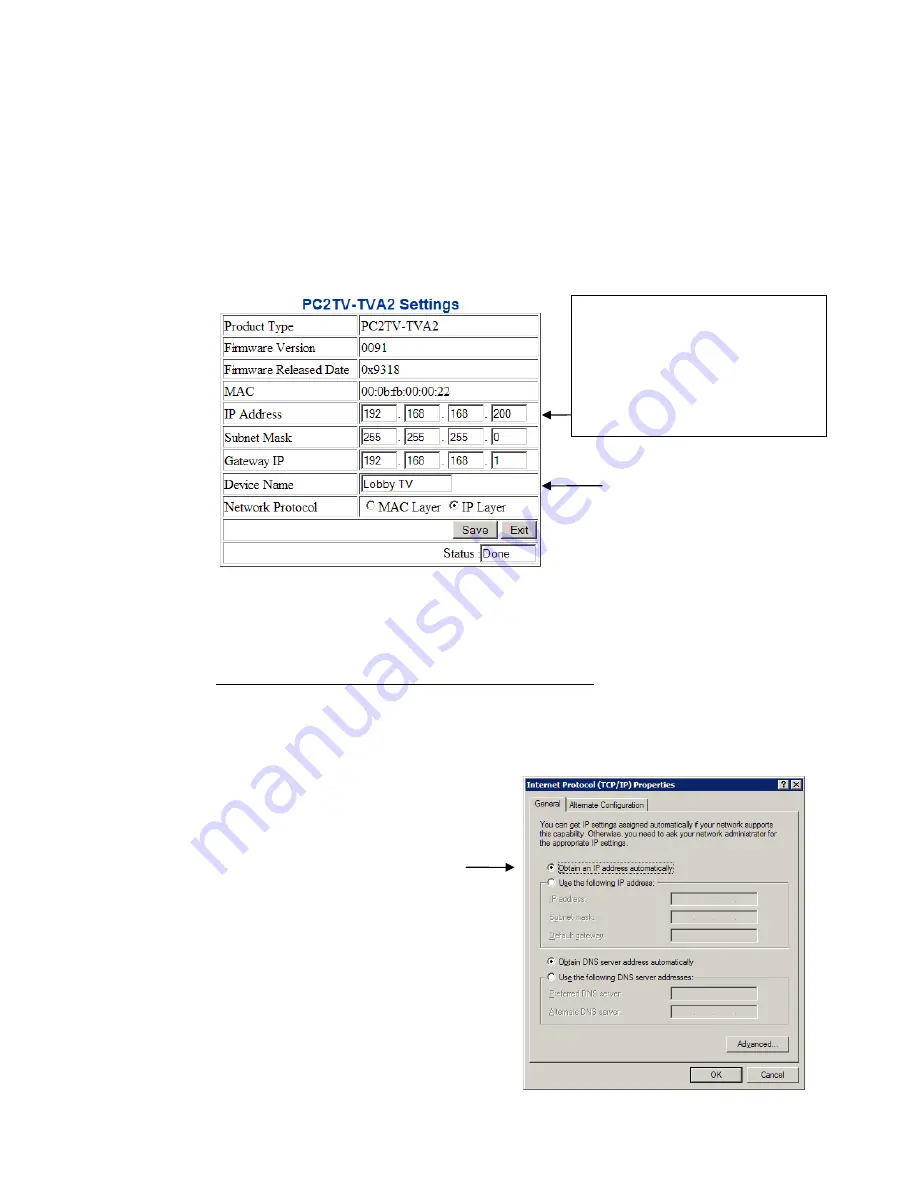
The
DT11
/
DT70
unit
is
now
configured
with
the
IP
address
192.168.168.200,
and
Device
Name
“Lobby
TV”.
1.8.
Repeat
steps
1.2
to
1.7
for
all
DT11
/
DT70
units
in
your
setup,
making
sure
each
unit
has
a
different
IP
address,
but
MUST
HAVE
the
same
first
three
octets
(ie.
192.168.168.x)
.
Here
is
an
example:
Unit
Type
Device
Name
IP
Address
DT11
‐
RX
Lobby
TV
192.168.168.200
DT11
‐
RX
Upstairs
TV
192.168.168.201
DT11
‐
TX
DVD
‐
Player
‐
1
192.168.168.202
DT11
‐
TX
DVR
192.168.168.203
1.9.
Go
back
to
the
TCP/IP
properties
window
as
shown
in
step
1.1.1
above,
and
change
it
back
to
“Obtain
an
IP
address
automatically”.
Click
OK,
then
OK,
then
CLOSE.
Permitted
IP
Address
Ranges:
192.168.0.0
to
192.168.254.254
172.16.0.0
to
172.31.254.254
10.0.0.0
to
10.254.254.254


